
by Patti Vanderbloemen
Recently, Carol did an awesome post on recycling some of her silver scrap into silver sheet (that post is right here). I think it is an awesome idea...it is on my very long list of things to do! I always save my silver scraps...they are thrown directly into this empty cool whip container on my bench.
Recently, Carol did an awesome post on recycling some of her silver scrap into silver sheet (that post is right here). I think it is an awesome idea...it is on my very long list of things to do! I always save my silver scraps...they are thrown directly into this empty cool whip container on my bench.

That container weighs 2 1/2 pounds (yup - POUNDS)!!! I knew it was accumulating - it has been quite a while since I turned in my scrap for credit at Rio Grande. However, I reuse a lot of the bits and pieces in that bowl. A tiny textured piece of sheet can become a bead cap, or even just a tiny accent on a back plate. The wire scraps are balled up in the flame for additional textural accents on pendants, rings, etc. You get the drift. With sterling silver so cheap right now - I am still going to wait before turning it in to get the most bang for my buck . The price of silver has only smidged (I know - not a real word...yet) upwards lately, so I will wait until it soars (or I use up all my scrap).
I have made a few charms from the scraps - melt down a few small pieces of wire/sheet into a ball, flatten it, stamp on a design, and solder on one-half of a jump ring for a bail.

But today, I thought I would show you how I make teeny weeny post earrings with some of that scrap. Some of us - including me - have double, triple, etc. pierced ears, and tiny posts look great whether worn alone or in that second hole in one's ear.
I tried to take good step-by-step pictures - I wish I had a third hand (on my body...not my bench). Anyway, take two pieces of equal amounts of silver. I very roughly wind my silver into a coil - for no particular reason except in melts into a ball quicker than if left straight.

I always use my charcoal block to melt any metal - it retains the heat better than a firebrick. That's my firebrick on its side - making it just a tad hotter in that area of my soldering station. An oven effect, if you will.

Just roll your flame around the silver until it balls up. Let it cool from red hot to gray before you move it off the block with your tweezers for quenching - otherwise, you run the risk of re-shaping that perfect little malleable mound of silver with your tweezers.

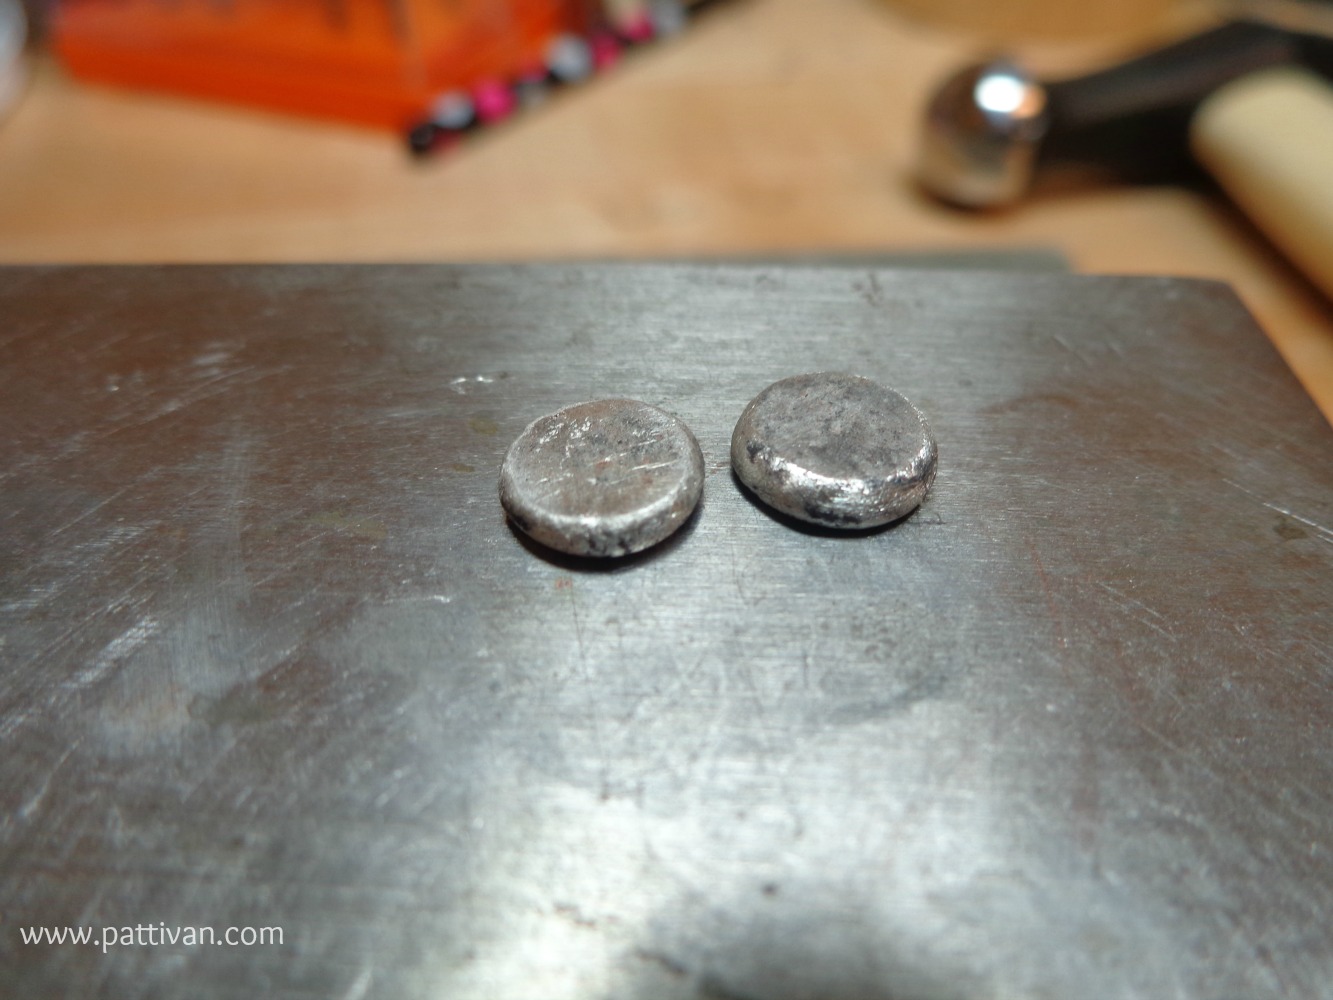
Quench and pickle. Now is a good time to make sure the balls are the same size - they should be if you used the same amount of silver to melt in the beginning (I say SHOULD here, because my eyes are not perfect and I don't always pay attention to my measurements when prepping silver for melting!) If not the same size - just remelt that ball and add a little bit more silver scrap.

I like to use my Peddinghaus hammer (link here) for flattening the balls into discs. It is just a bit heavier than my Goldsmith hammers - though any hammer works here.

Then - stamp the little discs to your heart's delight. My example below features a tiny little horse head stamp. Now, before you solder on the earring post to the back of the earring, take your center punch and hit it once in the back of the earring where you will add the post. This extra step provides two benefits. 1) It is so much easier lining up the earring post in my third hand when soldering - it sits right in that little divot. 2) It creates more metal-to-metal contact with the post to the earrings. The solder flows all the way around - into the divot - providing a very strong, secure join.

This is how I store my solder. Each tin holds 3" - 4" pieces of solder wire. Each tin is labeled "hard", "medium", etc. I cannot remember where I first saw this tip, but I have been storing it in this fashion for years.

Inside each tin, I store a pro polishing pad (link here)- I swipe the solder wire to clean it completely, before I cut off the required pallions. Both your metal and your solder needs to be clean before you hit it with the flame.

And, for the past year or so, I keep a very small amount of flux in a resealable plastic jar at my soldering station - this happens to be a seed bead storage container. Flux dries out so quickly - it is a pain to keep opening and closing the large jar during a project (not to mention the number of times I have completely forgotten to put the cap on the jar at the end of the day, only to come back 10 hours later to flux that is hard as a rock). This way, the large jar keeps the flux in the right consistency, and if the small jar dries out - I add a touch of water to reconstitute the flux, or rinse it out and start with fresh flux.

Flux the earring, place the post in the divot created with the hole punch, and line up the third hand to hold the post in place. This can be a fiddly process - I always seem to be holding my breath at this point, so as to not disturb the post! :)

I tend to pic solder - it is simply easier for me. Just ball up a pallion of solder, it will attach to your warm solder pick like a magnet - and then place the ball of solder right next to the post. You could just place a pallion of solder in this position as well - but I am creature of habit. That tiny little red circle in the picture below (click the picture to zoom) is where I place the solder.

Now, the thickness of the earring, in my example, is much greater than the thickness of that ear wire. So, I start by heating the charcoal area around the earring, thus, heating up the metal. I used Medium solder, so it's melting point is lower than the melting point of the sterling silver (Easy solder could also be used - I just happened to grab Medium).
This part goes VERY QUICKLY. After the solder has melted, I wait a few moments before even trying to remove the earring from the charcoal block. Then, quench and pickle.

The soldering action will anneal that post. To harden the post, I line it up in my flat nose pliers, hold on to the earring, and VERY GENTLY twist - not even a quarter turn of the pliers- to the right. You can actually feel that earring post instantly harden.

Then, oxidize (or not), throw them in the tumbler for half an hour, and done!

Little bitty earrings!

Yet another design that is hard to photograph...

Are these too small for you? Solder on half a jump ring to one end (I do this BEFORE I solder on the earring post), and wire wrap some beads into the loop.


I know that not everyone likes post earrings. Personally, I have very long hair and I love wearing posts as my hair tends to get caught in the french ear wire - style. It's nice to have options!
***********************
A final note on earrings posts. Yes - you could use 20 gauge sterling wire, cut the post to length, make sure it is 100% absolutely flush before soldering, round the ends, and- using your flush cutters - carve a tiny groove in the end to create a "stop" for the ear nut. I have tried this method and it is too frustrating to get everything perfect. So, I buy the ear posts already made - a pack of 20 - enough for 10 pairs of post earrings - for under $5 at Rio. Here is a link to the posts that I use (click here). They come in different lengths. I tend to use the 1/2" length, as I can get a better grip on the earring when attaching the ear nut - it's a personal preference.
 |
| Photo credit: www.riogrande.com |
And these ear nuts/clutches fit perfectly on those posts (link here).
 |
| Photo Credit: www.riogrande.com |
Anybody want to share their ideas for reusing their silver scraps?? I do have a few scraps left! LOL! Would love for you to share your ideas, too!
Thanks for dropping by today - now go make something wonderful!!
Patti
5 comments:
I do hope you are not wishing too hard for the price of silver to go up! ;)
Good tips re. the backing wires--buying and twisting to harden.
I like the teeny weeny post earrings!
If they are long and hanging, I'm afraid they'll get stuck in my hair or my clothes. The teeny weeny earrings you have made with a sun, they are beautiful, and also the one with the horse, so very nice, I like them a lot! More of that,:) and so good to take advantage of what is left over in your earlier work ...
Great post Patti! I love your little post earring charms, especially those cute little horse heads. All great tips too! Making post earrings is a difficult task to master, I've melted quite a few posts myself. Love the tip about the using the punch to center the hole and make a divot:) Thanks Patti!
Awesome post! So helpful and clearly explained. Can't wait to read Carol's post!
Patti, you are becoming quite the metalsmith! It is so fun to see how you have progressed!
Post a Comment