Showing posts with label Handcrafted Jewelry. Show all posts

Monday, April 4, 2016

Pattern Wire....continued


My post two weeks ago touched on a new-to-me technique using sterling silver pattern wire - a great way to add dimension and texture to projects. Just as I was starting my journey back to a healthy recovery, I was knocked down with an awful cold and eye infection that left my right eye swollen shut for 4 solid days. BUT...I am 99.9999% better now! Before my cold struck, I ordered just a bit more (understatement!) pattern wire..again, from Rio Grande.


So far, I have only managed to make two new pieces with this wire. For the first project, I chose to use the square pattern wire. I had only used 18 gauge square wire in the past and was fearful of the wire twisting on me when forming. But, this wire has much more heft, and the actual challenge was having an absolutely flush solder join for this bangle ... any sanding of excess solder and there goes that lovely pattern!


I added a little mixed metal charm, but the bangle alone would have been fine, I think.  


I apologize for the blurry photo below, but I wanted you all to see the nice thickness to this wire.


The last piece I made was that ring that I originally purchased the wire for in the first place. I FINALLY got my hands on a Labradorite cabochon that actually had the flash that I thought was out of reach for me -- every Labradorite I have purchased in the past lacked all flash.


Yes - that pattern wire was meant to be a ring shank! 


That's only a 10mm cabochon...but I happen to have the world's shortest fingers and rings always look so huge on my hands....sigh.


I hope to get to work on using more of this wire as the very next set of projects!

Thanks for stopping by today!!

Monday, March 21, 2016

Patterned Wire

by Patti Vanderbloemen

I've been under the weather on and off lately and have not spent much time in my studio...and I miss it so! I apologize for my absence! But, on those days where I can drag myself out of bed, it was directly to the coffee pot...and then my studio.

Recently, I had an email link (from one of the many vendors that send me links) with a quick tutorial for using patterned sterling silver wire. I can no longer find the link (It was Terri McCarthy on a Cool Tools -video but a search on their site as well as You-Tube proved futile).  Sigh. Anyway, Terri soldered a strip of patterned sterling wire to a piece of sterling sheet, soldered on an ear wire and...boom...instant textured earrings! I was inspired!

The first item I made was similar - but I cut my sterling sheet larger, and soldered my pattern wire down the center.  I then added some hand stamping to the sides of the sheet.


A technique I loved from the artist's video was using tiny sterling silver tubing to "hold" the ear wire.


It was tricky to solder the ear wire and the tubing at the same time - that sucker just wanted to move, no matter how well anchored it was on my soldering block! Although easier said then done, I added more solder to the tubing after my first soldering operation  - just to ensure it was secure.

I originally had ring shanks in mind for this patterned wire, but, it is a substantial weight, so I made a bangle.


I added two faceted bangles to the set - looks so good on the wrist when worn together.


Earrings again - this time post-style.


I just could not stop, so I also made a matching pendant.


It's not that large, so it's comfortable to wear all day long.


I have had this patterned wire in my stash for a long time, and was happy to put it to good use, although I still need to make a ring!

Patterned wire comes in all shapes, sizes, and textures (mine came from Rio Grande) - I love the versatility of this metal!

Thanks for stopping by today!

Monday, February 1, 2016

Hoarding


I am a hoarder...a tool hoarder. There ... I said it...and I feel so much better!

I find it comical that the definition I found of HOARD references silver....

The problem with collecting all of these goodies is finding a place to store them. January always seems to be the time I get stoked into organizing..and reorganizing. Now, I am blessed that I have an entire room in my basement dedicated to my passion. What I was lacking was storage space. Last year, I opened up this "temporary" 8 foot folding table that I used to use when I worked at craft shows. There is also a small, 3 shelf bookshelf to the immediate right of that table that became a catch-all for just about anything and everything.


Personally - I hated this table - I tripped on those legs every single day! And I found it to be too inviting to just set something down and leave it there. And, what a waste of space beneath the table! While my work space becomes incredibly frazzled while I am working, I have an incessant need to put all tools and supplies away every single night. Otherwise when I return to the studio the next day, I become especially nervous not knowing everything is in its place!

I have been searching for an inexpensive storage bench for some time now - something with drawers. I found this at Harbor Freight - had a 20% coupon - and shipping was $6.95! Final cost before shipping:  $128.00 

Storage Bench by Harbor Freight

I actually enjoy putting things together. And this only took an hour of my time.


Admittedly, the fun part was re-organizing everything. 


The drawers are felt lined - added protection for my precious mandrels and such.


One of the best outcomes of this new storage bench is that I now have space between the left side of my jewelers bench and the new storage bench. I cannot tell you how many times I have dropped things to the left of my bench and could not get down to reach them, as the little chrome 3-shelf unit was in the way.

When I purchased my jeweler's bench, I installed a swing arm attachment on the left hand side, where I store my most used tools. Before, there was no room to swing this arm out....so much better now!


I was inspired to actually clean the studio after the storage bench was complete. Next up, I must attempt to destash some of the beads I have hoarded...way too many beads!


Hoping this brings me new inspiration to start creating again!  Thanks for stopping by!

Patti

Monday, January 18, 2016

Baby Steps


In my last post (here), I shared with you my current progress on a sterling silver cuff that featured many new-to-me techniques. I did finish the cuff, including setting the faceted Cubic Zirconia stone in a cone setting, dead center of the cuff.   


While I am extremely pleased with how the cuff turned out --- it literally sucked the mojo right out of me! This class truly took weeks for completion.  The hype in prepping and completing each step of the soldering was draining...to me (will I burn all that silver? Will the filigree solder to the cuff? What if I cannot set that center stone?)  You get the drift.

I have not ventured into making another one  --- I still haven't figured out when/where I will wear this baby!  Suffice it to say that I am a homebody and rarely even go out to dinner these days! :)

So, I decided to concentrate on the individual techniques involved. The hardest part of the cuff -- for me -- was soldering those tiny little granulation balls on such a huge piece of silver. So, took a tiny piece of silver scrap that I rough cut into a heart shape and made a little necklace.  The smaller the piece of silver - the easier it is to maintain an equal temperature on the entire piece of silver.  


Creating bangles and cuffs are one by far one of my favorite techniques to date.  So, I grabbed some 16 gauge copper, and instead of etching, I added some stamping.


I cut and dapped a little disc from silver, which I was going to rivet to the center of the cuff. I changed my mind mid-design (does anyone else do this? I really should sketch.....). Instead, I soldered on a little decorative shot to the center of the disc. 


I wanted to provide more surface area for that disc on the cuff prior to soldering - the last thing I wanted was for that disc to fall off. So, I made a very small divot dead center in the cuff and flattened the bottom of the disc just a bit by rubbing it over my files/sandpaper. You can see the divot on the inside of the cuff.


I am happy to say that disc is on for good!


I am working on creating a ring with another cone setting.  The cone is complete, but I have not taken any pictures yet.  Baby Steps.  Practice. Practice. Practice!

Hoping my mojo returns today....

Thanks for stopping by!


Monday, December 7, 2015

Cutting Jump Rings


One of my least favorite tasks in making jewelry is cutting jump rings. If you were to google "jump ring cutter", I guarantee you will find tons of links for products that promise you the easiest, and fastest way to cut jump rings. Some of these tools will set you back some $$ - and if jump rings in bulk are needed, say for chain maille, it may be worth your while.  

I have read many ways to cut rings - make a coil and place a piece of tape around it. Cut the rings with your jeweler's saw while bracing this coil stack against the bench. I have tried this method several times, and I simply cannot get a grip on the coils with my saw - my rings turn out misshapen as I am holding onto that coil for dear life while sawing!

Personally, I have not attempted to use a cut-off blade in my flex shaft, as some of the pricier jump ring cutters suggest. I keep reading the "danger" signs involved with flying metal, and then I simply stop reading and move on!

I also refuse to use flush cutter's - even if I only need on jump ring. Due to the notching caused by the cutters on one side of the ring, it requires two cuts - and for me - rings cut this way do not produce a perfect join.

When I make jump rings, I typically use 14 or 16 gauge wire. The easiest way for me to cut these rings is to coil the wire and slip the coil on a wooden dowel. I buy the wooden dowels in various sizes in the wood craft department at Joann's or Michaels.


I then clamp the wooden dowel in my vice and use my jeweler's saw to start cutting. By cutting them this way, a notch is made in the dowel, which helps guide my saw blade. This is a "one jump ring cut at a time" process.


This works perfectly fine for me, but I wanted to see if there were any other products that could make this process just a little bit faster.

I have seen this coil cutting tool before online (photo courtesy of Beaducation - link here), where the coil is slipped inside the tool.  I assume that tool is supported by the bench block when sawing as opposed to holding up at this angle, as in the photo below. But, I have not tried it. It still looks to be a plausible solution, and one of these days, I may try it.


While up late one night with insomnia, I found this nifty little wood block on Etsy (link here).


It comes with very good, illustrated instructions.  Make a coil of wire...


Slip the coil onto your saw frame...


Insert the coil into one of the "V" channels in the block. The instructions state that you do not have to clamp this block in a vice - using your left hand, hold the block and the coil and saw with your right hand.


While the method above does work, I have the world's smallest hands. So, I clamped the block in my vice for a bit more stability. This way, I only had to gently hold down the coil.


Voila!

I suppose if one possesses wood working skills, a similar style block could be easily produced. I do not possess these skills - and for $13.50, it was money well spent!

If you have found other methods of cutting jump rings that work for you, I would love to hear about it - leave a comment!

Thanks for stopping by today - now go make something amazing!!

Monday, November 16, 2015

Art Beads - not just for jewelry!


Don't hate me for bringing up Christmas on November 16th...but...we have spent almost all of last week decorating our house for Christmas. Yes...in November....before Thanksgiving. Personally, I despise anything Christmas-related BEFORE Halloween. After that...it's fair game with me! Actually, I am hosting several get together's at my home beginning on Thanksgiving, and I have TONS of decorations that I have accumulated through the years. If it's not done by now..it ain't gettin' done!

The majority of my decorations are handmade. Some from craft shows I have attended through the years...but most have been made by me or my extremely talented mother. She has dabbled in all crafts - ceramics, lapidary, jewelry making, sewing, quilting, crocheting - if I have any creativity at all, it comes from my mother's genes (no disrespect to my Dad)!   

It is a CHORE to decorate: empty plastic bin after plastic bin, move the everyday stuff out of the way and pack it away, dust, arrange, rearrange, put the plastic bins away. It's a workout. But I must say, each year as I open the bins and pull out a special decoration, memories - sweet memories - flood my mind.

While I promise to end this post as it relates to the title - Art Beads - I thought I would share just a sampling of what I have uncovered this past week.

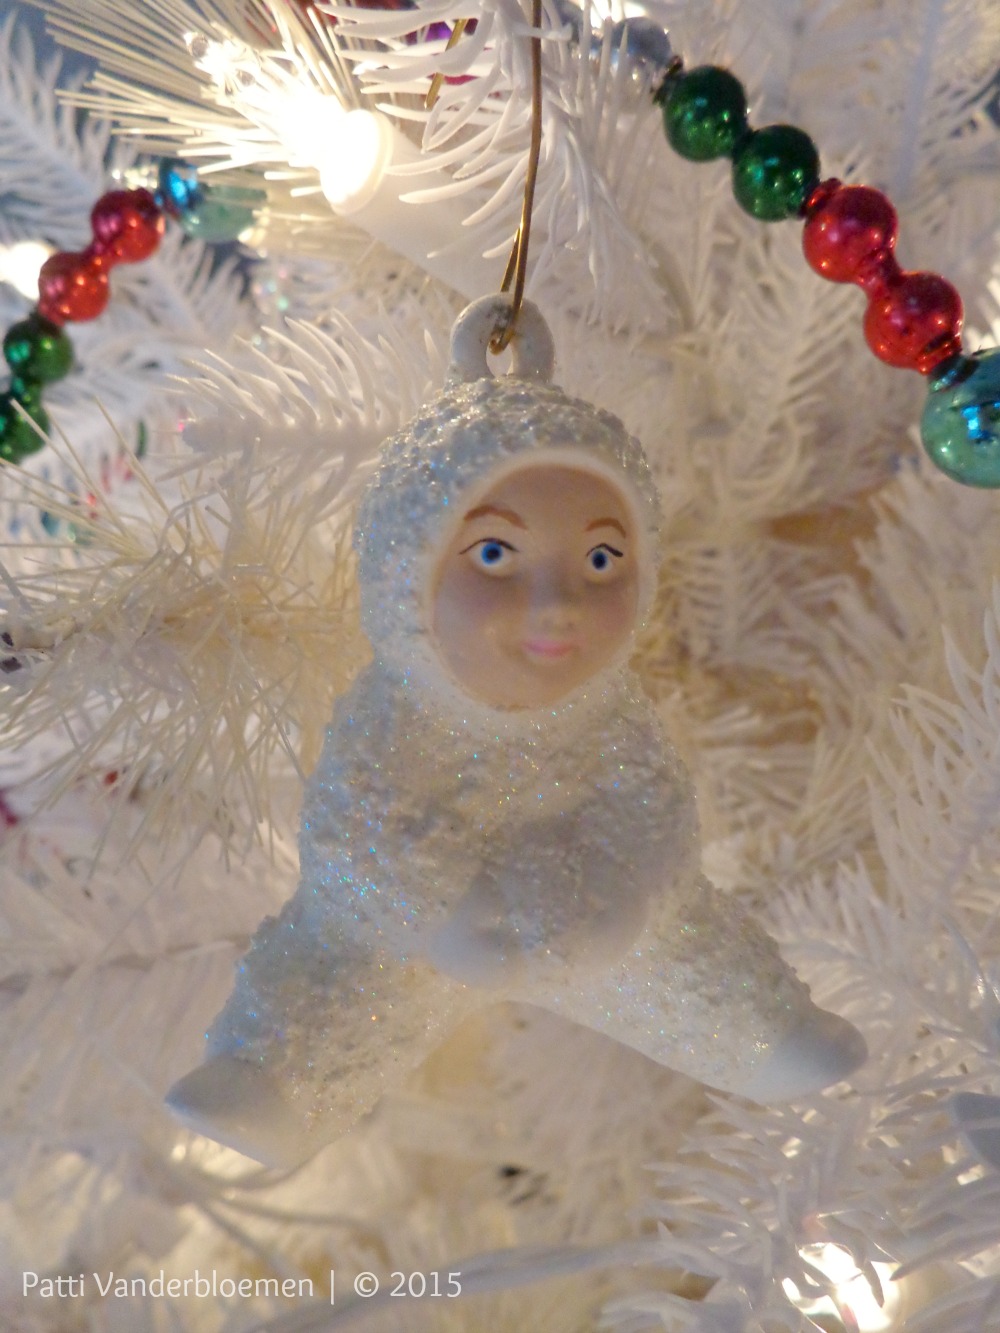
The Snow Babies collection - anyone else remember these? I believe the original "maker" of these gems is Department 56. I have probably a hundred of these hand painted lovelies - most are ornaments - painted by either me or Mom.


Some of my Snow Babies are not ornaments, but stand alone decorations.


My parents lived in Florida for at least 25 years. When I visited, I preferred to stay indoors as I absolutely despise the heat (sorry Karen - way too hot for me where you live!) So, during yearly visits, Mom would plan craft marathon sessions, and we would sit and paint ornament after ornament, while Dad watched football, golf, etc..


This little guy has such a mischievous face...


This one of Mary and Jesus is still one of my favorites that my mom painted - a dry brush technique. The eyes are perfect, which is why I know this is one of Mom's creations and not mine!


My favorite ornaments were made from light bulbs! Yes - light bulbs! Flesh-tone painted (Mom had to paint the eyes), lots of glue and batting, and felt...so cute!


Somewhere - there are matching reindeer light bulb ornaments...but I cannot find them...yet!

One of my trees - I have 3 - is decorated with about 20 of these quilted poinsettia flowers that Mom made just a couple of years ago.


Mom moved in with us five years ago - and her focus nowadays is quilting. I have gorgeous handmade quilts, place mats, and the most beautiful table toppers- for pretty much every single season! Yes...I am blessed!

On to the art beads!

For the past few years, I joined Sally Russick's Ornament blog hop. I loved participating in  this hop - swapping handmade ornaments made with art beads.  

Pam Ferrari gifted me these tiny little treasures a few years ago, made with her lampwork beads. Look at that angel on the left - a bead cone for the body!


Susan Kennedy combined one of her gorgeous handmade lampwork beads with Crystals from a chandelier for this ornament.


I sent Susan Kennedy this ornament, with a perfect holly-themed bead by Donna Millard, and a bit of metalwork by me. 


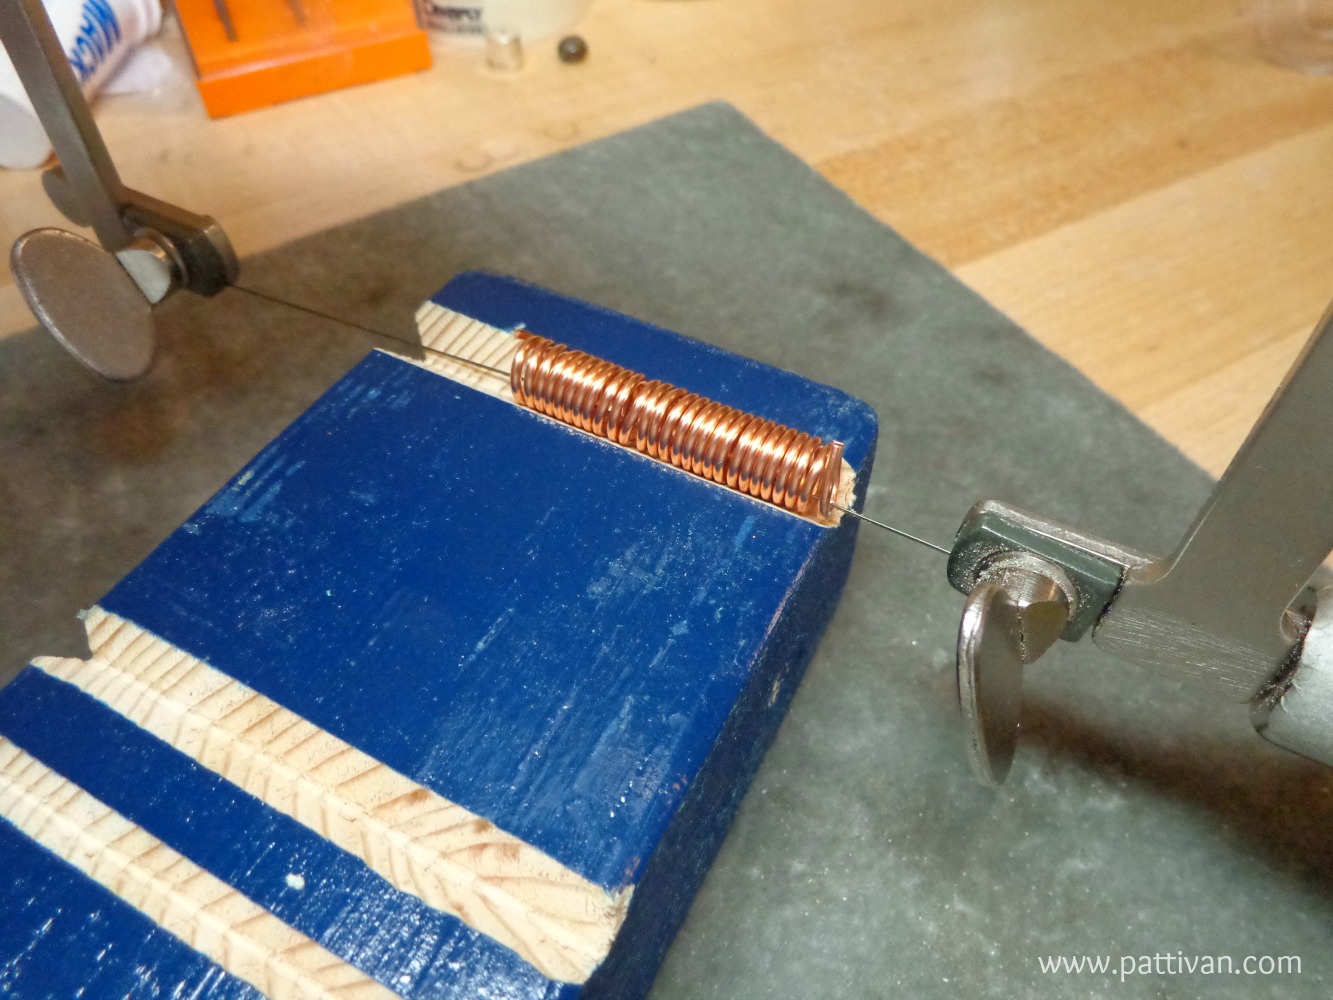
I was  attempting to recreate the striping on the sides of a drum with wire...for some reason, the song "The Little Drummer Boy" was stuck in my head when trying to come up with an idea.


Last year, my partner was Jenny Davies-Reazor - who pretty much does everything in the World of Art - polymer clay, ceramics, metalwork, bead work, etc. She asked me a series of questions related to my favorite things, and then sent me this sweet felted ornament (yes...coffee is my favorite beverage)!


Every evening - usually by 8:00 PM - I can be found on my sofa - I-Pad in hand.  This is "my time" to peruse Face Book, You-Tube, etc.  Very recently, the very talented Raida Disbrow of Havanna Beads posted pictures of the cutest Santa Lampwork Beads I have ever seen!


I had to have them!  Even the backs have Santa's fluffy hair - in glass.


I knew I was going to make ornaments....but I had no clue what to make. My mother suggested I create a bead frame...similar to this necklace I recently made.


I did not want to use silver, as these ornaments will be gifted - who wants to polish silver ornaments every year?  Not me. So, copper it is.


This "geometric style" frame is a smaller version of these bangles I recently made - very cool technique - squared sides in a circle.


The next bead frame is for a very special lady.  I donate the proceeds from jewelry sales to Miracle Horse Rescue - a sanctuary that has been near and dear to my heart for over 13 years now.  Stephanie and her husband have devoted their lives to rescuing these animals in need.  So, I personalized this bead frame just a little, by soldering a little horse shoe (right side up for luck) to the top of the frame.


I just need to add my ornament hangars, and I am done!

Years ago at Christmas-time, I would be the one wearing the loud, Santa sweater with matching jewelry. Suffice it say, with age, my style has mellowed and it's all I can do to get out of my sweats these days But, I still love to use the beads - and ornaments are a perfect solution for me!

Thank you for hanging in there for my very long trip down memory lane!


Now...go make something beautiful!!

Patti
face
Related Posts Plugin for WordPress, Blogger...