by Patti Vanderbloemen
Recently, a friend of mine asked me if I could make her a necklace with a sort of 3-D effect. Before I retired nearly 6 years ago, I spent 20 years as a Proposal Writer for Architects and General Contractors. One word that was constantly used back and forth between designers and contractors was - "constructability." Just because an architect can draw the idea, it does not mean a contractor can build it. That word still sticks in my mind with every single piece of jewelry that I create....How will it lay on the arm or neck? What type of clasp? Are the earrings too heavy? How can I make something 3-D and not have it fall apart?
I ended up not using my friend's exact design concept, rather, I riffed. I actually remembered to take pictures of each step (I apologize in advance for any blurry photos)!
She wanted mixed metal, so I started by drawing out a freehand heart on copper, and sawed out the shape.
The copper heart would serve as my backplate/base, so I used 20 gauge copper. After filing the edges smooth, I used the ball peen hammer to add texture to just the edges.
I then cut out a smaller version of the same heart shape with a scrap piece of silver that I had etched.
I knew I had to have something underneath the two hearts to raise the silver heart above the copper for that 3-D effect. I could easily have used rivets - with tubing in between - but I did not want to deface the pretty silver! I do not etch often, and my etch scrap is running low! So, I decided to use square wire to serve as legs and give me some height - similar to pilings on a bridge (see..I really did work with architects...who thinks of structural engineering and bridges when designing a necklace??)
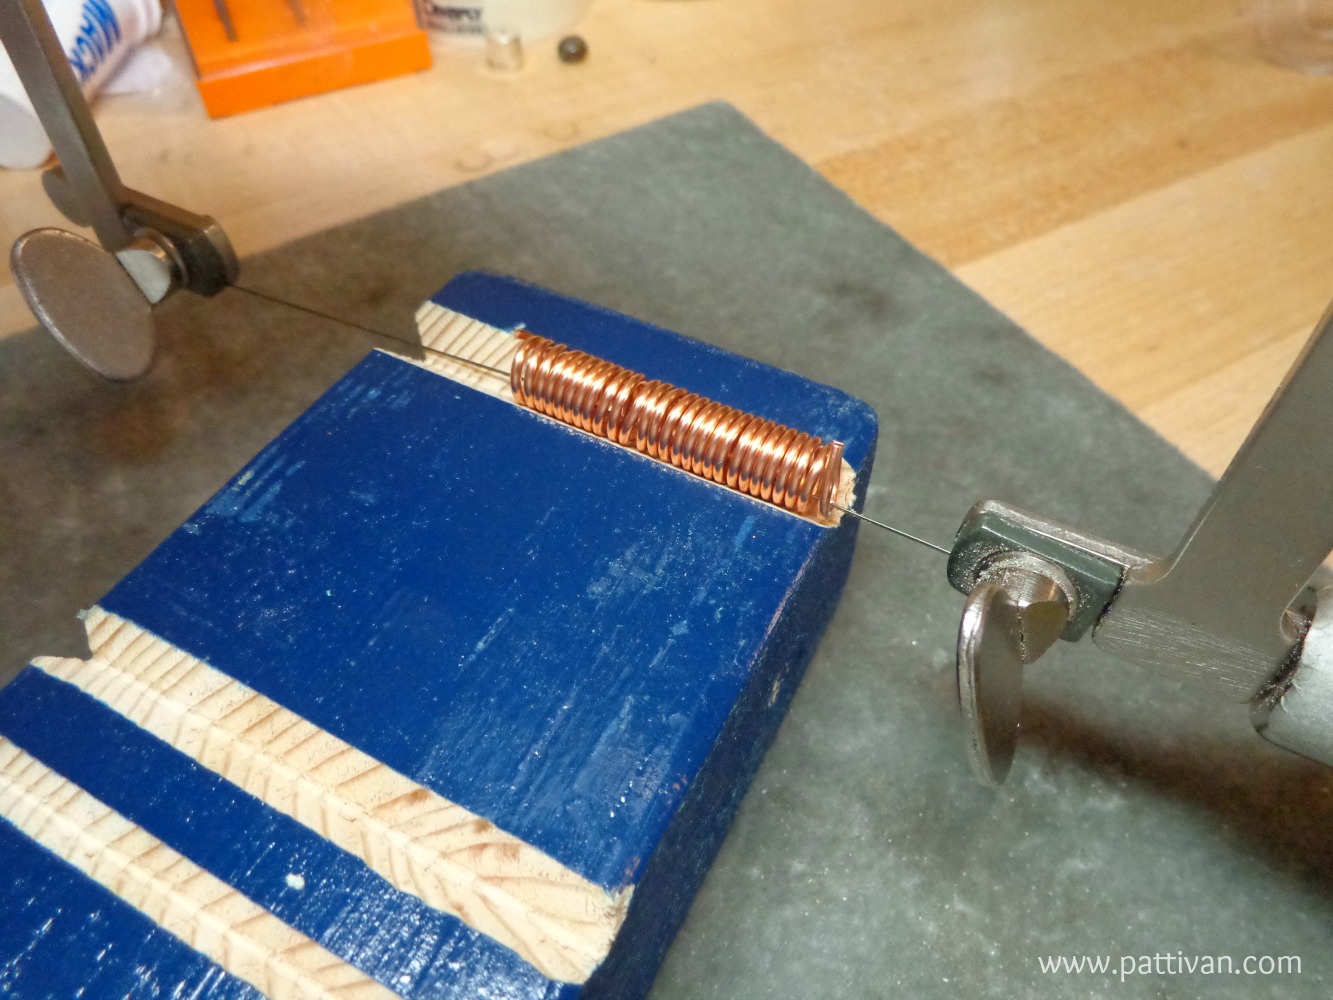
A couple of weeks ago, I shared a video of my studio and I distinctly remember pointing out this tool - a miter cutting vise (link here). I truly use this tool constantly for sheet and wire. You just slip the sheet or wire into the tool, tighten, and then use a file to get a perfectly flush edge. The tool is steel and will NOT ruin your file.
After getting a flush edge on the starter piece of square wire, I cut (with a saw) 3 little legs, each approximately 2 mm long.
I then soldered (hard solder) these legs to the silver heart. I use Knew Concepts Titanium Clips (link here) to raise the silver heart so I could aim my flame underneath, though that square wire would probably not melt, as it is pretty thick.
First solder complete.
After pickling and cleaning, I made sure the 3 little legs were all the same size - a quick file and that was done.
I then sweat soldered 3 balls of medium solder the top of the legs.
The next step was to solder the top, silver heart with legs to the bottom, copper heart. This was my setup - again, the intent being to aim the flame underneath the copper base and not melt the "legs" or the little silver heart..
Pickle and clean. I brass-brushed this sucker to death and then threw it in the tumbler for an hour - I wanted to make sure I had a good, solid connection.
Side view
Of course, I forgot to take a picture of the back of necklace to show the bail placement. It is just a copper ring, with a closed (soldered first) sterling ring on top for the chain.
Liver of sulfur, buff, and tumble.
I plan on making this again...I see an arrow shooting through there somewhere! :)
It is really not bulky and heavy...my friend was very pleased!
I want to end this post by thanking everyone who is out there working on this Labor Day- Police, 911 Operators, Fire Men and Women, Doctors/Nurses/Hospitals, and especially all the Lineman who are working 24 hours a day to restore power to those who have lost it during the horrific hurricane / extreme weather that has hit this past weekend. Their work does not go unnoticed...and I am forever grateful!
Thanks for stopping by!
Showing posts with label handmade jewelry. Show all posts
Monday, September 5, 2016
Sunday, July 31, 2016
Another Studio Tour!
I have created nothing even remotely "innovating" for me, and could not think of what to share with you today, But, I returned from vacation about a week ago. Before I left, I cleaned my studio ...including the floor, which so desperately was in need of a good vacuum! Both Staci and Karen recently posted videos of their studio space. I am ALWAYS inspired by other artist's studio images and videos, so I thought "what the heck" so here is mine!
Now, this is my first video so I hope no one gets too dizzy! Lots of shaking going on from my phone, so I apologize in advance! I actually shot the video 3 times - man can I talk! The first one was 20 minutes long, the second video, 15 minutes...the final is about 11 minutes. Sigh.
Thanks for stopping by today!
Monday, March 21, 2016
Patterned Wire
by Patti Vanderbloemen
I've been under the weather on and off lately and have not spent much time in my studio...and I miss it so! I apologize for my absence! But, on those days where I can drag myself out of bed, it was directly to the coffee pot...and then my studio.
Recently, I had an email link (from one of the many vendors that send me links) with a quick tutorial for using patterned sterling silver wire. I can no longer find the link (It was Terri McCarthy on a Cool Tools -video but a search on their site as well as You-Tube proved futile). Sigh. Anyway, Terri soldered a strip of patterned sterling wire to a piece of sterling sheet, soldered on an ear wire and...boom...instant textured earrings! I was inspired!
The first item I made was similar - but I cut my sterling sheet larger, and soldered my pattern wire down the center. I then added some hand stamping to the sides of the sheet.
A technique I loved from the artist's video was using tiny sterling silver tubing to "hold" the ear wire.
It was tricky to solder the ear wire and the tubing at the same time - that sucker just wanted to move, no matter how well anchored it was on my soldering block! Although easier said then done, I added more solder to the tubing after my first soldering operation - just to ensure it was secure.
I originally had ring shanks in mind for this patterned wire, but, it is a substantial weight, so I made a bangle.
I added two faceted bangles to the set - looks so good on the wrist when worn together.
Earrings again - this time post-style.
I just could not stop, so I also made a matching pendant.
It's not that large, so it's comfortable to wear all day long.
I have had this patterned wire in my stash for a long time, and was happy to put it to good use, although I still need to make a ring!
Patterned wire comes in all shapes, sizes, and textures (mine came from Rio Grande) - I love the versatility of this metal!
Thanks for stopping by today!
Monday, January 18, 2016
Baby Steps
In my last post (here), I shared with you my current progress on a sterling silver cuff that featured many new-to-me techniques. I did finish the cuff, including setting the faceted Cubic Zirconia stone in a cone setting, dead center of the cuff.
While I am extremely pleased with how the cuff turned out --- it literally sucked the mojo right out of me! This class truly took weeks for completion. The hype in prepping and completing each step of the soldering was draining...to me (will I burn all that silver? Will the filigree solder to the cuff? What if I cannot set that center stone?) You get the drift.
I have not ventured into making another one --- I still haven't figured out when/where I will wear this baby! Suffice it to say that I am a homebody and rarely even go out to dinner these days! :)
So, I decided to concentrate on the individual techniques involved. The hardest part of the cuff -- for me -- was soldering those tiny little granulation balls on such a huge piece of silver. So, took a tiny piece of silver scrap that I rough cut into a heart shape and made a little necklace. The smaller the piece of silver - the easier it is to maintain an equal temperature on the entire piece of silver.
Creating bangles and cuffs are one by far one of my favorite techniques to date. So, I grabbed some 16 gauge copper, and instead of etching, I added some stamping.
I cut and dapped a little disc from silver, which I was going to rivet to the center of the cuff. I changed my mind mid-design (does anyone else do this? I really should sketch.....). Instead, I soldered on a little decorative shot to the center of the disc.
I wanted to provide more surface area for that disc on the cuff prior to soldering - the last thing I wanted was for that disc to fall off. So, I made a very small divot dead center in the cuff and flattened the bottom of the disc just a bit by rubbing it over my files/sandpaper. You can see the divot on the inside of the cuff.
I am happy to say that disc is on for good!
I am working on creating a ring with another cone setting. The cone is complete, but I have not taken any pictures yet. Baby Steps. Practice. Practice. Practice!
Hoping my mojo returns today....
Thanks for stopping by!
Friday, January 15, 2016
4 Tips for Neater Macrame
by Sherri Stokey
3. Maintain consistent tension on the knots. This is easier said than done and does require some practice for most of us mere mortals, but will make all the difference in your piece looking neater overall.
4. Be tidy when you finish off your piece. The ends of your piece should look as good as the focal part, so don't slack off when you get close to the finish line. The little details are what sets your work apart. I like to use a split ring finish for many of my pieces (there's a free tutorial here on how to do that, if you're interested). I like the more "finished" look this gives my pieces, but no matter what ending you use, make it neat and secure.
One question I get pretty often is how I get my micro macrame jewelry pieces to looks so perfect. First let me point out that they aren't perfect. They're tied by hand one knot at a time and there are imperfections in every piece. That's sort of the thing about handcrafted jewelry - it isn't mass produced or made by a machine. I think it's one of the things that gives handmade its charm.
That all being said, I do try to make my pieces as perfect as I can. I'm just wired that way. Here are my top four tips for neater macrame:
1. Straighten the cords before you begin knotting your macrame project. I usually measure and cut my cord from the spools, then use my handy dandy hair straightener (flat iron) to get rid of the curls. A large barrel curling iron will work, too. I've heard of using a plain old iron, but I cannot attest to the effectiveness of an iron since I steadfastly refuse to use one in any context. The hair styling tools work swimmingly. Getting the cords all straight like this will help you keep track of them much easier when it comes to knotting, especially if you're working with many cords.
2. Use pins while you work. I'm a pinnin' fool. I use regular old sewing pins (straight pins) as well as t-pins to hold my work to the pinning surface while I knot. This helps me keep the lines all straight and uniform. It also gives me something to pull against when changing direction of a cord.
3. Maintain consistent tension on the knots. This is easier said than done and does require some practice for most of us mere mortals, but will make all the difference in your piece looking neater overall.
4. Be tidy when you finish off your piece. The ends of your piece should look as good as the focal part, so don't slack off when you get close to the finish line. The little details are what sets your work apart. I like to use a split ring finish for many of my pieces (there's a free tutorial here on how to do that, if you're interested). I like the more "finished" look this gives my pieces, but no matter what ending you use, make it neat and secure.
And there you have it, my top four tips for neater macrame. Do you have other tricks that you use? I'd love to hear them!
Monday, January 4, 2016
The Year was 1976
by Patti Vanderbloemen
I remember, quite vividly, on my all-important 16th birthday in 1976, thinking...."OMG...in the year 2000, I will be 40! I don't think I will live to be that old". Ha! Here it is...nearly 40 years from the day I said those words and I am still here? How naive! :)
Echoing Karen's last post, 2015 was a very long year, and at the same time, I cannot believe it is over. It was a very unhealthy year for me, so I hope that the next 12 months show at least a glimmer of improvement in that department. I also do not make New Year's Resolutions. But, I do try to set goals that I can at least attempt to achieve.
I remember, quite vividly, on my all-important 16th birthday in 1976, thinking...."OMG...in the year 2000, I will be 40! I don't think I will live to be that old". Ha! Here it is...nearly 40 years from the day I said those words and I am still here? How naive! :)
![]() |
The Original Rocky - 1976 |
Since this is a "jewelry making blog", my related goals for this year are to expand and hone the skills that took me this far in my creative venture. It took me years to try a new technique, only to become depressed when it did not work...the very first time. As an example, I remember the first time I soldered a jump ring, only to remove the flame way too late and wind up with a ball of metal. And the solder still intact in a little ball - not even close to its melting point. Things like that used to frustrate me to the point of not making a second attempt.
I'd like to think I have grown up a bit since that jump ring. My first bezel set stone was horrid - but I was still so excited that 1) the bezel fit and did not melt; and 2) that stone is still set to this day! I know it is old hat - but Practice. Practice. Practice. It has truly become my mantra of late. And, while I do get frustrated when something does not go as planned, I try to make lemonade from the lemons instead of tossing the fruit in the trash.
Last Fall, I enrolled in an online class from Leslie Kail Villareal to make a Boho Saddle Ring. For the first ring I made, the silver elements were not quite aligned - but I was so pleased that I was able to set a stone on a curve! It's in my jewelry box now, and I do wear it. But, I made another, and another. Practice. Ahh...symmetry.
I actually recently completed a custom order for a 3-inch saddle ring - sans a stone. I received an email request, and I told the customer I was not sure I could do this, but I would certainly love to try. So, I made a practice ring in copper first - the silver ring on the right is just over an 1 1/2" in length.
She loved it - so I crafted one in silver, just for her. You can really see the size difference in the picture below.
I know that a 3" ring is not for everyone - certainly too long for my short fingers! But, she loved it, I loved creating it - it was win/win. I can absolutely state with certainty that two years ago I would have simply told her "no" when she first asked.
I learned so many techniques in taking this online class. I believe Leslie will be offering this class again in February/March 2016 - here is her site if you are interested. Worth every penny!
So, in keeping with my 2016 goal of trying something new, expanding and honing my skills, I enrolled in Leslie's Boho Cuff Class, which began on December 26 (enrollment is now closed). This is Leslie's completed cuff.
![]() |
Source: Leslie Kail Villareal |
Let me tell you - this is one intense piece of jewelry! It includes so many firsts for me: Etching on Silver, Filigree Work, Tapered Stone Settings (Cone) - not to mention the geometry involved in crafting that stone setting from scratch. Many apologies to Mrs. Managault, my 9th Grade Geometry teacher - whom I boldly said to her face "I will never use geometry in my lifetime". I was an unruly teenager - and she got the last laugh, didn't she?
While I have not quite finished the cuff, I have progressed just a bit. First off - silver etching. It's not for everyone. The use of a hazardous material - Ferric Nitrate (FN) is involved and ----for me --- it was a tad on the scary side (kind of like that first soldered jump ring and the use of fire). Since I decided to jump right in and try it, I etched two pieces of silver. The piece below is a 3" square of 18 gauge. It could make a fabulous ring(s), or several pairs of earrings.
Although I have my own studio in my basement, I did the etching in the garage with the doors open - with head-to-toe safety! :) I have to admit, now that I have cleaned up the FN, I may try it again...in the Spring when the recent cold snap subsides and I am not subjected to freezing my tush in my garage.
I have not completed the cuff - I still have several more soldering sessions to go, and then the all important setting of that center, faceted stone. (It's not polished yet in the pictures below, for obvious reasons).
This is by far the most labor intensive piece of jewelry I have ever made. It has taken me days to get this far. But, I will finish this piece. And, even if I cannot set that stone, or the tiny little balls of silver that need to be soldered into that filigree wire do not hold - or heaven forbid, I melt the entire cuff on the next round of soldering - it was a success in my book. Just because I tried it. Many thanks to Leslie for offering the most-awesome online classes!
So....here's to 2016. And more Practicing, and perhaps, Succeeding!
Now - go make something amazing!!
So....here's to 2016. And more Practicing, and perhaps, Succeeding!
Now - go make something amazing!!
Monday, December 7, 2015
Cutting Jump Rings
One of my least favorite tasks in making jewelry is cutting jump rings. If you were to google "jump ring cutter", I guarantee you will find tons of links for products that promise you the easiest, and fastest way to cut jump rings. Some of these tools will set you back some $$ - and if jump rings in bulk are needed, say for chain maille, it may be worth your while.
I have read many ways to cut rings - make a coil and place a piece of tape around it. Cut the rings with your jeweler's saw while bracing this coil stack against the bench. I have tried this method several times, and I simply cannot get a grip on the coils with my saw - my rings turn out misshapen as I am holding onto that coil for dear life while sawing!
Personally, I have not attempted to use a cut-off blade in my flex shaft, as some of the pricier jump ring cutters suggest. I keep reading the "danger" signs involved with flying metal, and then I simply stop reading and move on!
I also refuse to use flush cutter's - even if I only need on jump ring. Due to the notching caused by the cutters on one side of the ring, it requires two cuts - and for me - rings cut this way do not produce a perfect join.
When I make jump rings, I typically use 14 or 16 gauge wire. The easiest way for me to cut these rings is to coil the wire and slip the coil on a wooden dowel. I buy the wooden dowels in various sizes in the wood craft department at Joann's or Michaels.
I then clamp the wooden dowel in my vice and use my jeweler's saw to start cutting. By cutting them this way, a notch is made in the dowel, which helps guide my saw blade. This is a "one jump ring cut at a time" process.
This works perfectly fine for me, but I wanted to see if there were any other products that could make this process just a little bit faster.
I have seen this coil cutting tool before online (photo courtesy of Beaducation - link here), where the coil is slipped inside the tool. I assume that tool is supported by the bench block when sawing as opposed to holding up at this angle, as in the photo below. But, I have not tried it. It still looks to be a plausible solution, and one of these days, I may try it.
While up late one night with insomnia, I found this nifty little wood block on Etsy (link here).
It comes with very good, illustrated instructions. Make a coil of wire...
Slip the coil onto your saw frame...
Insert the coil into one of the "V" channels in the block. The instructions state that you do not have to clamp this block in a vice - using your left hand, hold the block and the coil and saw with your right hand.
While the method above does work, I have the world's smallest hands. So, I clamped the block in my vice for a bit more stability. This way, I only had to gently hold down the coil.
Voila!
I suppose if one possesses wood working skills, a similar style block could be easily produced. I do not possess these skills - and for $13.50, it was money well spent!
If you have found other methods of cutting jump rings that work for you, I would love to hear about it - leave a comment!
Thanks for stopping by today - now go make something amazing!!
Subscribe to:
Posts (Atom)