
Written by Patti Vanderbloemen for Love My Art Jewelry
This is a two-part post - Part One is a discussion of my most used tool in my studio, and Part Two is related to a brand-new-to-me tool. Grab a cup of something wonderful and read along!
This is a two-part post - Part One is a discussion of my most used tool in my studio, and Part Two is related to a brand-new-to-me tool. Grab a cup of something wonderful and read along!
PART ONE
I receive lots of comments on the "finishing" of my metals - copper in particular. I always patina the copper (with liver of sulfur), and hand buff with steel wool, though I also also use a variety of buffs on my flexshaft (but this step is not necessary).


The sheen that I achieve in my metals is not from shellac or a protectant - it's from the buffing AND the tumbler. Every single piece of jewelry I make that contains metal (that would be all of it!) has been tumbled.
This is my tumbler set up. I have used the same Lortone Tumbler for years (this model). I use 2 pounds of mixed stainless steel shot (this shot), 2 drops of regular, blue Dawn Dish Detergent (and only Dawn), and enough water to cover the shot and the jewelry. I place the tumbler inside an old plastic shoe box. Why? Once - and only once - I misaligned the cover to the tumbler, added water, turned it on and walked away. When I came back 20 minutes later, I had water all over the floor. So, this is just my way of containing that spilled water ('cause I still put that cover on crooked!).

I always put my finished pieces in the tumbler for 20 minutes or so BEFORE I add patina. I have found that patina "takes better" to a completely clean piece of metal. Yes - this adds time to my finishing work, but I prefer the final finish I achieve when I take this extra step.
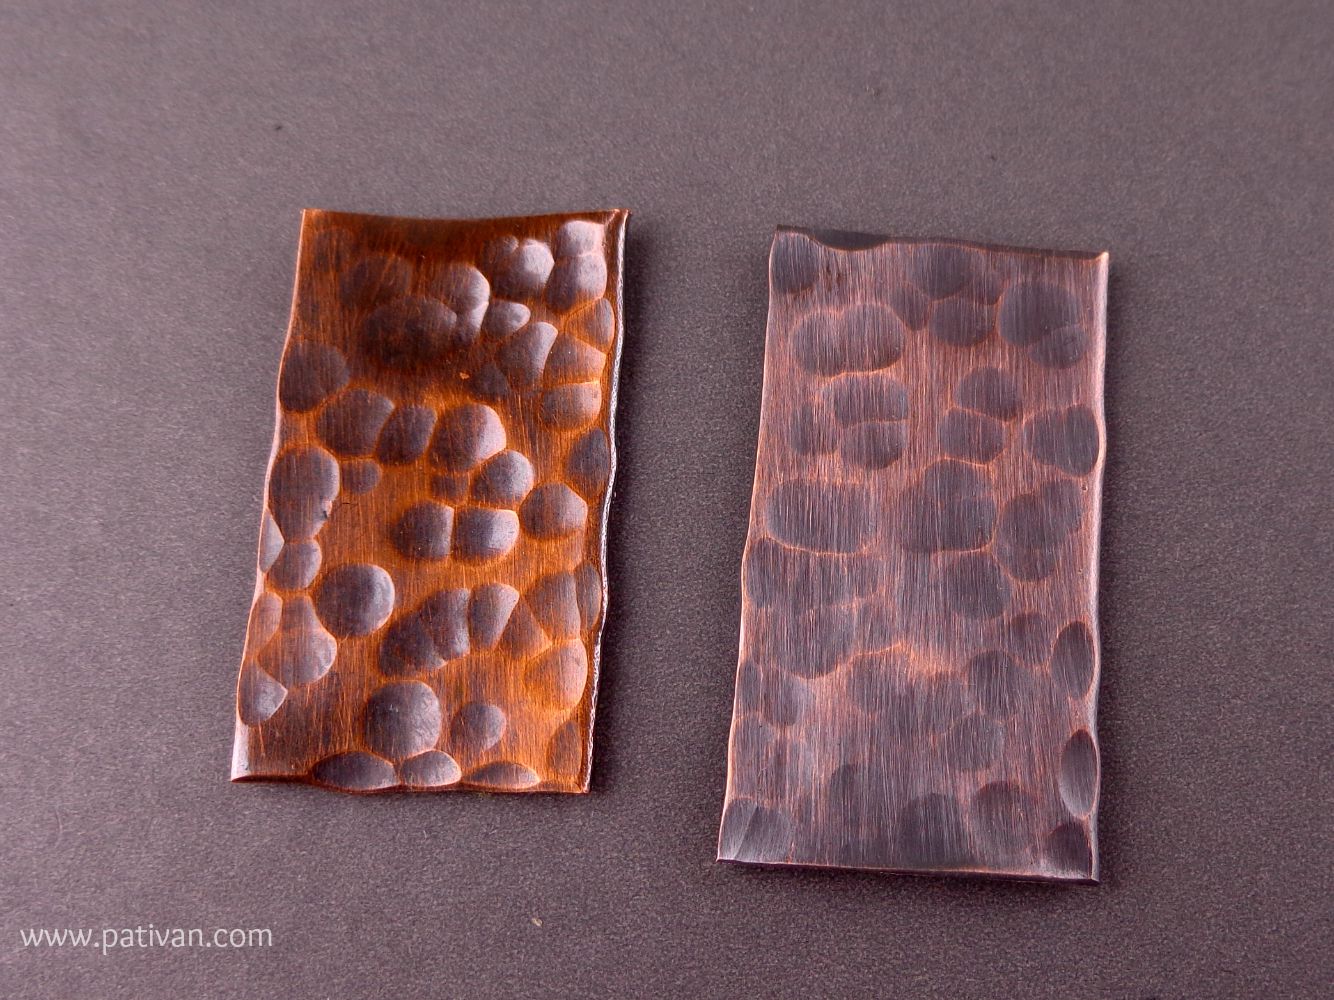
As a test for this blog post, I made three sets of samples of textured copper. For one set, after texturing, I tumbled for 20 minutes, added liver of sulfur, buffed, and then placed the patinated pieces back in the tumbler for an additional 20 minutes. For the other set, I textured, added liver of sulfur, and buffed - no tumbling. The following pictures are the result of my test (click on the pictures to make them larger and really see the difference). I took 2 pictures of each sample.
 |
| Sample 1: Left - tumbled / Right - no tumbling |
 |
| Sample 1: Left - tumbled / Right - no tumbling |
 |
| Sample 2: Left - tumbled / Right - no tumbling |
 |
| Sample 2: Left - tumbled / Right - no tumbling |
 |
| Sample 3: Left - tumbled / Right - no tumbling |
 |
| Sample 3: Left - tumbled / Right: no tumbling |
The burnishing effect of the shot with the copper pieces, while tumbling, adds a shine that I just cannot achieve without tons of buffing. Even the color of the copper is enhanced, and tumbling also hardens the metal - always a plus.
When the tumbler is done after 20 minutes or so (I have been known to keep some metals in the tumbler, such as bangles, for hours), I simply pour it out in a strainer in my sink and rinse.

Once the water runs clear, I dump the shot onto a clean, white towel and spread it out to dry. THIS IS AN IMPORTANT STEP. You do not want the shot to get rusty (never happened to me...yet...but my basement studio is freezing)!

STORING YOUR SHOT - Once dry, I just keep in the shot in the dry tumbler barrel.
CLEANING YOUR SHOT - A spanking new bag of shot is bright and shiny stainless. After years of use (see photo above), it does turn dark. I clean my shot about once every 2 months or so in one of 2 ways. 1) I add the shot with some room temperature coca-cola (enough to cover the shot) for about 2 hours, rinse, dry. 2) I have also cleaned my shot with water and baking soda (I do not measure - couple of tablespoons and enough water to cover), tumble for about 2 hours, rinse, dry.
A WORD ABOUT TUMBLING GEMSTONES AND CERAMICS Now, I do not tumble anything with gemstones. If I bezel set a gemstone cabochon, I add patina to the silver, buff, and tumble AND THEN set the stone. I actually keep a supply of both copper and sterling silver wire that I have patinated with liver of sulfur, buffed, and tumbled - in a coil - for use with gemstone beads. Yes - the wire hardens a bit - but I like the finish of tumbled wire. Several years ago, I learned the hard way and tumbled a bracelet with turquoise beads. What a waste! Lampwork beads tumble beautifully! I have never even attempted to tumble a piece with ceramic - I have just never wanted to take that chance of ruining the piece!
So - no secrets here - the tumbler is my best friend in the studio! There is no hard and fast rule for tumbling - everyone has there own method...I simply found this method works best for me.

PART TWO
I belong to several metal-related Face Book groups. I am mostly just a lurker. Well, I started seeing a picture of a shot plate on several of these group pages, and I knew I had to have one! I intentionally took a picture with my fingers so you could get an accurate aspect ratio - it's small!

From my online research, I have read that Tucker Tool Company is the one reputable maker of this tool (link here). (There may be other makers - I am just not aware of any names at this point). These Tucker Tool shot plates are also available at Indian Jewelers Supply (link here) and Monsterslayer (link here), but as of the writing of this blog post, Monsterslayer it is currently out of stock. Onward.
I researched online (outside of Face Book) how to use this tool - and it is really simple, but this technique can add such a bang to a completed piece of jewelry! Much more intricate than just adding a ball of silver (which I still do and still love)! Here is what you do.
Take small bits of sterling silver, and melt it on your charcoal block. I used bits from my bowl of to-be-recycled sterling. The holes in that shot plate are small - you do not need a lot of silver!

Once melted, wait until the silver turns back to gray before you quench it in water. I have, in the past, been too quick and picked up the red-hot ball of silver. It is still quite malleable when it is red and can be deformed by your tweezers!

 |
Melted balls are in my hand for size reference - tiny! |
Place the ball inside the depression, and hammer. I do not use my "good" hammers for this - this is my brass hammer that I use for stamping.

Each time I made a decorative shot (that's what the end result is called!), the shot became stuck in the shot plate. Just grab your center punch...

Place the punch in the middle of the depression, and hammer. The decorative shot will "stick" to the center punch and will release from the shot plate.

It does not matter that you will have a depression from your center punch in the bottom of the decorative shot, as you be soldering this to your piece of jewelry. However, while the shot is still "stuck" to the center punch...

I use my files to round the bottom edges.

A quick whack with my hammer and the decorative shot will release from the center punch.
A picture of 4 completed decorative shot flowers.

I soldered these flowers to some hoop earrings, flanked with tiny little balls.

Finished! A complete pair of 100% handcrafted sterling silver hoops with flower accents...that began as wire!

In my mind, I am imagining many ways to use this decorative shot - place one inside an "upside down" bead cap and you have a flower with petals; accents on a the back plate of a bezel-set pendant, etc.
To those of you that made it to the end of this extremely long blog post - thank you! I am on the verbose side....:)
To those of you that made it to the end of this extremely long blog post - thank you! I am on the verbose side....:)
Thanks so much for staying with me and visiting Love My Art Jewelry today!!
Patti
21 comments:
Wow Patti! You shared everything and though I will probably never work in metal you did make me drool! I love, love, love the look of your finished textured copper. I must get me some! I definitely will be purchasing one of your beautiful pieces of art! TFS
Thank you for this very informative post Patti. Love learning about the decorative shot plate! New to me. Also many thanks for the Tucker tools link. Your work is amazing.
What a cool new tool! I adore the earrings!!!
Thank you for sharing, especially about the shot plate. So interesting.
OOooooo- new tools! i love that plate!
I just keep water in my tumbler, so its always covered and my shot doesn't rust. Also- it has never turned dark, and I wonder if that is because it has always been kept in water. I clean it good and fill with fresh water. (OH- and I too did the top not on right water on the floor thing once!)
Fabulous Post!!! Thank you for all of the great tips.
laurie
Wow, Patti! I have never thought about putting things in the tumbler before I add patina - will do it that way from now on. What a difference. I have a vibratory tumbler so it will be interesting to see if it works the same way as yours does. And the Tucker shot plate was already on my list.
I loved this post, Patti. The details you give are just what is needed. Especially for that shot plate tool which is new to most of us. Such a cool tool ! Thanks for sharing. I also loved all the info about tumbling...I needed that! I'm really glad you're now part of LMAJ so I don't miss your blog posts which I have always enjoyed.
thank you for these , informative , easy to follow , & totally do~able !
Love the new tool! And you already know how much I love those earrings. ;) Thanks for sharing your knowledge Patti. I have had water on the floor with the tumbler too. I'm having issues right now with my tumbler/shot not bringing my metals up to a nice shine like it used to. I've been researching this on various sites and I keep coming up with the cola solution or vinegar and baking soda to give the shot a nice cleaning. I'll be trying one or both methods.
A great post Patti! Thanks for the detailed explanations. Helps alot.
I'd seen those earrings and the new tool online too. Looks like fun.
Mona
Thank you for sharing wonderful post
Great post, Patti. I love the information about the shot plate. I've never used one. Also, your copper finish is always so lovely. Thanks for all of the info in this post!
Wonderful post Patti. I really enjoyed reading about your process.
Excellent post! Thanks for all the information. I have been considering tumbling but had no idea where to begin! I love the finish you get on your beautiful designs. Off to search for a tumbler!
Excellent post! Thanks for all the information. I have been considering tumbling but had no idea where to begin! I love the finish you get on your beautiful designs. Off to search for a tumbler!
Very cool! I definitely want one of those shot plates. I could've used it for a piece I just finished. I ended up changing the design, because I couldn't figure out how to do what I wanted to do!
Question on the tumbling... You say you tumble before setting a cab, which makes sense. What does the tumbling do to the bezel wire? Do you use a certain thickness, as I would think it might get damaged. Thanks!
Hey Janet! I have never damaged a single piece of metal in my tumbler - EVER - does not matter the thickness. My backplates have been as thin as 24 gauge, though I mostly use the 18 - 22 gauge. In this particular instance of tumbling, I only tumble 20 minutes. I also only use ready-made bezel wire (I have not advanced to cutting my own), and the gauge used depends upon the cab. The bezel wire does harden a bit BUT it is still workable (for me, anyway)! Hope this helps!
Great post! Lots of helpful information...and a new tool to drool over!
I do have a question though. I also use my tumbler to finish pieces once I've used LOS and buffed them. But I was wondering, do you seal your finish with anything? I know some jewelry artists do and others don't - I generally don't (due to not knowing what to use that won't make the metal look or feel off),but then find my pieces will lose their lovely"fresh from the tumbler" finish. Any advice would be much appreciated!
I love your little flower accents. Cool! Thank you so much for the tumbler discussion. I put my lid on askew the last time I used it and got the water (and shot!) on the table scenario (lucky it is a plastic table in my basement.) But I'm going to use your excellent plastic bin tip! Also, I've always wondered when people say they LOS and tumble finished jewelry; it just seems so delicate to me when it has beads. But you clearly stated what it works for and what it doesn't. Thank you!
fantastic post in so many ways. yes, i agree completely about the tumbling. what a difference it makes. and thanks for the referral of other supply companies. beautiful work!
Post a Comment