
Today, I thought I would share my technique for making hollow metal beads. I have seen tutorials for making these before, but I am including a couple of tips that help me. In the past, I have made these in both sterling silver and copper - today's images illustrate sterling.
(As always, please be safe and wear the appropriate eye protection and a mask, as well).
The first step is to texture your metal. I like to use 20 gauge sheet. Once the sheet is cut into discs, the metal will then be dapped. As you hammer while dapping, the metal spreads, thus the texture will not be quite as deep in the metal as when you began. So, I start with a heavier gauge metal and texture deeply - the example below illustrates a texture I made using the flat edge of my riveting hammer.
The first step is to texture your metal. I like to use 20 gauge sheet. Once the sheet is cut into discs, the metal will then be dapped. As you hammer while dapping, the metal spreads, thus the texture will not be quite as deep in the metal as when you began. So, I start with a heavier gauge metal and texture deeply - the example below illustrates a texture I made using the flat edge of my riveting hammer.

The size of the beads is totally up to the maker. In the example, I am using a fairly small punch and the discs measure 9.5mm. I always place a piece of scrap metal - same gauge as my work- opposite from the hole I am cutting. This extra step should make my disc cutter last longer.


Once all the discs have been cut, I then anneal the metal, quench in water, and pickle.

The edges from the disc cutter can be abrasive. I take a second and run a sanding pad around the edges to smooth out the roughness. These pads last a long time, and I use them daily (link here).

When doming each disc, I use my brass hammer and usually dome 3 sizes down, starting with the largest dapping depression, down to the smallest size. It is a personal preference how "puffy" a shape you want for your final hollow bead.

I then take my mini round needle file and make a slight impression on only 1 of the 2 discs. I have 2 reasons for doing this: 1) I use silver solder paste, and this impression/hole provides an escape for the pressurized air when soldering; and, 2) it also makes drilling the hole in the final bead slightly easier.


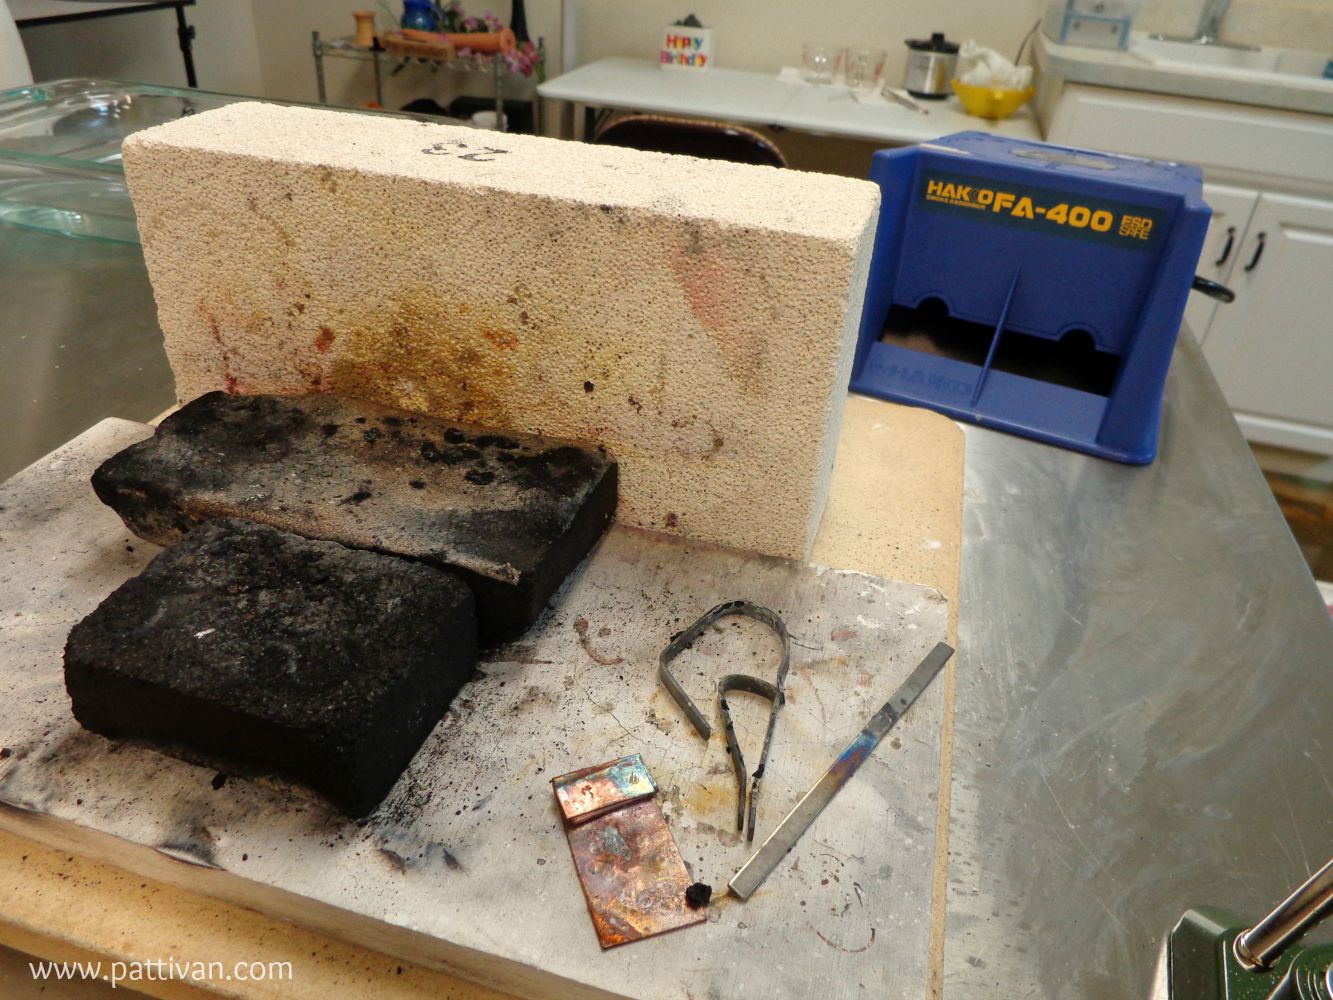
This is one of my soldering stations. I have mentioned in the past that I only use a butane torch (this one). But, I set my fire brick (or an additional hard charcoal block) on it's side. I then set my item to be soldered on the charcoal block - right next to the fire brick. The heat generated from my torch bounces off the fire brick back to the item being soldered. This setup provides me with enough heat to solder 6 gauge wire with a butane torch (it takes a while, but it can be done)!
I add silver solder paste to the inside one of the domed discs. Remember - no flux is required with paste and Yes - using solder paste is messy!

I add the second domed disc, and set it on the charcoal block next to the fire brick. The solder paste binder will burn away (evidenced by the flame you will get when you hit this with the torch)! When applying the heat with the torch, fan the area around the bead with the flame first, just to heat it up, then aim the flame at the bead. Watch carefully while torching - you will see a very thin line of silver - that's the key to knowing that the solder has flowed. It does not take long with the torch. Wait about 20 seconds, quench in water, then pickle.

Drilling the holes is the most challenging part of this process. Remember the impression I made on one side of the disc? Well, I put the bead in my ring clamp (link here) for support (a vice would probably work here also .... but that would require me to move across the room to my vice) and I swipe the same round needle file over the bead to create a rounded-flat spot (I know...my wording here is bad)! This flat spot is where I will drill the first hole.

With my left hand, I brace the ring clamp against my bench pin for support and drill with my flex shaft in my right hand. I will admit - that drill bit will want to bounce. But, by bracing the ring holder in my bench pin, and my right hand with the flex shaft braced against my bench, it is do-able, I promise!

This is 20 gauge sheet - slightly on the heavy side - so the drilling will take a bit to get through the metal. I am HUGE proponent of lubricating my drill bits - I use this.

Once the hole is drilled, I mark the other side with a sharpie (I just eyeball this mark) and repeat the steps above for drilling the second hole.
Next comes finish - and this is simply how I finish my beads. I prefer to smooth the solder seam as much as possible. The image below (click to zoom) are the silicone and fiber discs that I use the most (all available from Rio Grande). The pumice disc (the green discs, bottom left of the picture) are truly the most used discs for this purpose. The pumice can even be used around gemstones when cleaning up bezels - it is safe and will not scratch! I simply place the bead back in the ring clamp and go through a series of buffing, starting with the pumice, and usually ending with the green 3M Bristle Disc silicon wheel (the grit is slight - only 1 micron).

Ready for the tumbler!

After tumbling (no patina, yet)!

These beads look so beautiful with patina added. Well, my mother has been begging for some earrings made with these beads - sans patina. She also prefers post earrings, so, she was quite happy to receive these!

Just two beads add a nice design element to a bracelet, I think.
 |
| Lampwork by Susan Kennedy of Sue Beads |
The hollow beads below are 3/4" round.
 |
| Lampwork by Judith Billig) |
The next two images feature 3 beads from the batch above - with patina - and gorgeous artisan lampwork work nuggets by GlassBeadArt.


The Giveaway
Okay - you have lasted this long...want to win these 2 hollow beads? I have already added the patina, buffed and tumbled.

Just leave a comment on this blog post - please make sure to leave your email address so that I can get in touch with the winner! Winner will be announced by my next posting!
Thanks for joining us today - go make something wonderful!
xo
Patti
65 comments:
What a wonderful post. Those beads are stunning and it is so interesting to see how you made them. The jewelry is beautiful and it is amazing how just one or two of the metal beads add such a richness to the pieces.
phandschuh@hotmail.com
Thanks for taking the mystery out. Lovely beads! Ltwichell@twcny.rr.com
Beautiful beads! Thanks so much for sharing the time and techniques you use to make these pieces of art! (kf.ahlskog@gmail.com)
Great tutorial! Nice beads! Lorimckay@msn.com
Wow that was so interesting and you get such a beautiful result! Thankyou so much for sharing with us.
Oops forgot my email address! It is seonamargaret@gmail.com
Thanks again!
Fantastic 😊 what a process! Thanks for sharing!
Mjc880@yahoo.com
Thank you to show us your process in all detail and with so many images! :)
And of course I would love to win some of your beauties ;)
saraccino [at] gmail[dot] com
*waves*
Claire
Patti, these are one on my favorite things that you make. I just love them. Thank you for sharing how you do it. Once I get my craft room back(we are making some changes and everything is moved in there) I hope to try it. Thank you also for the chance to win.
I can't wait to try these. Thanks for sharing. theresalbush70@gmail.com
Patti, Great instructions. Thank you so much for sharing - great tips. I really like that you showed how much solder paste you used. I'll have to take a crack at these! Thanks again - Michelle
thanks for sharing your craft with us. Amazing how easy you make it look. Junecrow1953@gmail.com.
Thanks for sharing your craft and talent with us. Of course I would love to win. Junecrow1953@gmail.com
Thank you for the tutorial for these lovely beads.
beadsophisticate(at)gmail(dot)com.
Thanks so much for sharing your knowledge. Want to win your beautiful beads.
Mishelly9000@sbcglobal.net
You know how much I love your work, and seeing this post shows just how much love goes into it! Really, really love these hollow beads! Thanks for the opportunity to win dear!
Shirley
sjmoore 2 3 5 at gmail.com
Great tutorial. Love the beads and the many ways you used them in jewelry. cougarridge2002 (at) yahoo (dot) com
Patti....These beads are gorgeous and I loved learning how you made them! Thank you so much for sharing your knowledge and for this opportunity to win some of your beads!
I forgot to add my email.....stephanie_mcginley@hotmail.com smh...lol
Great post! A lot of work goes into those beads. Thank you for illustrating that.
Annrishell@gmail.com
I can certainly see why your mom would want those earrings! I wouldn't mind a whole bracelet full of those beads myself. Anyway, you've convinced me I can manage something like this with my Wall Lenk...if I add that charcoal block for the extra heat and use solder paste. Thanks for those details. Drilling into a curve is another story, but one step at a time! Your explanations are inspiration enough, but winning some of the actual beads would be a real bonus.
Thank you for the tutorial! I would love to win your beads! I always love you blog - so inspirational! indiancreek410@gmail.com
Thank you so much for sharing your knowledge with us, and so clearly too. Whether or not I win your lovely beads, I feel I have learned something valuable. I've always thought of trying to work with sheet metal but have been too chicken to do so, now may be I shall. Thank you again! x
luisaheaton@gmail.com
Oh my, yes I would love to win these beads-absolutely gorgeous!
judyklarson@gmail.com
Great tutorial, you are a master. I am as always so impressed with what you do. I would love to win. kepi.rasmussen@ gmail.com
This was fascinating and very educational...thanks so much!
what a delightful tutorial. It is powerful to see how much you have mastered in the past few years. your art jewelry beautiful.
Thanks for the tutorial! ruth@ruthscott.com
Thanks for the very helpful and detailed tutorial!
Terry trcrafts@aol.com
Thank you for being so generous, both with your beads and your techniques! You make everything less intimidating!
bugrocksthehouse@gmail.com
While I may or may not ever get enough gumption to try this...I do love reading great tutorials...and this is inspiring, Patti! Love what you've created with these silver beauties as well. Thanks for the opp to win a few to try out in my creations.
Lynda
I so admire your designs, Patti, and I enjoy reading your blogs very much! This was so interesting to learn about and thanks for the opportunity to win such beautiful silver beads. (lecarling@verizon.net)
Love your metal working posts. I haven't done any yet - just stringing - but your tutorials make it seem possible. (cathrynlane@gmail.com)
they would be amazing earrings for my small tastes......
Daryl
Thank you for generously and graciously sharing your technique with us! Love all your work! Can't wait to try this! Joann@soapboxhawaii.com
Wonderful! Thank you! You have made the process sound so very easy!
Thank you for the great tutorial
Cherylannfl133@yahoo.com
Thank you for sharing such a concise tutorial. Just another thing I have been wanting to try!!!
masonb60@gmail.com
Beautiful! Thank you for sharing this tutorial! Sharon Winstine email samwinstine@yahoo.com
Thank you for sharing the great tutorial!
Mary maryredman144@gmail.com
Beautiful. I never used to understand how these were constructed. Thanks for the enlightening post
Mona
bijouxgemsjoy@gmail.com
Thank you Patti for writing this post and showing us how you make those gorgeous hollow beads! I love all of your metal work and really enjoyed seeing all the steps involved. Thanks again for sharing and for offering this giveaway. I'd love to win these beads. Wirednan13@hotmail.com
Thanks for the wonderful tutorial! This one was a delight to read! I'm going to pin to my Pinterest tutorial page too so I can find it again!
As you know, I greatly admire your metalwork, so I'd love to win your very cool beads! (Yes, me and all the others in the list!) :-)
Many thanks,
Sharyl McMillian-Nelson
Metapolies
sharylsjewelrytoo (at) gmail (dot) com
I love reading your blog posts and always learn so much! I love your hollow beads and it would be great to have a couple to wear and use to refer to when making my own. Thanks! Sharlyngp@yahoo.com
Amazing beads and so much work involved for such little beads!
Your work just takes my breath away. You are so talented and it is just so kind of you to share your process of how plain metal is magically changed to lovely works of art! You design such beautiful art jewelry and I would be so delighted to be gifted these amazing beads.
I am so very grateful that there are patient artisans like you who take the time to create these little wonders!
Great post! Thank you for the wonderful tutorial and lovely give-a-way, Patti! You make this look fun and easy, even for me who feels 'flame/flux-challenged'! Your beads and finished jewelry are always so beautiful and I truly enjoy seeing your process here on your blog. My hope is I will one day get past my 'fear of mistakes' and start experimenting a bit more, and when I do, you can bet I will be coming back to your posts which I have book marked. :-) (Shel@asicj.com)
Always something to learn thank you so much for taking the time to educate us....
Very nice tutorial. Thank you
So very kind of you to share your knowledge...thank you!!!
Lori
lackerman@cba401k.com
Beautiful and well done tutorial.
flowergurl4eva@gmail.com
Thank you for the tutorial. I hope to try it out soon. I would love to win your beads to use for new earrings. Kathy baymoondesign@gmail.com
Love your tutorial, can't wait to try. Your gorgeous beads add so much personality to a piece! Whoever wins will have loads of fun designing something special with them.
Carol Bartraw
Pliccb@gmail.com
Your beads are lovely and you make it look so easy!
Susan
susanatsandenodotcom
Whenever I see posts like this, I am amazed anew at all the work and care that goes into handmade. I wish everyone could see this to appreciate it more! I love your beads!! Thanks for the chance to win.
What an incredible amount of work to make one bead. Now I understand why they are so pricey , not just the cost of the silver but all that hand labour. I don't know if i'd have the courage to tackle such a task. but i do love watching you demonstrate the process.
thanks for the opportunity to win a pair of these beautiful beads.
deb4tin at gmail dot com
Besides thinking OMG these are pretty, I kept thinking OMG these are a LOT of work, these take a LOT of time. Never mind that as a bead weaver I can spend 40+ hours making a single piece. Perspective counts.
Fabulous, like all your work! Your mother's earrings are super-fab too! Kim
Those beads are absolutely gorgeous! They would look wonderful with anything! You did a fantastic job!
Amazing Patti! They are beautiful, as are all your creations. I especially appreciate the extra detailed info on polishing! Love to see the magic! goldkissesart@hotmail.com
Oh wow, I would love to win thoose beautiful beads ! I could use them in the viking knitting necklace I make. Also: Thank you for the tutorial!
yh@telia.com
Thanx for sharing your tutorial. I would feel honored to own some of your beautiful metalwork Patti.
It would indeed be an honor to have a pair of your amazing beads. beadcontagion.blogspot.com
Patti,
Loved your post. Hope I am not too late for the giveaway. Would love to win some of your beads.
Carolyn
Carolynscreations@live.com
Post a Comment