Showing posts with label letter stamps. Show all posts

Wednesday, November 2, 2016

the evolution of metal stamps

mary jane dodd

mj dodd 2016 

tools seem to be constantly evolving for jewelers - there is much craft involved in each step of the process. one can buy things that are made or learn to make it themselves. 

one of the things you need to ask yourself is what your vision for your work is. with more and more variety in stamps, you can differentiate your work from that of other sellers. this was very difficult to do even a couple of years ago. there were a rather limited number of design stamps and the alphabet stamps were even more restricted. 

i use both alphabet and design stamps in my work. this post is going to cover alphabet stamps only. i'll do design stamps next time. design stamps are in a really interesting phase. they are being made by individuals out of rebar, nails, any steel base. and they are made one at a time. 

there are alphabet/letter stamps available that range from economy, to mass produced designer fonts, to sets that are custom made. i have some of each. economy sets tend to be a basic font but are great to have. 
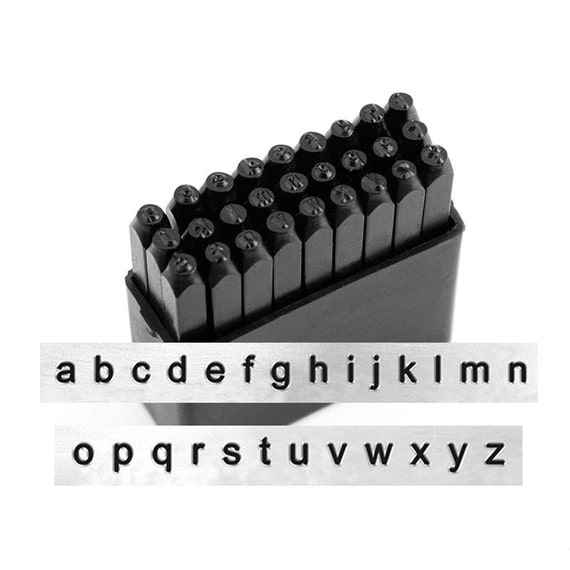
impressart and beadsmith have started putting together sets with less basic fonts and at a higher quality than an economy set. here's a set from the website beaducation called lucida. a set is usually sold as upper or lower case.  


i have an alphabet set that is custom made. to get this, i had to first purchase the rights to the font in order to have it made by infinity stamps. a very helpful company that puts out a great product. 


the choices of sizes of stamps is growing as well. the standard is about 3-4mm. but there are sets that are smaller and larger. beaducation even sells single letters if you don't want to commit to a whole set. 

if you want numbers, you will have to buy them separately. the impressart line offers coordinating number and alphabet sets. take juniper, for example. 


they are even starting to add little decorative stamps in the sets. 

i can get expensive quickly when you start to invest in these tools, so you want to take some time to look at the different fonts available to you. in etsy, i use 'alphabet metal stamps' in the search bar to find them. 

to do the stamping itself, you need a brass head hammer and a steel bench block or anvil. personally, i like using an anvil. there are lots of fancy new gadgets to hold the stamps for you. made to protect your fingers (which i understand) i find they get in the way of my seeing the piece of metal i'm working on. instead, i use gorilla grip gloves for control. they are very lightweight and indispensable for keeping the stamps from slipping.


learn on copper - and try to work on 20-22 gauge. thinner metal limits the depth of the impression. look at how clean these letters look on 20 gauge copper.


like any other technique, it's a learning process. the more you practice, the better your impressions will become. 


Thursday, March 28, 2013

Textured Wire Sprial Donut Connector

by Staci L. Smith

Here is just a little something you can make with your new textures- using the alphabet stamps again, combined with Stacie F's texturing wire post.
 
Take 6-8" of 12 gauge copper wire.  Spiral it into a coil, but leave a big open middle to create a sort of donut.
 
With a chasing hammer, hammer it to flatten the surface.
 
 
Then use the ball end of your chasing hammer to flatten the ends a little more.
 
 
Then I took my letter x, the period, and the letter I to make patterns on the wire.  I stamped them just like I would on sheet metal, it was just a little trickier to line them up.  Then I used my chasing hammer to flatten the wire again.
 
 
Add some liver of sulfur and polish off the high spots, and voila!  A wire textured spiral donut.


It is fun, and very sturdy, and it can be used as a pendant or a connector.
 
Hope to see what you have been playing with at our blog hop April 8th.

Monday, March 18, 2013

Boot Camp: Alpha-Texture

by Staci L. Smith

I think that when people decide to try out metal stamping, the first thing they buy is a set of letters.  I know I did.   I got this very basic set ages ago. It's capital letters, and numbers and a few symbols.  I didn't use it very much for letters though.  I'd like to share with you some of my favorite ways to use my letter to make patterns and textures on metal.  Remember- using letters as letters is NOT part of this challenge.

Here are my stamps, very basic.  I think I got these at Cool Tools many years ago.


Here is the hammer I like to use for stamping.  It's shorter, which gives me good control, (I hit my finger a lot less) its heavy, and its cheap, so I don't care if it gets marred from striking the steel stamps.  I got this one from Melinda Orr of Orrtec.


I took some discs I had lying around, they are made from about 24 gauge copper sheet.  Then I took my capital letter I.  In this simple set, it is just a straight line, and I use it a lot!


I hammered it over and over in some random patterns to create a sort of trail across my disc.


Then I took my letter O.


And I filled in the gaps, randomly changing the direction of the O so it gave it more natural look.


So using two letters, I created a kinda modern organic pattern on my metal.
 
Now we will get fancy. You can use a whole bunch of letters to make a really cool Boho like pattern.
 
I started with the period. I love using this as a dot texture.  I stamped it around the entire outside of my disc.
 

Then I did the same thing using my S going side-ways.  For the next inner ring I used the letter W.


After the W's were done, I took my letter X and stamped it, turned it on its side, and stamped it again in the same spot, to create these little star bursts in the center of the disc.


I thought I would show you one more thing I love to use as texture.  It's not an alphabet stamp, its my awl.  It's just a steel awl from the hardware store, sharp point on one end.  I use it with a rubber block, ILO a steel block to get the effect I want.
 
 
I hammer it hard into the metal (a brass strip this time).  It will curl as you do this, and that is fine. 
 
 
Then you can take your rawhide or rubber mallet and hammer it gently flat on a steel block.
 
 
I like it for the reverse side texture, with the bumps sticking up.  Sometimes I even break through the metal on purpose to create a rustic torn up effect.
 
Here they are, all done, I used Liver of Sulfur to antique the copper discs and then cleaned it off the high points.  It really brings out the textures that way.


If you didn't get to see Barb's post and video from last week you can view it here.
 
The blog hop will be on April 8th- so get those creative juices flowing.  Remember, we hope you will not only try to hand texture metal, but then, use it in a design, be creative with it.  Let's inspire each other!
 

face
Related Posts Plugin for WordPress, Blogger...