Showing posts with label festivals. Show all posts

Wednesday, September 16, 2015

Redneck Air Conditioner for Craft Fairs and Festivals

Carol Dekle-Foss
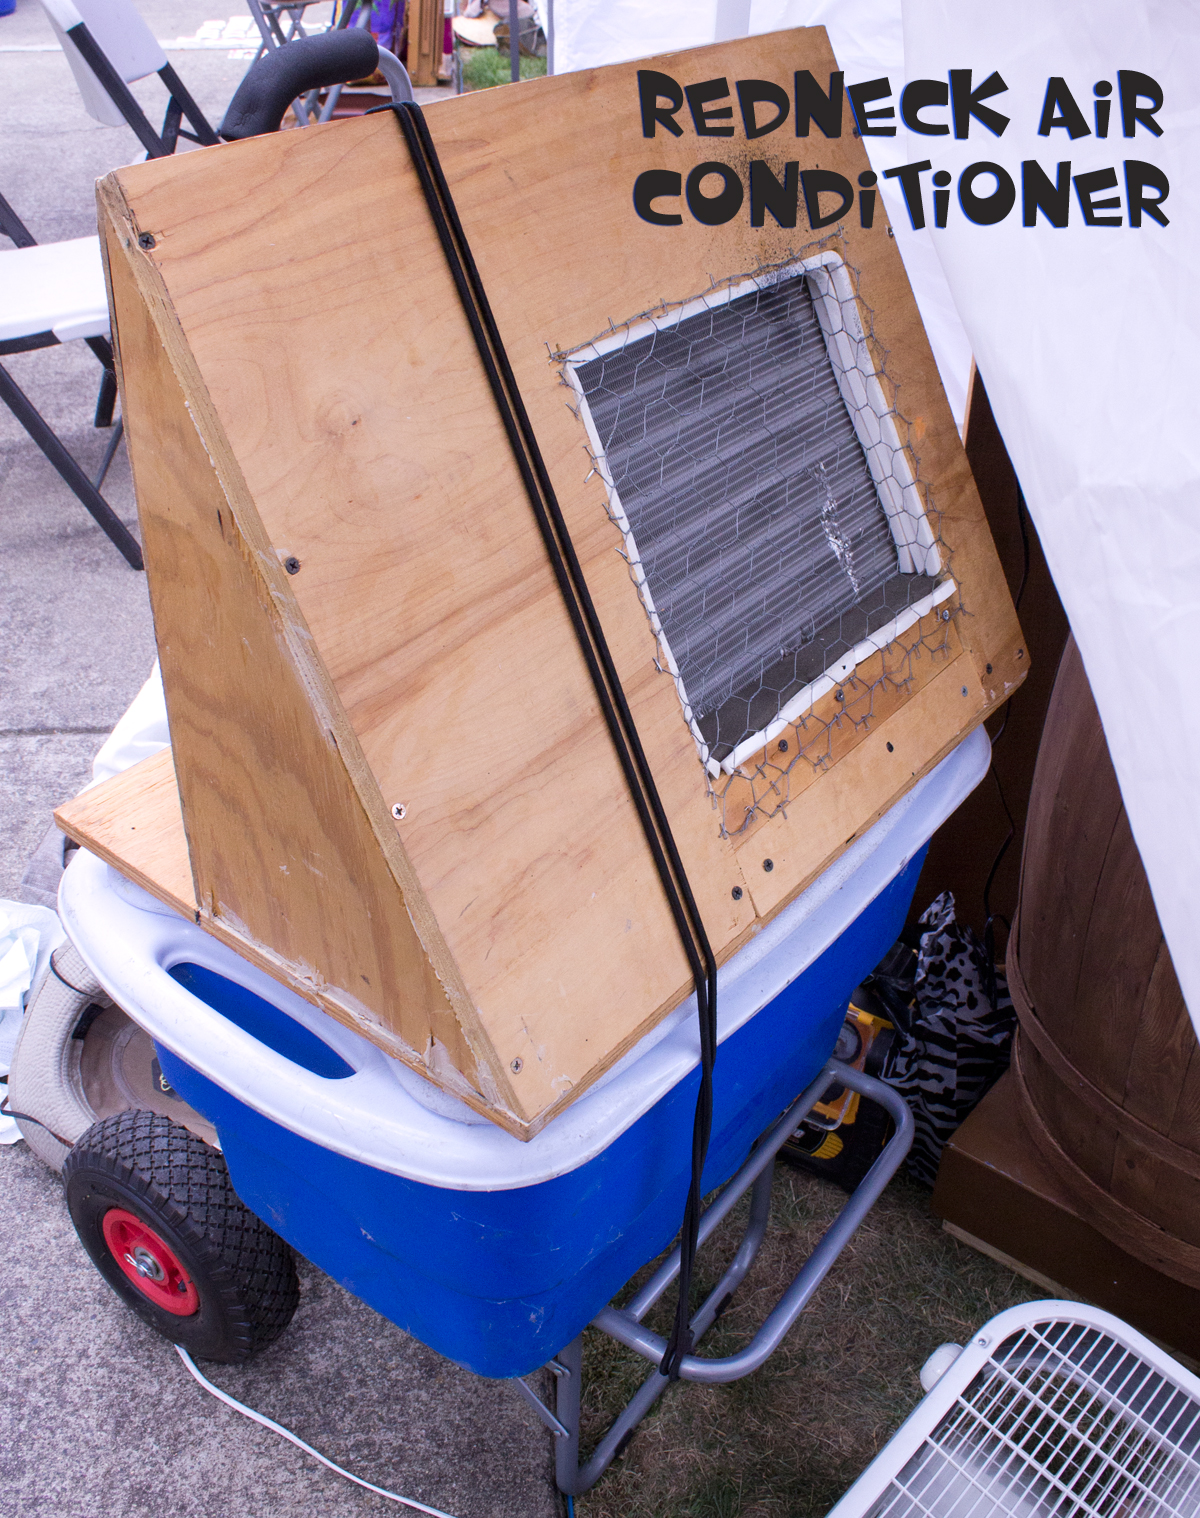
Hello everyone! For my very first post back in June of 2014 I promised I would share our crazy but fabulous handmade air conditioner, and here it is! I had scoured the internet looking for ways to keep cool during craft fairs and ran into the idea of making your own air conditioner. 
 My husband and I built it together using these genius instructions. There are TONS of tutorials out there on how to make them, but this guy beats them all with a built-in radiator!

Craft fairs and festivals can be challenging because you never know what the weather will bring. Torrential downpours, gusty winds, snowstorms, and even hot weather will clear out even the best of events. We try to combat the weather by using propane heaters for the cold and this air conditioner for the heat. It gets the customers attention and is a nice ice breaker. Also, it makes our tent cooler, so customers want to stay and shop longer! It also keeps my husband and I from passing out of heat stroke.

We just plug in the bilge pump and fan, add tons of ice and it lasts for a good couple of hours. Down the road we plan on investing in a heavy duty battery so we will be able to run all our gadgets and doohickeys without having to buy electricity.

So there you have it, our redneck air conditioner. I love it! So how do you combat the elements during outdoor craft fairs and festivals? I would love to hear your ideas!

Wednesday, October 15, 2014

Earrings, earrings, earrings...DISPLAY!

Carol Dekle-Foss 
What's your biggest seller? For me it's earrings. I try to have as much on display as possible when selling at craft fairs or festivals. I created the three displays pictured below all from recycled materials. They hold a TON of earrings for me. Do you have any picture frames laying around that you can refurbish? 

The cork board was already in this pretty frame when I bought it, but you can purchase cork board from craft stores and add it to your frames. All I did was hot glue burlap to the board and trim it with fabric lace. 
I love how easy it is to hang and remove the ear wires through the stitches in the burlap. I kept the center as the cork board so I could use the decorative rose pins to hang necklaces. 

When I purchased this frame, it already came with the chicken wire. I just stapled the back with some light colored fabric to make the earrings stand out more. 

I  painted two of the frames so there would be continuity in my booth. I used all the metallic glazes pictured below to highlight different areas of the frames for contrast.

You can hang your picture frames, use picture frame stands or simply prop them up. 

So what do you sell the most of and how do you display your creations to attract customers? I would love to hear from you!

Wednesday, August 20, 2014

My latest booth project & theft prevention tips

 Carol Dekle-Foss

With the luxurious days of summer coming to an end and the cool breezes of fall fast approaching, everyone seems to be in a hurried rush. Last minute road trips are being taken, school clothes and supplies are being bought, and for some, preparation is being done for upcoming fairs and festivals. Here on LMAJ, our very own Marsha Neal and Staci Louise Smith have been prepping for Bead Fest Philadelphia. It starts today and ends on August 24th, 2014. This is a huge event with over 200 workshops and more than 350 vendors.

Staci will be teaching tomorrow on how to make these Painted Polymer Fossil Talismans. We are so proud of you Staci! Good luck to you both!


I also have been prepping. The largest event for me right now is the American River Music Festival. I'm busy checking inventory, making new jewelry, and getting my booth ready.

This year, I have created pieces that are more expensive using gems and sterling silver. This has presented a challenge. I want to be able to have these items on display but I worry about theft. Some of them took me over two days to make. I poured my heart and soul into these creations. If one of them were to get stolen, well I would be crushed. Last year at the American River Music Festival, my booth neighbor left all his items in his tent overnight. They have security but the event is right next to a busy road. Someone got into his booth and stole an untold amount of jewelry, rock gems and fossils he collected from all over the world. It was awful, and he was in tears all the next day. There are those that target craft fairs for an easy buck, but if we are diligent, we can do things to protect our wares. The reality is though, there is nothing you can do to stop all theft.

Having a locked display case is the number one effective way to stop thieves, so here is my latest project to prevent some of my pieces from falling into the wrong hands.
The wine barrel, locking Plexiglas box and base were individual items that my husband brought home from work. His company throws away used advertising displays. The box was silver, the wine barrel unfinished, and the base was blue. All had company logos that I had to sand off.  I then painted, distressed and finished everything and put it together as a locking jewelry display case.
I think it's important to have jewelry out on display for everyone to touch and try on, but having at least one case is a good idea for those expensive creations.

Here's a little tutorial on how I made the logo. 
First, I created the image on Photoshop, then transferred it to the Silhouette cutter which did all the work cutting out the card stock. You could also cut your logo out with an exact o knife. 
I then taped the logo to the barrel and just eyeballed the placement.

I traced the edges of the logo with a permanent sharpie.
I then used this wood burning tool to burn in the logo. Wood burning is definitely NOT my cup of tea. I burned myself once. Only the whole tip of my finger, to which the skin is now peeling off. Just painting the logo is a painless alternative!
Here is the finished detail. 

Another way to protect your profits is to hide and secure down your cash box. This table is always in the back of my booth. It's tall enough for me to stand at when working and it has a hidden area. I keep a  director's chair in front of it as well so it's not easily accessible. 

This crazy contraption is under the cloth. I couldn't find a tall table with a storage area, so I made one! The cash box is screwed down and secure. The only way it's coming off is with a crow bar. I do wear an apron for small bills but when the traffic dies down, I add the larger ones to the box. 


Here are a few more tips for preventing theft.
  • Greet every customer that comes in your booth, this will make customers feel welcome and also deter thieves. 
  • Have a helper. This will allow you to take much needed breaks and also your helper will be able to greet and keep an eye on things.
  • Booth setup. Creating height is great for display. The only problem is if you are behind your high display, it will be hard to see people's hands and what they are touching. When designing your booth setup, just make sure there are no blind spots, and that you can see all that is going on.
  • Secure your items. Clips and pins are a great way to deter thieves because they have to undo them first, and run the risk of being caught.
I would like to hear about any special tricks you use to protect your jewelry or beads at fairs & festivals. Please feel free to share!

So what have you been doing to take advantage of the last days of summer? Do you have any rituals that you do to celebrate the changing of the seasons? I like to visit the coast before it gets too cold, it's very therapeutic and rejuvenating, plus its a great way to get out of the heat!

Wednesday, June 18, 2014

The art of selling at craft fairs & festivals

"For every sale you miss because you’re too enthusiastic, you will miss a hundred because you’re not enthusiastic enough." -Zig Ziglar

With craft fairs and festivals well under way, I wanted to share with you some of the techniques I use to be successful.

There are benefits to both selling online and selling at craft fairs. What I like about selling online is I can still be productive in the studio. Also there is a broader customer base one can reach online.  Craft fairs can be challenging but they provide the greatest opportunity to really connect with a customer and get good feedback on your product and booth display. I wanted to create a post to address the challenges of selling at craft fairs and how to overcome them. There is great potential for profit and building a strong customer base if the right steps are taken. 

Working straight commission for eight years, I learned some very savvy lessons on selling and now want to pass them on to the LMAJ readers.  I am also providing a printout HERE that you can take with you to craft fairs as a reference if you like.


Carol's Tips for selling at Craft Fairs and Festivals
  1. FIRST APPROACH  Say hello to EVERY customer that comes in your booth within at least 5 seconds. Then let them briefly look before your second approach. By doing this you are letting the customer scan your merchandise to see if it is their style. Some will walk right out, and that is fine, not all customers will be attracted to your particular style. 
  2. SECOND APPROACH  Remember craft fairs move very fast, and if you still have a customer in your booth for more than a minute or two then you have their attention. Walk up to the customer and engage them in a genuine way. Each customer has their unique buying style. Some like to be left alone and choose what they want on their own, and some like you to walk them through every step and help them select pieces. To gauge what type the customer is you can say something like, "please let me know if you have any questions" to see how they respond. Or if you can read the customer and they are sending you non-verbal buying signals then try an open ended question like "are you looking for something for yourself or a gift?  At my last festival a customer actually asked me to "tell her my story". I was more than happy to 'help' her see the value in what I was selling and she ended up buying 2 pieces.
  3. KNOW HOW TO CLOSE THE DEAL Don't be afraid to ask for the sale. Not all customers are going to throw you money. Although it's nice when they do! If you feel a customer is ready to buy, you can say something like "just so you know, I also take credit cards" or "those earrings will look very nice on you! Would you like to get those today?" Or "were you thinking of getting that necklace to go with your dress?" Be genuine and don't be afraid to ask for the sale.
  4. HAVE AN EMAIL SIGN-UP SHEET  Keep a decorative notebook with a cute pen or pencil asking for customers to sign up for your email list. If you want even more emails, you can offer a giveaway. When a customer is buying I ask them if they would like to be on my email list. Gathering emails is great for future marketing techniques. 
  5. CHOOSE EVENTS WISELY  Visit craft fairs and festivals to see if they are events that fit your style. Check out the customers to make sure they are your target market and also you can ask the vendors what their opinions are on the event. Keep in mind the cost's that you will incur, such as fee's, travel expenses and any other overhead to determine if it will be profitable for you.
  6. THE RIGHT PRICES Offer a range of price points to attract a variety of customers. I always have a clearance bin where items are marked down around 25%. On some items I will do a "buy one get another 50% off (lesser price item)". Some items are not on sale at all because they are new or some of my best sellers and I don't want to mark them down. There are some customers who are sale oriented and then some that want to purchase the very best pieces you have at retail. By having a variety of prices you are opening yourself up to more buyers and more sales.
  7. DESIGN A BOOTH DISPLAY THAT DRAWS CUSTOMERS IN  Create a booth that is appealing, uncluttered and easy to see your products.
     Make sure you have signs that are visible from the outside and easy to read. You want the customer to be able to know right away what you offer. Visible prices are also very important as well. Here is my booth set-up with a cedar wall that is to the right. It creates a vertical line that attracts customers right away. I plan on doing a post soon on how we built it. You can see it on my blog.
  8. CREATE A NICHE TO STAND OUT If you create a product the customer has not seen before, then they are more likely to stop and take a look. 
There you have it! I know this isn't the most interesting topic but since I just finished a festival these thoughts were fresh on my mind.  So tell me, what techniques work for you at craft fairs? I would love to hear your thoughts!

Thank you to all who commented on the giveaway and also made me feel welcome. Now for the results!!!! Here is a screenshot with all the names entered on random.org.  Stacie Florer, congratulations!!! I will contact you soon for your address!
face
Related Posts Plugin for WordPress, Blogger...