Showing posts with label clasps. Show all posts

Wednesday, August 14, 2013

Boot Camp Clasp Round Up

In case you missed it, Monday was our Boot Camp Blog Hop for our current topic, Securing the Perimeter AKA CLASPS! There's still time to hop on board because of this busy time of last minute summer/ back-to-school! We've extended the hop to add your links through Friday, so if you thought you missed it, be sure to add your blog link here!


There's been some lovely and really insight-FULL posts on clasps this time around, so I thought I would go back and give everyone an overview!


Copper Tube Clasp - Boot Camp Tutorial -Mary Ann starts off our bootcamp with a great tutorial on forming a clasp using copper tubing as a closure!

Adventures in making a new clasp design....  -Stacie Florer challenges finds inspiration in some forms around her home to come up with a new and unique clasp.

Clasps: Practical, Pretty or both? -Staci Smith shares her inspiration and her tips for finding your go-to clasp.

boot camp - button & fiber closures - Mary Jane gives her tips and suggestions for making beautiful and strong button closures.

Twisted, Crusty Toggle -Kelli shares a beautiful and pataina-ed tutorial for a handmade toggle.

Boot Camp: Tackling the Toggle  -Staci Smith shares how to make a beautiful wire toggle clasp

Clasp Tutorials & How to work a clasp into your Design. -Genea shows off some of the lovely clasps made by LMAJ members and around the interwebs and her tips for incorporating them into a necklace design artfully. 

Finding Closure
Carol shows us how to beautifully bead woven clasps can effortlessly become part of a design and even enhance the final piece.

Boot Camp: Securing the Perimeter aka: clasps -We start off boot camp by showing a oldie but goody of a standard wire wrapped clasp tutorial by Kelli.

Art Jewelry Boot Camp: Clasps that identify -Barbara shares her signature clasp and how she changes it up while maintaining a signature style.

Book Review: The Missing Link: by Cindy Wimmer -Stacie Florer reviews Cindy Wimmer's forthcoming book on links and shares how useful it could be in transforming some of the ideas into clasps!


Monday, August 5, 2013

Art Jewelry Boot Camp: Clasps that identify

by Barbara Bechtel
Once you become comfortable making clasps you may find yourself returning to your favorite, time after time. It can become synonymous with your work, with people identifying your pieces through the way you construct and finish your pieces.


My favorite and most often used type of clasp.


Because the clasp is usually the last piece added, although you may have planned the piece out in its entirety, the clasp is usually the finishing touch becoming the signature, much as a painter signs his piece at its completion.

Adding different closures with a standard clasp can help you switch up the look while still maintaining a signature style.


Many artists sign their work with a personalized tag or hallmark when their finished and often this is found near the clasp. Your signature can even become part of the toggle. I often do this when I use a button type clasp or toggle where I have more room for stamping.

I often combine this clasp with signed buttons as a secure hook for bracelets and necklaces.


When used with leather, this signed button closure adds a finished look to even simple bracelets.

Next MONDAY is our BLOG HOP and we can't to see what types of clasps you've been creating! Make sure to come back next week to join in on the fun!

Monday, July 29, 2013

boot camp - button & fiber closures

mary jane dodd


button closures are often used with fibers, where you create your loop on one end and secure the button on the other using overhand knots.
sounds simple and is.
but there are things to think about.

consider the fibers or materials you are using - 
will they hold up to the wear of passing a button through it over and over?
i tend to use non-metal buttons with fibers,
but feel perfectly comfortable using metals with leather or heavier cotton cording (2mm or so). 

look for strands that can catch or make closing your piece of jewelry difficult. threads and fibers can fray and split. 

i find that wrapping the loop with a finer thread (think embroidery floss weight) adds strength and durability. waxed irish linen thread is particularly durable. 

create a loop that is neither too loose nor too tight. 
you want your button to pass through relatively easily but without so much play that it will slip out of the loop.


i often use e-6000 adhesive to secure knots.


i will also opt for braiding the section of fibers that serve as my loop. again, adding strength but also compacting the fibers to reduce the risk of catching and fraying. 

buttons can add a really beautiful bit of detailing to your work. and the choices are great - vintage, natural materials and handmade abound on etsy. 

long necklaces are quite popular, but it is nice to have the option of adjusting them. i wanted to share a video with you that teaches how to make a secure sliding knot by kate drew-wilkinson. i use this knot with leathers and cotton cording as well.

thank you for joining us here at love my art jewelry - 
we're looking forward to seeing what you teach us in this boot camp!


Monday, July 15, 2013

Boot Camp: Tackling the Toggle

by Staci Louise Smith

The first fancy clasp I fell in love with was the toggle clasp.  They came in pretty designs, fun shapes, and all sizes.  I used to page through my Fire Mountain Gems catalog (lol, my first source of bead supplies) and drool at the ones that had stones set in them.
 
I could not afford the pretty ones early on.  So, I did what all poor jewelry designers do, I made some.  At the time I had NO metal or wire skills.....I mean NONE.
 
So I took the gemstone donuts I loved, and used a stick pearl, and made it into a toggle- in the front of the necklace.
 
I wish I had a picture of them.  You would laugh, it was genius, yes, but my execution...wellllllll...............
 
Anyhow, fast forward, and its still a good idea.  You can make a toggle clasp out of most anything with a hole.  And I still like the look of stick pearls.
 
I used a pearl for the toggle on this Moon Necklace of mine.


There is a challenge in finding just the right size bead to make this work. 
 
However, if you are handy at all with wire, or even if you just know the basics, you can make your own toggle, just the right size, to fit anything.
 
This is a typical Staci tutorial, as it has no measurements in it- I wing it was needed.  Also, please don't mind the dirty fingers...I used oxidized wire, its messy.
 
To make the toggle bar, cut a piece of wire, I used 16g for this be highly recommend 14g- or even 12g!!  Make it about 2" larger then the diameter of your toggle....always over judge NOW, cause if its too small you have to start all over.
 
Take your round nose pliers and place them in the center, and make a loop
 
hammer the loop
 
hammer the bars flat
 
It is ok at this point if the size is off.
 
To size it, place it through your toggle, and move the center loop of your toggle bar to the far side of the toggle.  You want to do this at the widest part.  This is to figure out how long to make it so it doesn't fall though.  You want the bar to go over the edge enough to hold, but not so much it will be TOO big and annoying to the wearer.  Though it is always better for it too be too big then too small.  Trim the wire.  Repeat on the other side.
 
 
Hammer and file the ends (you don't want it to poke people!).  Voila!  You made a toggle bar.
 
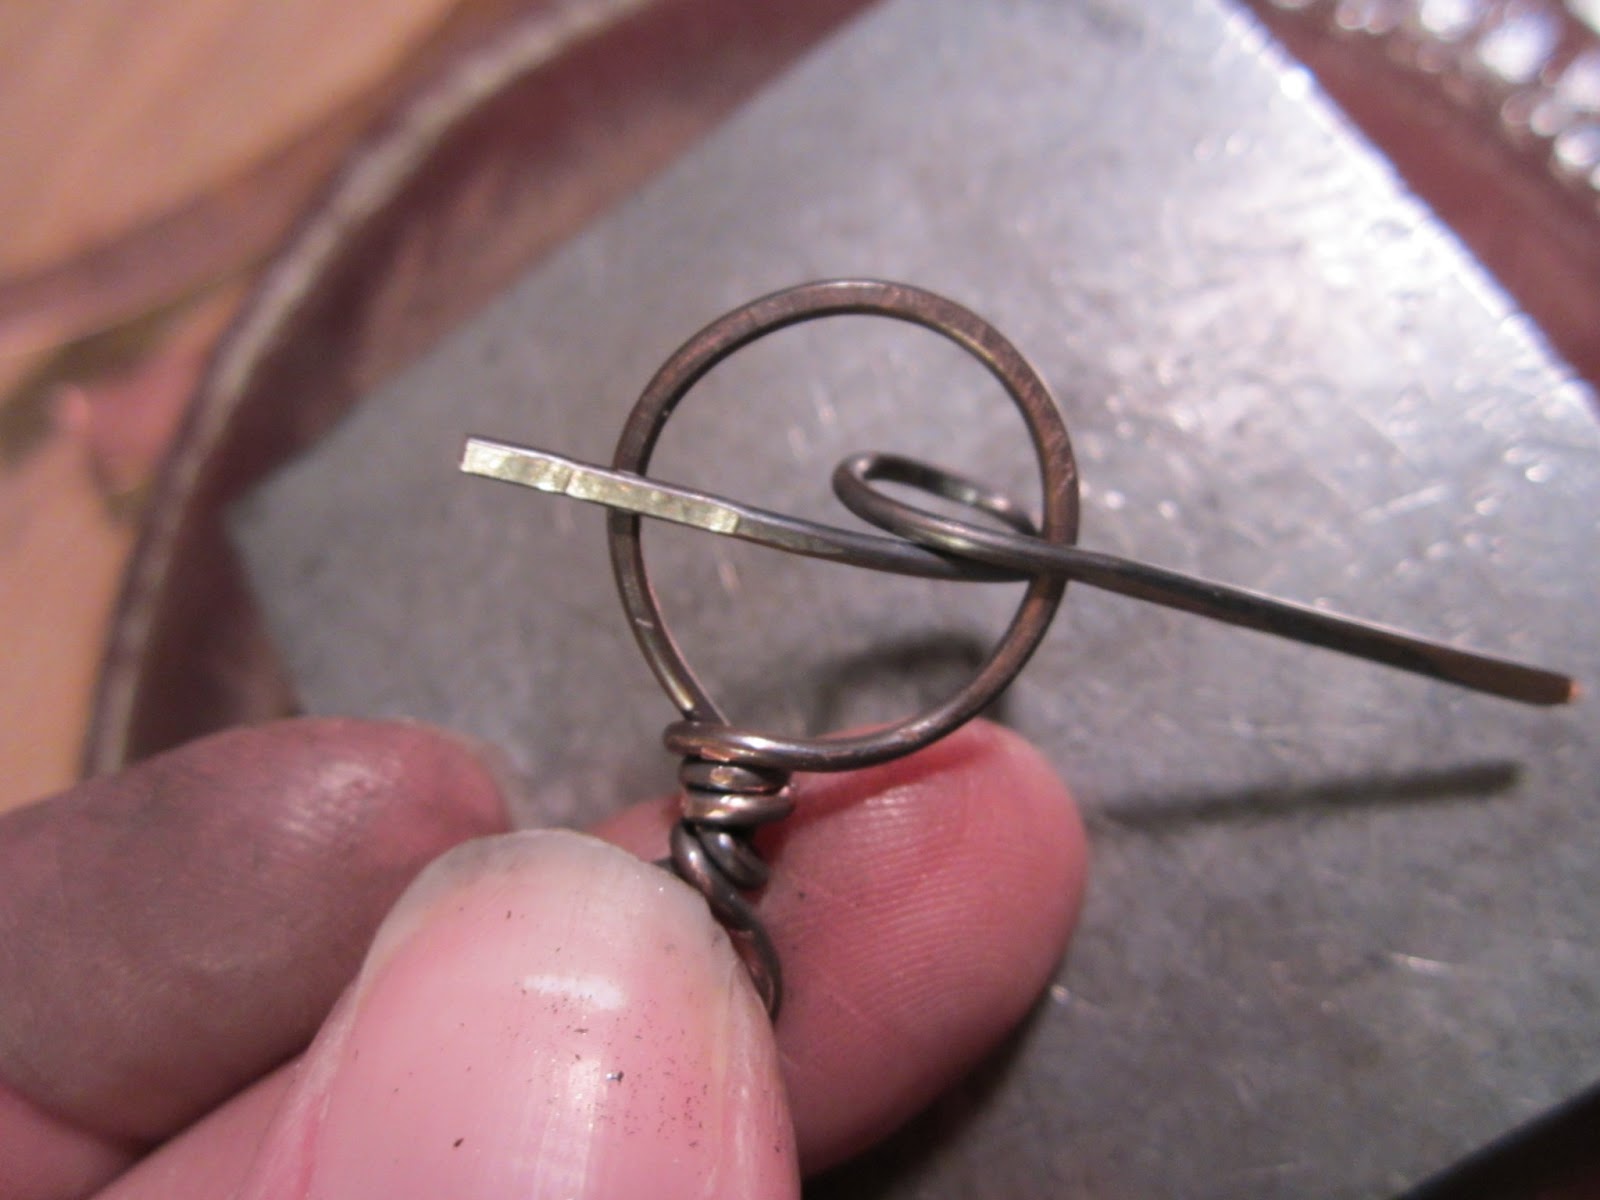
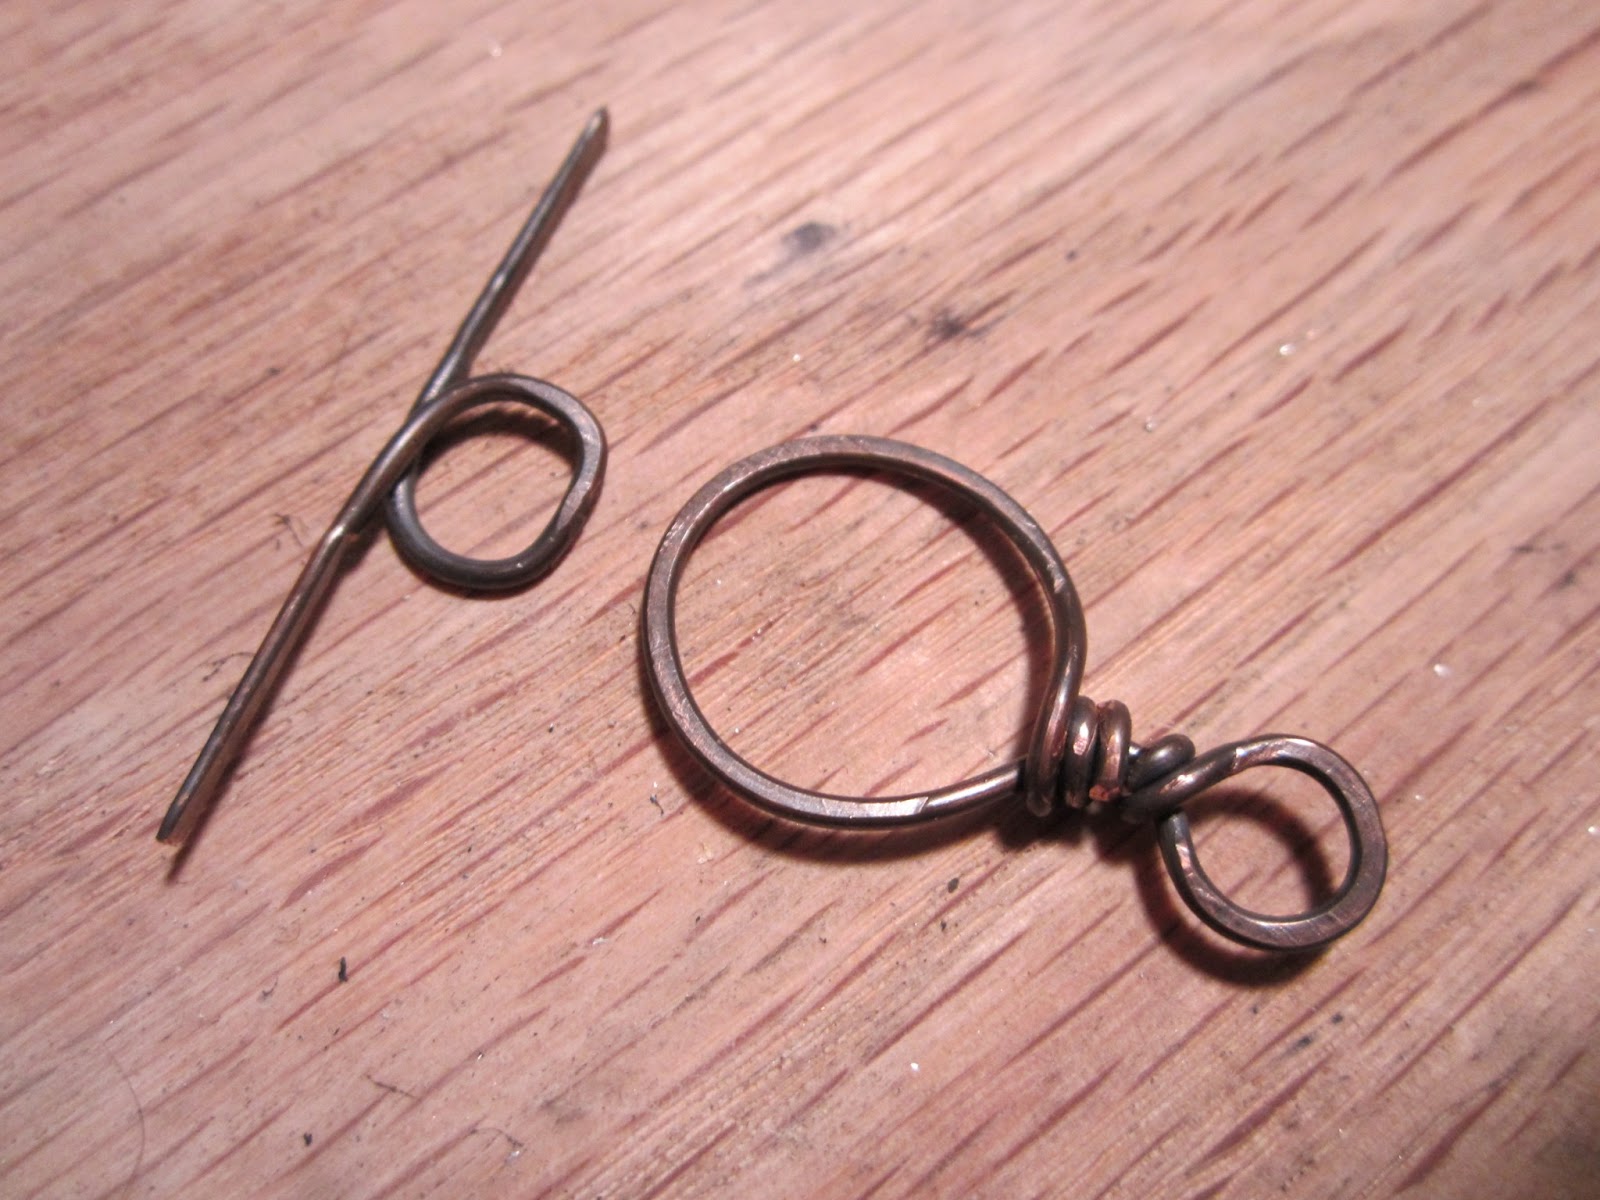
To finish your project, you can make the toggle out of wire too.
 
Cut a long piece of wire, make a small loop at one end
 
 
Make a larger loop with a ring mandrel
 
Wrap end to connect and hammer


Now you have endless possibilities for toggles!!!!
 
I highly recommend wearing every piece you create with a toggle for a little bit, to make sure it stays put.  Personally, I find them tricky to get just right. 
 
Now go and Tackle some Toggles!!!!


Thursday, July 11, 2013

Clasps: Practical, Pretty or both?

by Staci L. Smith

I will admit, I always went for secure and practical in my designs for the majority of my jewelry making career.  I used lobster and spring ring clasps with chain on the other side- so that I had a secure and adjustable (practical) closure to my jewelry.
 
Here is what I didn't like about that.  First of all, I didn't make the clasp, and sometimes, they broke. 
 
Second, it was not the punctuation I desired at the end of the sentence, er um, necklace. 
 
Cindy Wimmers "S" clasp tutorial changed my life.  Literally.
 
I was now able to make an "S" clasp, that was pretty, matched my style, and could still make the piece adjustable. 
 
I highly recommend checking it out.  And the nice part of these, are you can put your own spin on them.


Here are a few things I have learned about S clasps.  First of all, PLEASE do not make them too flimsy.  I recommend using nothing below 16g.  16g can even be used to make smaller size clasps....for my big ones, I use 14g, and I still hammer it to work harden it.  There is nothing worse then a clasp that can be pulled open.
 
Another thing I learned, was that using these on bracelets, which I saw everyone doing, so I did it too, doesn't always work.  Now, I make my bracelets adjustable but putting chain on the opposite side, allowing people to fasten it at just the perfect length.  However, if it is not fastened tight enough, it will slip out and fall off.  In order to fix that, I went from make S clasps with the rounder top like Cindy's to these (for bracelets).
 
 
These have a longer hook, so that the chain has to travel pretty far back to come undone.  They have been working wonderful!!!!
 

So now you can make an easy practical clasp, but what about making it pretty?  Well, I really love how Nikki of Love Root made her S clasp to fit the design of her necklace in this piece (I think Nikki made it anyway)
 
NOTE:  clasp below is by Gail Cormier of Supply you Soul- thanks for that info Nikki!


Use your Wire Work Boot Camp knowledge and carry it into your clasp making- I know you guys can rock this Boot Camp!  So once you master making clasps, or if you already have, lets see how creative we can be in making them fit our designs.


Monday, July 1, 2013

Boot Camp: Securing the Perimeter aka: clasps

And we are off to Boot Camp again!!! This time we will be sharing the many ways that we can find closure. The whole idea of "closure" in our jewelry designs lends itself to being very concise, complete and, in other words, "done."

That last step, however, just might be one of the most important ones. To head off this boot camp, we have chosen to do a rerun post by Kelli Pope that was written in 2010. Hopefully, this will get your nuerons charged and we will have LOTS of fun ideas to share at the end of this boot camp!

Remember, the best way to share with everyone is to have a blog. Even if you are not a blogger, why not set up a simple blog for boot camp. If not, there are other ways to share your creations like Flickr. That's what our friend and follower Erika Atkinson chose to do for our last wire work boot camp

So, without further ado, let me share with you the rerun written by Kelli:

After years of trying to find unique closures, or simply buying mass produced toggles or lobster claws, I decided it was time to make them myself. It was something I'd always wanted to do. (In fact, it is still my goal to make each and every component in each and every design. Luckily, until that time comes, I have found some INCREDIBLY talented artists I can purchase handmade pieces from, that still make my designs unique.) What finally made up my mind was a judge at an art show. I've worked for years to climb that art show ladder, applying and jurying to bigger and better shows each year. One particular show I'd finally gotten into a few years ago awarded prizes for best in show, most unique, etc. A judge was appointed to each category and came around and viewed your booth. When the judge reached my booth, she pointed to one of my necklaces, and asked if I had made the closure. "No." I had to say, crushed. She looked at another piece, and pointed to that closure, and asked again. "No, but........" She wasn't interested in my "buts", or what was unique and handmade about my pieces. That did it for me. I started out by making hooks to finish my pieces. And it was SO easy!!!!! Follow along, and I'll show you how.
I used 16g copper for this one, but you can choose your wire.


Pull out your tools of choice

Start by making a simple loop around your pliers.

Then bend into a hook shape, and cut your wire just below the loop on the opposite side. Use your pliers to make another smaller loop to the end.
Voila!!! You have a hook!

For strength, I hammer mine. Plus, I just like the hammered look :)

You can hook it into a jump ring,
a hammered ring, as above, or make your own link, to complete
the closure.


To make your own link, start with a simple wrapped loop,
add a bead of choice, and create a larger wrapped loop on the other side.


When I started making my own closures, it added a special touch to each
piece, gave me a sense of accomplishment AND made for much happier endings...........
pun intended :o)
face
Related Posts Plugin for WordPress, Blogger...