Showing posts with label handmade artisan jewelry. Show all posts

Thursday, January 7, 2016

Exotic Elephant

by Sherri Stokey

It's finished!  Remember last week when I was showing you the palette I built around Staci's elephant pendant?  The post is here in case you missed it - or better yet,  I'll refresh your memory:


After a bit of trial and error, I'm pretty happy with the results!


I made long skinny beaded macrame straps and then attached them to the pendant with ceramic beads in sloppy wire wraps for an extra pop of color.  It feels very bohemian.


I love taking inspiration from art beads (or pendants!).  Or taking inspiration from another artist's inspiration, if you think about it!  Has anyone inspired you lately?

Friday, October 25, 2013

I'm Homeless--Virtually By Karen McGovern

Sorry, this is going to be a bit of a serious post, but I'll throw in some photos of pretty jewelry, art and stuff to make it bearable...
 
If you follow me on Facebook or on my blog, you know that recently I made the decision to close my Etsy shop until further notice.  I've been an Etsy seller for over seven years.  I'm sure you have seen the news, it's all over the Internet, how Etsy has gone from a handmade market place to a source for mass produced goods, mixed with handmade.  Why does this drive me so crazy?  Why is it reason enough to close my shop? 
 
I'm working on a LIMITED number of new leather cuffs to offer on Facebook.
STAY TUNED....
Well, I did it for several reasons.  For one, Etsy rocketed to fame on a platform of selling truly handmade goods.  It was a welcoming community supporting artists creating everything from stunning works of museum quality artwork to crochet toaster covers (which are FREAKING AWESOME AS WELL).  It was, and still is, an affordable venue for artists to sell online.  But then, it changed.  Over the years re-sellers crept in, marketing mass produced works as handmade.  Artists have been totally ripped off by "clone" shops that lift photos of work and offer the goods under another name.  Mass produced "tchotchkes" were (and still are) making the front page of Etsy offered as handmade.  Artists struggling to get noticed and make a sale were being out-competed by these re-sellers offering imported goods for pennies, compared to original artwork offered at reasonable prices.  Small artists who don't have a huge following, like me and hundreds more, simply cannot compete with this and SHOULDN'T HAVE TO on a site built upon the sales produced by original artists creating handmade work. 
 
THIS IS POLYMER CLAY!  Breathtaking vessel by
Emily Squire Levin
When this all started coming to a head, shop owners innundated Etsy with letters of complaint and calls to shut down the fraudulant shops.  Etsy responded by hiring a new CEO who has notified all Etsy sellers that re-selling mass produced goods would now be allowed on the site, you just have to "note the origin of the work".  CRAP ON TOAST.  Pardon my French...In my opinion this is betrayal, period.
 
So, I closed my shop until further notice, and this decision has directly impacted me financially.  But, I simply can't roll over and take it.  This is just how I feel and I certainly don't fault any other Etsy seller out there.  I'm thrilled that artists I personally know and support have healthy, successful Etsy shops, and STRONGLY encourage everyone to continue to support handmade shops and independent artists wherever you find them.  This is my decision alone and it really sucks.
 
Did you know I also make weird assemblage creations?
This is my Beetle God in a burned shadowbox.
So, I am virtually homeless--or shop-less, I guess.  I have set up an independent e-commerce page on my website (with Shopify--give it a look...) that allows sales directly, and hope that this will somehow be noticed in the churning sea of the Internet.  Without a big name and storefront like Etsy, I doubt I will be able to do a fraction of the sales I had previously.  Sigh...
 
I also make these three-dimensional figures I call "Butterfly Keepers".
Real butterfly wings in laminate and stuff....
There are new storefronts supporting handmade popping up out there, and I am tracking as many as I can to see if they can compete with Etsy and support handmade like Etsy once did.  I've tried Artfire, Copious, StorEnvy, Big Cartel and most recently Goodsmiths.  I have yet to make a sale anywhere other than Facebook, which is turning out to be a great selling platform--and fun too!  It eliminates the "middle man". I can direclty interact with my friends and clients, offer "Facebook specials", and have actually sold a bit.  I hope this means I'll be able to sell some work this holiday season...cross your fingers, toes, whatever body parts you can for me!
 
For the holidays I'll also be offering custom made pendants featuring old family photos.
This pendant is mine, featuring a photo of my Grandfather holding my Dad. 
Copper, silver, optic lens, gears and more....EMAIL ME FOR DETAILS!
I mean it when I say that I support handmade art and independent artists.  It's a commitment I take very seriously, and felt I needed to reflect that in my shop as well.  I applaud all you working artists out there that continue to amaze me with your works.  I wish us all a prolific and profitable future so we can continue to do what we love.
 
If you know of new handmade storefronts, please let us know!!!  See you on the Internet....
 

Thursday, October 20, 2011

Selling Your Handmade Jewelry at Shows Part 1: Home Shows

I started out selling my jewelry at home shows.  It was a big leap for me (you know, from just my mom and friends buying it), but it was the only way I knew to sell it at the time (the whole online thing was just beginning to boom, and I had dial up!)  When I first decided to do a home show, I didn’t even have enough inventory to sell (I made gemstone jewelry back then).  So I made samples of things I could recreate, and made a catalog, so you could pick your gemstone, color, clasp and lengths…………….and I made jewelry to order.  I had some items they could purchase that day, but most of my sales were pre-ordered, and then I used the money from that day to buy the materials and make the jewelry.  It was a lot of work, and I don’t recommend it.  The artist in me was crying “I don’t want to make the same thing again in a new color!!!!”  However, I needed money to grow my business, and I muddled through it.  What I did like about those shows, was making something custom for each person.  I enjoyed knowing they would be getting a piece that they picked and customized, and that they would love.  I found my old catalog over the winter, when I finally set up my studio, and it was a riot!  I will share some of it with you.....................don't laugh!!!

Well, that all seems like forever ago (10 years).  I still do home shows, but my jewelry and my philosophy have changed.  My work is really one of a kind now, although, I can do similar styles, but none will be identical.  And let me tell you, that feels better!  The inventory at the show is entirely available for purchase on the spot.  What hasn't changed, is the fun of getting up close and personal with your buyers.  Home shows can be pure fun!

Here are some tips I'd like to share with you for creating a successful home show:

1.      Have enough inventory and if not have samples with “made to order” forms.  Make sure the inventory you have is a variety of shapes and sizes: for example, triple strand necklaces to simple pendants…….long ones, short ones, you get it, right?  Keep it your style, but have something for everyone too.  And never forget EARRINGS!  Ladies love their earrings! (and they make great gifts)
2.    Make sure your hostess sends out invitations that have all your information on them (web site, blog, shop), a sample of your work they can see and what forms of payment you accept so they can come prepared.  Have your hostess send out a lot, in hopes a fraction of the people can make it.  I get mine made at vista print when they have their free offers for postcards.
3.    Have a show special today only- like earrings $18 each or 2 / $15  or buy a necklace at full price and get earrings $5 off- you want to encourage people to buy today (and not just take a card for later), since you went through the work of being there. 
4.    Incentive for the hostess- make it worth her while.  This is going to vary for each business....I can't tell you what to give.  I gave a certain percentage off for every couple hundred $$ the show made, and if it was above $500, they got the special hostess bracelet or pendant free (usually something I was promoting at the time) or a half price item, ect…..figure out what works for you, write it up and stick to it.
5.    Do a door prize- two entries if you bring a friend- always a hit!  Encourages more people to come.
6.    Try to sell within your market- if you have modern jewelry you may not want to do a show for the elderly

7.    Don’t do a big ol’ speech about handmade jewelry, or the history of metal, ect…just be yourself and talk about the jewelry as people look at it.  For example: "oh, that bead was etched by me, or that’s a lampwork bead made by so and so, or that is made from recycled materials"…people like it when you are just yourself and natural.
8.    Bring your TOOLS and some beads so you can do adjustments and or make matching earrings:  I have a couple general bead containers that have a little bit of everything in them, and it has saved my butt many times.  I often end up changing the little bead at the end of the necklace, or making matching earrings for something.  (side note: my  opinion on matching earrings is that it’s a waste of time to make them for every necklace.  You may have many people who want them to match, but when you have even have half of the sales that don’t, you wind up with lots of odd earrings.  I like to offer to make them as needed, and just have more universal earrings for sale, like mixed metals and beads I use in a lot of designs….just how I do it due to overwhelming amounts of earrings that were never purchased to match)

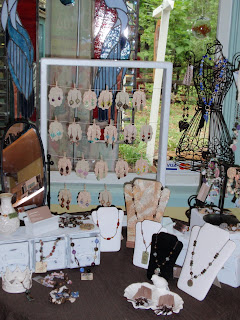
pictures of what I bring to shows with me- plus wire and tools!!!!

9. Have signs and prices to make it easier for people, you can’t be everywhere at once.  I also highly reccomend making them on the computer, use the same font for all of them, print them on cardstock, and laminate them (so when you move onto outdoor shows, they don't get ruined).  I have a running file saved so I can add signs as needed and print new ones, and for laminate, I just use the self stick kind for pictures.

10.  Be organized at your “checkout” spot, give them a receipt, and bag the item nicely , include your card and make sure the area has room for them to set down their things and write a check
11. Credit card option- you WILL sell more if you take credit cards.  It’s just a fact.  Besides, not everyone carries cash.  I use Square and recommend it if you are just starting out in shows.  First of all, you don't need to sign a contract and apply for a merchant account.  There are no monthly fees or per transaction fees.  They only charge 2.75% of each transaction AND they send you the card reader for free!!!!  The only downside is you need a smart phone with internet.  I LOVE Square- I don't miss the paperwork, I get my approvals immediatley, and the money is in my account the next day, already minus the fees.  I think Intiut also has a similar plan, but they do charge a monthly fee if you go over $1,000 per month...... and I haven't used them personally, so I can't give them a personal reccomend.
     If you don't have a smart phone, I would reccomend a company that you can open and close seasonally, so you don't pay for months you are not using it.  Plus, you need to sign a contract that will have penalties if you cancel early, so be careful.  Many of my friends like Propay, though I have never used them myself, they get high reviews from friends.  They have many different plans so you can find one that suits your needs, and its all laid out for you on their website, no hidden fees.
12.  Displays:  last but not least.....I could probably do a whole post on them, but I will try to sum it up.
a.  Make sure it represents your style
b. Use floor length table cloths in a neutral color  / pattern (so it doesn't distract) and I prefer a material that doesn't wrinkle, like a thick polyester- because I don't fold well or iron!
c. Use objects, crates and shelves to create multi-level display area- this accomplishes two things, it gives you more surface area to work with, and it creates good flow (just like in design- you want to eye to carry through seemlessly without disruption)  I like to use crates, because they can also double as storage to transport items to and from your show
d. Try to display some or most of your jewelry so they can see it, and how it lays (too many necklaces hanging side by side will be hard for them to visualize).  You can use picture frames, pads with u-pins, or bust displays.  I like Nile Corp. for bust displays.  They have great prices and reasonable shipping.  I also started using these (they are on sale- kinda cheap, but I stained them and now they look amazing)


so that I can just stack them back up at the end of the show.  (I will have more on set up, tear down and your display in the Juried and Outdoor Shows: Part 2 of this series)  I use U-pins to hold their shape (you can get them here on etsy) and I like how those boxes frame my work.  They also double for taking my jewelry to shops (which I haven't done yet, I am such a wuss!)
   You can use dishes filled with lentils or rice, picture frames with mesh, driftwood, pretty boxes stacked up......possibilities are endless.  Just remember, your jewelry should be the star, not the display.  The display should compliment, but not overpower your jewelry.  Here are some ideas..........

I love how Sandra Miller of Beaded by Sandra used lentils and beans in her display, to bring some color and contrast................


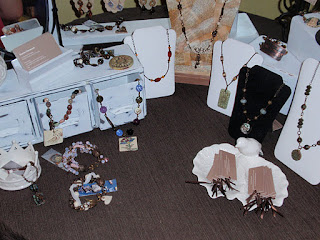
AND she use baskets and serving trays to create that multi-tiered apprearance on her table.
She also used household items for displays- a great idea if you don't have the money to invest, or if you just like to be creative and different with your display.  Below is a picture frame she used to display bracelets....................
 and a decorative candle cover to hang earrings from!
 
Below is a display Shannon C. of For my Sweet Daughter did for a shop she sells in.............I really like the little bust displays she used to showcase each necklace, and her creative frame for earrings as well!  Very nice set up in a small space, just like you may be challenged with in a home.

 
Below are a few displays for purchse on etsy.............just love the unique finds on there!
 Found on etsy here
found on etsy here

And these driftwood displays were the best I've seen around, and Miss Fickle Media used to carry them, but it looks like she's all out right now.................love these...................

What else can I say???  Have fun.  Meet your customers and talk with them, relax.  Not everyone will think you are awesome, and thats just their loss, so don't let a couple disinterested folks get you down.  Everyone's style is different.  I know for me, my style is different, and not everyone is bold enough to wear it.  I can't let that make me shy about putting it out there.  So talk to your friends, and book a home show.  I promise, it will be fun.  Good luck! 

Thursday, October 28, 2010

tool time (or introducing you to some of my closest inanimate friends) ~

by mary jane dodd

my grandmother had a goal of learning something new every day - and she was quite serious about it... if she got to day's end and felt she hadn't, she pulled out the dictionary or an encyclopedia... 

it is a quality that i admire & i try to emulate (emphasis upon try)... 

patty's post from the other day on her adventures with metal was really enjoyable... i love when people share themselves... like barbara lewis showing how she enamels...i think it tones down the initial fear people have of trying something new... you know, that 'oh, i can't do that' feeling... which is mixed with an excitement because you really want to do it... 

and how else can you create your own jewelry and components unless you try?!

i have become addicted to playing with metal - to the point that i am known to rush from whatever room i am in to my work area so that i can 'try something'... 'i just need to try something' has become a phrase my kids often hear... 

so i wanted to talk about tools a little bit - because outside of having sheet metal and wire, that is where it begins... oh, and a general idea of where you are headed is nice as well! 

my favorite cannot-live-without basics (we are going to leave out pliers and torches today) for working sheet metal ::

my hammers - jewelry grade to hardware store... and i have more... hammers for shaping, texturing, riveting, chasing, etc... and for striking - one of my most favorite hammers that i didn't even know i needed - the brass head... do you know that my pile of hammers is adored by the kids that come to my house? 'they are sooo cool!"... yeah, so now you know - em, alex, and nick's mom is so cool because she has this awesome pile of hammers... and while i am a mama bear when it comes to protecting my kids - i can get a little protective of my tools as well!

do you by any chance have a hammer whose face is marred? did your kids want to use the alphabet stamping set and unknowingly pick up the wrong hammer to strike them with? no? oh... well, mine did... and instead of setting this off to the side, i discovered that i got a great texture from it... stay open... 

disc cutter - saves time and money... swanstrom makes a big beautiful one as well... invest in the lubricant... 

dapping sets... these curve your discs... 

i happen to have both... different sets for different needs... 

5 lb. anvil... i love it... 

i just want to say that it is only in the past year that i have invested in some of these different tools... i do not have a big fancy studio... i had a very basic plier set for 10 years... but if you are interested in making your own components - even simple ones like bead caps, the tools you choose make a huge difference...  i know that they can be expensive... but they will save you money... a 6" x 18" sheet of copper is about $10 - that is it... 


** mary ann just brought up the question of where to get some of these tools - and it's a good one... i will honestly tell you that i forget the price comparisons for these... but some of the places i turn to are - my local bead shop (not read as 'large craft store chain' - nothing against them, i just like to support my local bead shop and the quality is usually higher), my local hardware store, rio grande, otto frei, fundametals, objects & elements to name a few.... please feel free to share any suppliers you know of in the comments section... **

more than the money, far far more than the money for me - the right tools are a ticket to freedom... they tap right into my lifeblood - at this point in my life, i cannot fathom being without them... 

'logic will get you from A to B.
imagination will take you everywhere.'
~ albert einstein

Sunday, October 10, 2010

Picture Taking 101...

Soooooo.......I'm still workin' out the kinks in terms of what I want my Sunday theme to be. 
Not that anyone said that I have to have a theme, but it helps put my ADD into focus. 
Today, I'm going to share a secret...shhhh...don't tell anyone...
Here goes...I'm not very good at taking pictures of finished jewelry. 
I'm still trying and this one is pretty good....


Perhaps, I would get better at it if I had the time to make more jewelry.  My bead making adventure started on Christmas Eve 5 years ago when I stopped at a bead store to buy last minute gifts.   The whole Christmas thing has always been difficult for me since my Mom died right before Christmas 25 years ago.  To this day, it is still a struggle and I'm always finding myself shopping....LITERLLY at the last minute!  This last minute shopping turned into a new direction for me.  I made 3 gorgeous necklaces.  And they were gorgeous!  When I went to pay for them, the $170 price tag wasn't quite as gorgeous....but, nevertheless, they were unique gifts made by me and I still hear about them to this day.


So, as of recently I passed on the interest of making beads and handmade jewelry to my son Ben and daughter-in-law Tiffany.  All of the styles that you see here were created by them.


We had a little picture taking session yesterday and after 100's of shots, this is what I came up with.  I know that I should also pose the jewelry with inanimate objects, but I also think that showing them worn helps the buyer to get a visual of what they will look like if they were to own the piece.


Here is today's question.  When taking pictures on the model, are you supposed to take them from a distance or up close like I did?  How about sunlight and shadows? 


I'd love to hear some advice from you about your picture taking experiences.


Pretty good.....They went right for the chain and wirework....We never did the basic stringing lessons!

One more thing....I worked through some of my Christmas issues.  That day 5 years ago also started a new tradition for my family and me.  Everyone gets a handmade item at Christmas whether it's made my me or if I buy an item made by another artist. I no longer run around on Christmas Eve spending way too much money.  Last year, I had paintings done by Joy Argento.  I own the Harold and the Purple Crayon Painting on that page...that was a gift from me for me ;o)

**Stop back tomorrow for our LMAJ Monday Giveaway**
face
Related Posts Plugin for WordPress, Blogger...