
I am always looking for new ways to incorporate metals –
wire, specifically – into my jewelry. My
scrap piles are huge – I have just as many failures as successes! I thought I would share a quick tutorial for
a wire connector that I have been using quite a lot lately. By changing up the length of the wire, or the
wire gauge itself, it can totally change up the look of the connector. I have never written a tutorial before - but this connector is very simple.
For this example, I am using 20 gauge solid copper wire. Personally, I don’t use artistic wire very
often, as it has a plastic coating that cannot take a patina, such as liver of
sulfur. I patina just about everything
if I can!
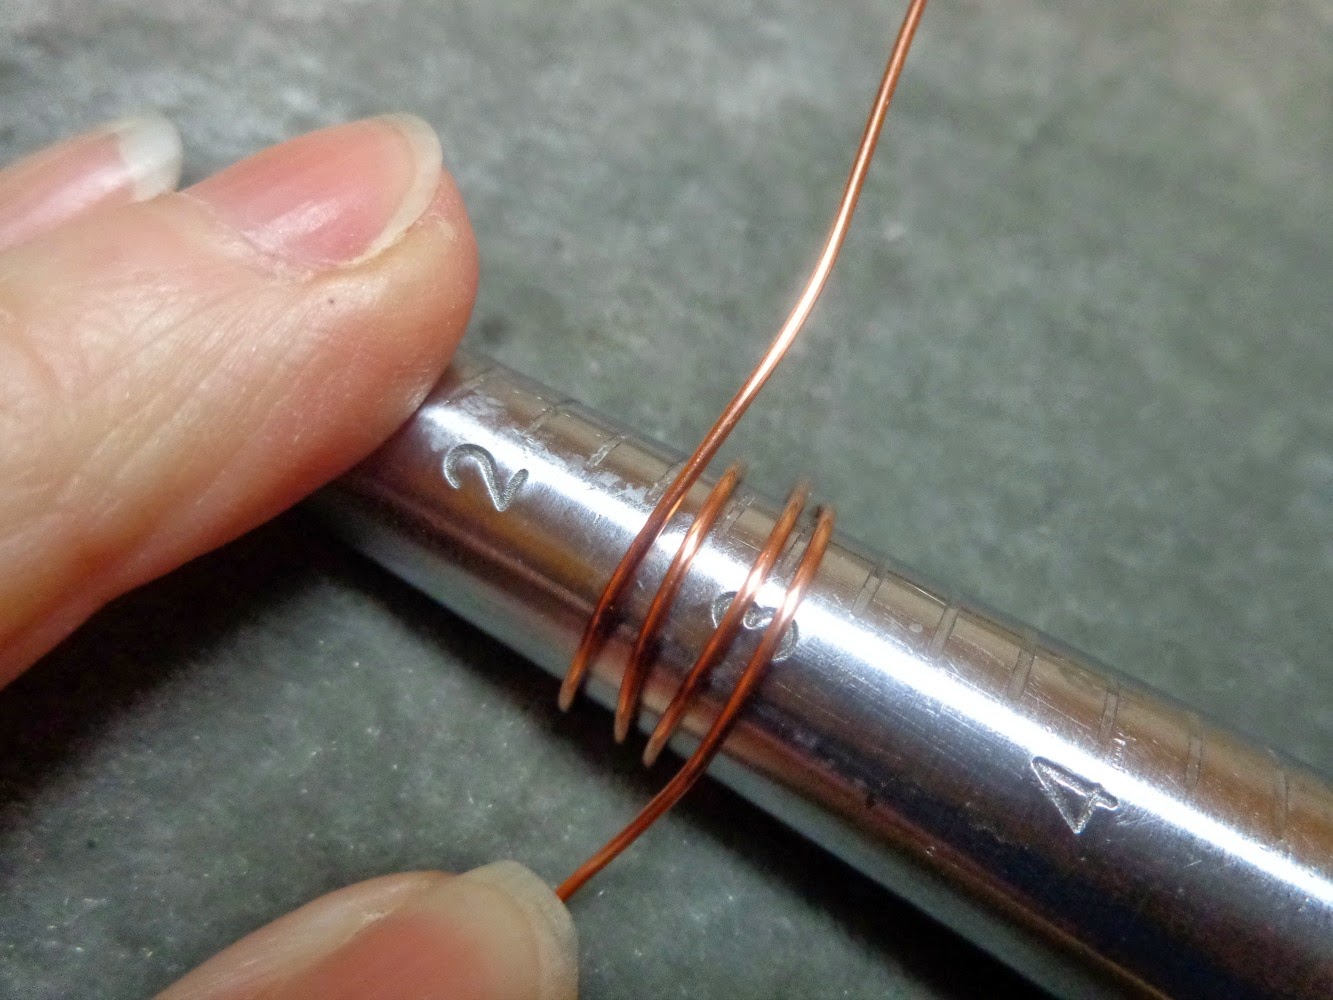
Cut about 30” of wire

Choose a round mandrel.
Depending upon the diameter you are after, you could use anything round
– a seed bead tube, a wooden dowel, a sharpie pen, etc. I am using my ring mandrel in my example below. Wrap the wire once
around your chosen mandrel.

Continue
wrapping your wire around the mandrel until you have 3 full loops
Remove the wire from the mandrel, and, using the one of the
long lengths of wire, begin to wrap one length around your 3 formed loops.

Continue wrapping until you reached your starting point.

Using the second long length of wire, begin wrapping around
your newly created “nest” in between the previous wraps made from the first
wire.

Continue wrapping each wire in between your existing wraps until you have
approximately 2” remaining on each end of the wires.

I personally do not care for unfinished ends to my wire –
whether they are filed and tucked or not.
Using your torch, ball up the two ends of the wires. I use a butane torch, holding the wires with
heat resistant tweezers over the flame. Quench in water and pickle to remove
the fire scale.

Wrap the two wires around your nest. Cut 4 additional 3 – 4” lengths of 20 gauge
wire and ball the ends with your flame.
Quench in water/Pickle/Rinse.

Wrap these wires around your nest.

I like the addition of the balled-end wires, as it creates a more finished look.

Your wire connectors are now ready for patina and
incorporation into your next piece. By
varying the gauge of the wire and the mandrel, it changes the look.
The wires above became connectors for these earrings.
 |
| Raku Beads by Duane Collins |
I used two connectors at the end of this jasper bracelet,
and fashioned a simple toggle bar to the opposing side of the bracelet –
instant clasp!

For the bracelet below, I used 16 gauge jeweler’s brass wire
and added a toggle.

The necklace below features the connector used as a bail,
made with 18 gauge sterling silver wire. I used less wire for the final
wrapping, around a much larger mandrel.
 |
| Lampwork Cab by Susan Kennedy |
The
bail for the necklace below was created from 16 gauge square copper wire, also on a
larger mandrel.

The links above the bail are made from 18 gauge round copper wire – and the diameter of the connecting links is slightly smaller than the bail.

The possibilities are endless by changing up the sizes of wire and the mandrels,
Do you find yourself craving new ways with wire, too?
6 comments:
Beautiful! I love how you incorporated this design into chain. Lovely!
Such as creative use of wire!! Love them all!!
Love these...I feel a wire day coming on....
Fantastic post and tutorial! Love this link...can't wait to try it out
Nice idea! :) I'm just learning to use wire. And kind of addicted... :D
Oh I just love these! I do have a question though. Is there any reason you didn't ball the ends before you wrapped the ring?
Post a Comment