
One of the most difficult things to deal with in the ceramic bead making process is the bead hole.
More specifically, keeping the glaze from filling the hole(s) and avoiding sharp edges around your bead hole.
 |
| Marsha Neal Studio Glazed Porcelain Pendants. |
Almost 2 years ago I wrote up this blog post about Cleaning Your Holes!
I have had many friends ask me to clean out holes from other artist pieces or commercially made beads they bought either online or at a show, but did not realize that the hole had been fused with glaze or that it had not been cleaned.
Or that the hole was way too small for the intended use.
My previous post goes into details on using diamond tip drill bits with a Dremel tool and with water, so I won't bore you here with the same info.
Glass beads that are made on a mandrel will need to have the bead release cleaned out of the hole. The beads are usually soaked in water then drilled out.
(Check out this great post by ShebaMakeda Glass Beads)
Polymer clay bead holes can be enlarged by drilled out with a drill bit after the clay has been baked.
(Check out this cool post: Lentil Bead Drill Jig by Desiree's Misc)
 |
| Image: Beaducation.com Small Files (Set of 6) |
Metal beads can usually be cleaned with a small file.
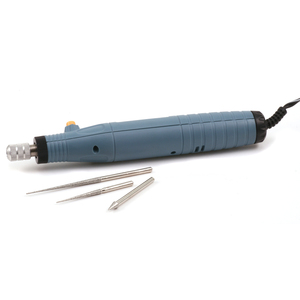 |
| Image: Beaducation.com Pro-Electric Bead Reamer |
Bead reamers of all sorts (electric and manual) are available through many bead suppliers, hardware stores, arts & craft stores, etc.
 |
| Image: Beaducation.com Diamond Bead Reamer Set |
Because I work in a manner of "production" when I am cleaning out my bead holes, I prefer to use my cordless Dremel tool with a diamond tip bead reamer and a bucket of water.
And now that I saw that Dremel has a drill press - I think I know what is going to be on my next "need to get this tool" list. I have way too many gemstone beads and agates that have weird holes that are narrow on one side, wide on the other - that I need to fix!
When using bead reamers or drill bits to enlarge your bead hole,
Please remember to work SAFE and SMART by using:
Gloves, goggles, dust mask, wet drilling to reduce dust and heat, etc.
And remember to work smart with water and electricity: dip your bead and just the tip of the drill bit!
And bead makers - remember - it is up to you to sell a product that is usable and of the highest quality that you are capable of. Don't skip on quality steps like this because it will only make people pause before they purchase something else from you in the future.
3 comments:
I clean the bead holes out after I am done glazing. I use a dremel and a narrow sander tip. If any glaze chips off during the process, I go back through and touch them up. That method works like a charm for me!
MaryAnn
Do you do that (use a dremel) before you glaze fire them?
I have found that I prefer to use either a slender bristle brush dipped in water or a zig-zag saw both clean out the bead hole of glaze prior to kiln firing. And yes - then touch up...
I'm all for speeding up the process wherever we can without compromising quality. :)
I have found that reamers usually end up splitting or cracking the bead (gem stone or ceramic) and that a diamond coated drill bit works best.
Post a Comment