Beaded beads are like those infamous potato chips: you can't have only one. Seriously.
Case in point, I set out to create a beaded bead so that I could take step-by-step photos for you. I ended up with not one beaded bead, not two, no...I ended up with THREE beaded beads.
As addictions go, these little peyote beaded tubes are pretty harmless and have positive results.
If you haven't worked peyote stitch before, it's okay. Don't be nervous. It's as easy as threading a needle and stringing some beads and...well, you'll see.
For our sample beaded bead, I chose two of my favorite colors, zircon blue and copper. The beads I used for this are delica cylinder beads (10/o) but any size works as do many different types of beads, so don't limit yourself. I do like the cylinder beads for learning peyote stitch, however, because they have such a wonderful habit of fitting perfectly together.
Okay. Get your beading needle (I used a size 11 tulip needle), your favorite beading thread (I used #10 Fireline), and your beads together in one place, preferably on a nice bead mat that will keep your beads from dancing around too much (if you don't have a bead mat, use a piece of suede or the back side of some leather to help you corral those little creatures).
Step 1. Thread your needle with a comfortable (one wingspan) length of your thread (nymo, fireline, c-lon). No. I don't have a photo for you.
Step 2. Pick up one bead with your needle; size, color, and shape matter not. Just a single bead.
Step 3. Take your needle through your single, lonely bead once more
and pull the thread taught, leaving 8-10 inches of thread. This simple act has transformed your lonely
bead into a "stopper bead." This acts as a temporary "knot" to keep all
the other beads you will string on from falling right back off your
thread. It's an important job, yes, but any bead will do.
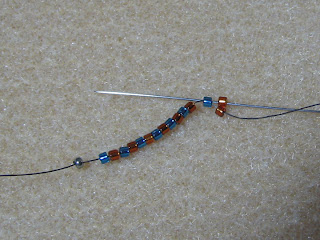
Step 4. Pick up 14 beads, alternating colors A (blue)/B (copper) as shown.
Step 5. Pick up one Color B bead and take your needle through the closest Color A bead, from right to left.
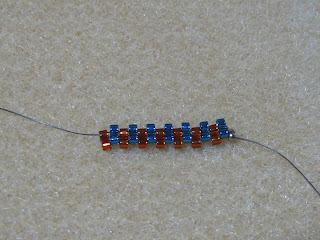
Step 6. Pick up another Color B bead and take your needle through the next Color A bead. Do this four more times until you have reached the end of your beads.
Step 7. Sit back and admire your work: you have just beaded the dreaded first three rows of peyote stitch. It's easy-peasy from here on in.
Step 8. Turn your beading over so that the working thread is on the right. Pick up a Color A bead and take your needle through the first Color B bead in the previous row.
Step 9. Add six more Color A beads, always taking your needle through the Color B bead in the previous row.
Step 10. Keep beading rows of peyote stitch until you have reached your desired length. In this case, we want a rather short rectangle and have only beaded a total of 16 rows (count up the number of beads on each edge to determine your total number of rows). You could keep beading like this for 6-7 inches and have most of the work for a bracelet complete, but that's another story.
Pull out your stopper bead and unthread your needle.
Step 11. Rethread your needle with the 8 inches of thread you left at the start of your work. It's time to weave this thread through some beads (change direction a few times) before cutting it off.
Step 12. Rethread the needle with your working thread. This next step is not required, but I find that it helps anchor the tension for the thread zipper you will create. Take your needle back through the bead immediately below the bead it exited from.
Complete this little "thread circle" by taking your needle through the upper bead again, leaving your thread at the same location we started this step at.
Step 13. At this point, you have a beaded rectangle. We will now turn it into a beaded tube (read: beaded BEAD) by sewing/zipping the first and last rows together.
Step 14. At the end of this process you will find that the last two beads facing each other are not connected. Perform the "thread circle" maneuver you used in Step 12.
Step 15. Secure and finish your thread as you did in Step 11.
Step 16. String your beaded bead on whatever medium (in this case a simple wire choker) you prefer.
Step 17. Decide that your beaded bead could use a companion or two...
These little beaded tubes of peyote can also be sewn directly onto elements that you can't string them onto because of awkward curvatures, as with these eye glasses, or because of permanent attachment (purse handles). All you have to do is close the tube around the element/with the element in place.
I told you it's hard to stop with just one. ;)


3 comments:
What a detailed tutorial! I may even be able to do that ;) (maybe not, I am so bad at anything that requires accuaracy or counting..lol) I love beaded beads, they have such a wonderful texture to them!
Great Tutorial CD! I used to wear beaded beads in my hair!
these are terrific, carol! thank you so much for the tutorial on how to do it - i have great admiration for those who can do such precise work.
Post a Comment