
by Jennifer VanBenschoten
Pretty much all of my beaded cabochon jewelry pieces begin with the same thing: a peyote stitched bezel to keep that handmade cabochon securely in place. Back when I was a beginning beader, I found peyote stitch a difficult stitch to learn - it's the only stitch that I couldn't teach myself!
Since then, I've learned a lot about peyote stitch, and it's one of my favorite off-loom beading stitches. Once you know the basics, you can use it to make secure bezels to hold just about any shape of cabochon.
So today, I'm going to share a free tutorial for getting started with flat even count peyote stitch. Even count peyote stitch is what I use to stitch my beaded bezels around a cabochon, and the flat version of this stitch is the easiest form of peyote stitch to learn.
Before you get started, I have a few tips for learning peyote stitch (and any new beading stitch in general):
- Use a large size bead, needle and thread. Instead of starting out with a smaller size 11 bead, try using a size 8 or a size 6 seed bead. And if you really want to be easy on yourself, use a size 8 Delica bead - Delica beads are incredibly uniform and have a smooth cylinder shape that will let each bead snap into place.
- When you are learning a new beading stitch, using a light color of thread and beads can make it easier to see where you need to stitch. If you use a darker bead (like black, brown or gunmetal colored beads), make sure that you have a good light source.
- How much thread you use can make a difference, too. Don't start out by using a long length of thread. A shorter length - say, no longer than five feet - won't tangle as easily, and it won't take as long to pull your thread through each bead as you stitch.

1. On your comfortable length of thread, pick up one bead. Pass through the bead again, moving in the same direction so that the thread wraps around the bead. This is your stop bead, and it will keep the rest of your beads from falling off your thread while you get the first few rows of peyote stitch going.

2. Pick up an even number of beads. For this tutorial, try by starting with 8 beads. Even count peyote stitch gets its name from the even number of beads that you start with. Push the beads down up against the stop bead - don't push too hard, or you'll push everything off your thread and will have to start all over again.

3. To start stitching, pick up a bead on your needle. Skip the last bead you picked up in your initial 8 beads, and then pass your needle through the next bead, working towards your stop bead.
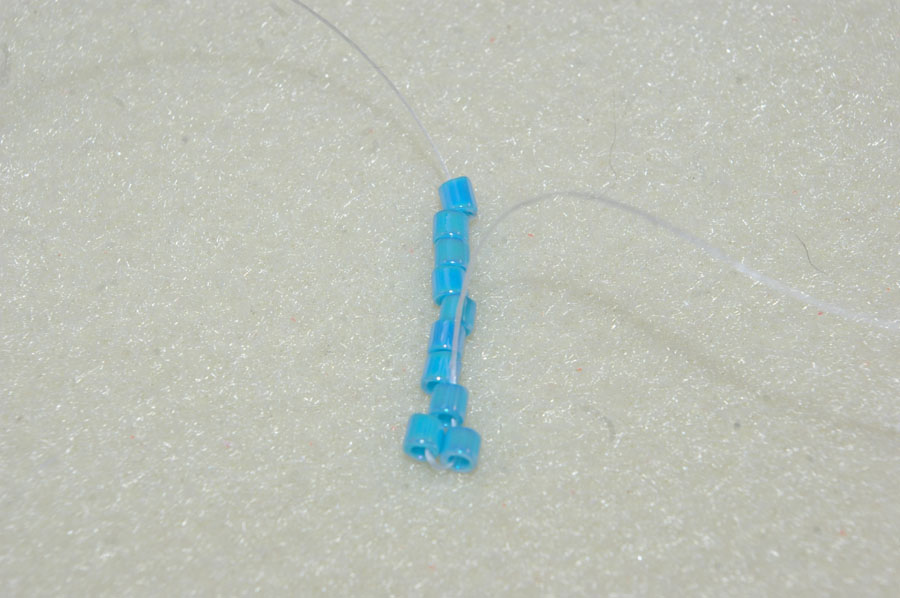
4. Pull snugly so that the two beads on the end line up next to each other. This is how your first stitch should look.

5. To continue stitching, pick up another bead, skip the next bead in the row, and pass through the next bead, always working towards the stop bead.

6. This is how your first three rows should look. Note how the beads in each row are offset from beads in other rows. This creates a row of "up" beads. To work in peyote stitch, you'll be filling in the spaces between "up" beads with beads as you work.
At this point, you can remove the stop bead by gently pulling it off the thread.

7. To turn around and begin your next row, pick up a bead, and then stitch through the "up" bead behind your last bead. The bead that you stitch through might be a little loose, since you just added it. To keep it from falling apart, hang on to your working thread tightly as you put your needle through the bead. Then pull on your working thread to snug everything up.

8. As you work, you'll be adding new beads in the spaces between "up" beads.

9. You have now finished four rows of peyote stitch! When counting rows in peyote stitch, you need to move on the diagonal, starting from the bottom row of beads and moving to the top.
I hope you've enjoyed this tutorial! Keep practicing that peyote stitch - next time, I'll show you how to use some basic bead embroidery techniques to make a peyote stitched beaded bezel around a cabochon. And if you want to learn more about off-loom beadwork techniques, check out my free tutorials on the About.com Beadwork site. Happy beading!
7 comments:
Thanks for a great tutorial, Jennifer! I haven't tried this one, but you make it look easy. Sign of a true expert. :-)
that is really interesting and i love learning how you do this! i can only imagine how much planning must go into doing more complex designs... thank you for sharing this jen!
Thank you very much for making this easy and simple to understand and see how to do. I think I have actually done this stitch around a cabachon without knowing what it was called. Happy beading...
Peyote is one of my favorite stitches now that I know how to do it! And it's so much more secure than just gluing the cabochon or focal piece down. I hope I inspire someone to give it a try!
That's a great tutorial, Jen. I'll have to stop back to try it when I can. I love the look of beads surrounding a cabachon. MaryAnn :O)
I can't wait until I have a spare minute to sit down and try this!
I love peyote and I won't admit how long I have been doing it. So let me add two more tips...
Recently I have read that starting with a double needle makes it easier to start. So, put a needle on both ends of the thread, add 2 beads, then add 1 bead and put both needles through that bead, next add one bead to each needle, next add a bead and put both needles through it, etc... until you have the length you need.
Second, and this goes for tubular peyote too... make your first and second and maybe third row a throw away, i.e. plan to rip them out once you have your project well along. This gives you the option of clearly alternating colors and those first few rows can vary in tension. When I was learning I always tore out my first few rows.
Post a Comment