Showing posts with label design. Show all posts

Monday, October 27, 2014

The Truth Hurts--Or Does It? By Karen McGovern

We all have secrets….all of us.  Especially artists.  Artists have TONS of secrets.  It’s part of what makes our work interesting.  “I wonder what inspired her/him to create THAT?” “I wonder where he/she learned to do THAT?”  And the most often heard…”How did you make that?” coupled with “Where can I buy the super spectacular thing you used to make that super spectacular thing?”

I recently read a post written by a jewelry designer asking other artists to comment on how much they comfortably share regarding technique and design details when asked by either a potential client/customer, or another artist.  I think the answer is simple.  Share whatever you want, and keep whatever you want to yourself. 


This post covers two topics—sort of.  Components and design.  I try to be as up front as possible about the “ingredients” of a design, usually in my listings and descriptions.  Names of stones (if you use gemstones in your designs, I think you should know with certainty what the stones are and say so.  Specifically…I’ll come back to this in a minute), type of metal, construction details (hot or cold connected, etc.).  Now, from here it can get pretty tricky, so I try to keep things as simple as possible.

Regarding gems—know what you are using and do not ever, ever make something up if you are not sure.  If you don’t know what the stone is, say so!  For beginning designers, this can be tough and you have to be careful.  I have written before about getting scammed at gem and bead shows, purchasing stones I thought were one thing only to find out later they were not---by a long shot—what I thought they were.  If your stones are dyed quartz, that’s fine, just don’t pass them off as amethyst, rubies or sapphires.  Jaspers are tough because there are a MILLION OF THEM.  But, if all you know is that the stone is a type of jasper, then say that.  My point is, don’t feel like you have to dress up your descriptions or stretch the truth.  It will bite you in the ass later, I guarantee it.  Always be truthful about what you use in your designs no matter what the material is—period.

Now, regarding SOURCES.  Hmmmmm…..when it comes to gemstones, and basic components I am happy to share sources with anyone who asks.  Many artists have relationships with their favorite vendors and spreading the love around will help you and the vendor as well.  I love to pimp my vendors!  But….NOT ALL MY VENDORS.

This is where the super spectacular thing comes in.  You know, the one thing you use that makes your design singular, unique and YOURS--your "secret ingredient".  I have a couple things like that.  Items I use over and over, would love to tell you where I found them, but would have to kill you if I did.  There are not many items like this, just a couple, and they are MINE.  AND, it’s perfectly okay to say that to anyone who asks for the source.  My usual answer is the tongue in cheek reference to murder, followed by, “That particular thing is so special to me and to my work that I just have to keep it to myself. I hope you understand!” Or some version of that.  These words, with a sincere tone and smile, should shut the door on that particular conversation.  I think we all need to understand that saying "No" is   not a bad thing....SERIOUSLY.


Same for singular techniques that you spent the past 20 years perfecting.  Unless you plan to share with a tutorial, you don’t have to share anything at all.  I’m always a little amazed by folks that see my work and ask, in all seriousness, for me to explain in detail exactly how I made it.  In that instance I make some reference to magic or something and move on.  I use humor as often as possible to get out of tricky spots like this.  I am always flattered when someone likes my work, but I do not feel obligated to share every detail of the process just because they ask. 

If this was a TV show I would so watch it.

Am I paranoid they will immediately try to steal a design or copy me?  Partly, but mostly I squirm because the creative process is intensely personal to me and not for the whole world to see.  The world gets the finished result, the rest is between me, my bench and my imagination/psyche thankyouverymuch.

Artists learn from one another.  It’s impossible given today’s technology and social media availability not to use Facebook, Pinterest, blogs and more as teaching tools.  I learn whenever I see an artist’s work that I love.  I emulate.  I am inspired by others.  I always give credit when creating work inspired by another.  I try to be polite, kind, grateful, RESPECTFUL and appreciative, and expect the same from others in my artistic community. I believe you get what you give. 


How I feel when I see an artist that inspires me....

Now, for something completely different, but still on the topic of sharing.  As we evolve as artists, we sometimes get a bit too big for our britches.  By that I mean, we can actually feel embarrassed to admit where we get some of our stuff.  Yes, I would like to be able to say in all truth that I discover all of my findings, components and unusual elements while wandering through abandoned mansions, visiting Parisian flea markets, or directly from my dear, dear friend who happens to travel the world collecting beads from ancient temples and tombs.  See the stones pictured here?  My latest haul from Michael’s.  MICHAEL’S CRAFT STORE, PEOPLE.  For reals.  You can find some great stuff there and YOU ALL KNOW IT!  I am no bead snob—not me.  If I see something I like, of quality, I’m snatching it up.  Yes, the turquoise is dyed howlite, but well done (and I will list the stone as howlite, not turquoise).  The points are dyed quartz, but again, well done.  The wood is….well….WOOD.  And now Michaels carries dyed, embossed LEATHER!  Who knew?  Even if I could afford the world’s finest stone beads I would still buy from my local craft stores cause sometimes that stuff is exactly what I need and exactly what I want.  Do not turn your nose up, ever, to “common” sources—if you do you’ll miss out on some rather cool bits and pieces.  Wait—I misspoke--go ahead, turn your nose up.  More for me!!! *Rubbing hands together*


Buying inexpensive materials to use in your designs doesn't immediately mean that the finished work is worth “less” than something created using material purchased at a “higher end” source.  DESIGN COUNTS.  Your artistic vision, your talent, your creative interpretation are PRICELESS, which makes pricing our works so difficult.  THAT IS ANOTHER POST FOR ANOTHER DAY!

So, keep whatever secrets you want.  Share what you want, honestly, and appreciate other’s works AND understand if they don’t want to share as much as you’d like them to. Bottom Line: Respect each other and each other’s works.  That is no secret and needs to be shared far and wide.

Now, GO MAKE SOMETHING!

Monday, February 10, 2014

Boot Camp- Physical Balance in Asymmetry

by Staci Louise Smith


We are off to a great start for the asymmetry boot camp.

Barb b started us off with a great post last week with some beginner tips for asymmetry


One of the things she mentioned that really stuck with me is design how you would think of a bracelet 
"1) Stop thinking of necklaces as necklaces.It always seems natural to design necklaces symmetrically. Part of that has to do with the weight of the necklace being distributed in an even fashion so it wears correctly. Instead, try thinking of your piece not as a necklace, but perhaps as a bracelet. I regularly see more asymmetrical ideas in bracelets that could easily translate into interesting and compelling necklace designs." - Barb B.

Here are a couple necklace I have made that make me think of that- now that I look back, they are very similar to the look of bracelets.


I think the only difference between these and a bracelet design is the larger components in the front which ensure it hangs with them as the focus.  

However, you can design a piece that is weighted evenly all around, so that it doesn't matter how it hangs, then balance is not an issue, and every part of it is interesting as a focal.

I did a post last week on the Visual Balance in asymmetry, and compared it to other facets of art,

http://www.lovemyartjewelry.blogspot.com/2014/02/art-in-asymmetry.html


This Monday I wanted to talk to you about physical balance in asymmetrical jewelry.  this is the big one to me.  I think after you have let go, and allowed yourself to play with varying shapes and a variety of beads, and designs where the focus is not necessarily in the center- now it is time to introduce this.


I believe this is the most difficult part of asymmetrical design, and the most important. 

Physical balance, is making sure your piece hangs the way you designed it too.  You can make an asymmetrical design, where the focal is off to one side, and you have pretty beads repeated at the bottom, and smaller beads on the other side, and then when you put it on, the larger focal portion slides around to the front.  Though you clearly designed it to be on the side.

This is the part where you have to be willing to to try, and wear your creations to ensure they hang they way they were designed to.  AND, if they don't, you need to go back and re-work it. 

I re-work my pieces all the time.  I refuse to sell something, so that the person will go home and be un-happy that it keeps sliding to the side, or a loop keeps leaning forward, ect. 

Besides the quality, you had a great design in your mind, and you can make it work......so just take that extra time and wear it.

This is one of my favorite chunky gemstone designs with an asymmetrical design. I wanted the large ceramic donut bead on the side along with the smaller garnet donut..  The problem is, that when you have a wider, larger piece on the side, you MUST have more weight on the bottom front or it will slide around, and you lose your asymmetrical design.

This was a challenging piece for me, and I had to rework it a couple of times until it hung just right.  I really wanted the donut to stand out, and use a lightweight chain above it.  The original design had the clasp on the side, but it just wasn't working.
I had to move it to the back, which also helps to balance the piece and keep what I want central, as central.

I will often lay out my design, and literally, hold the beads from one side in my hand and compare to the weight of the beads on the other side to make sure they match, so that it hangs properly.
This is where having a variety of beads really helps.  I like to add beads that are chunky but light to my collection, so I have options when I need something big, but it can't weight too much.  Polymer, wood and acrylic are good for this.

Another problem is using chain on one side, or beads, and sari silk or another light weight cord on the other.  If the weight on both sides is not even, it will slip around so the heavier side is down towards the front.

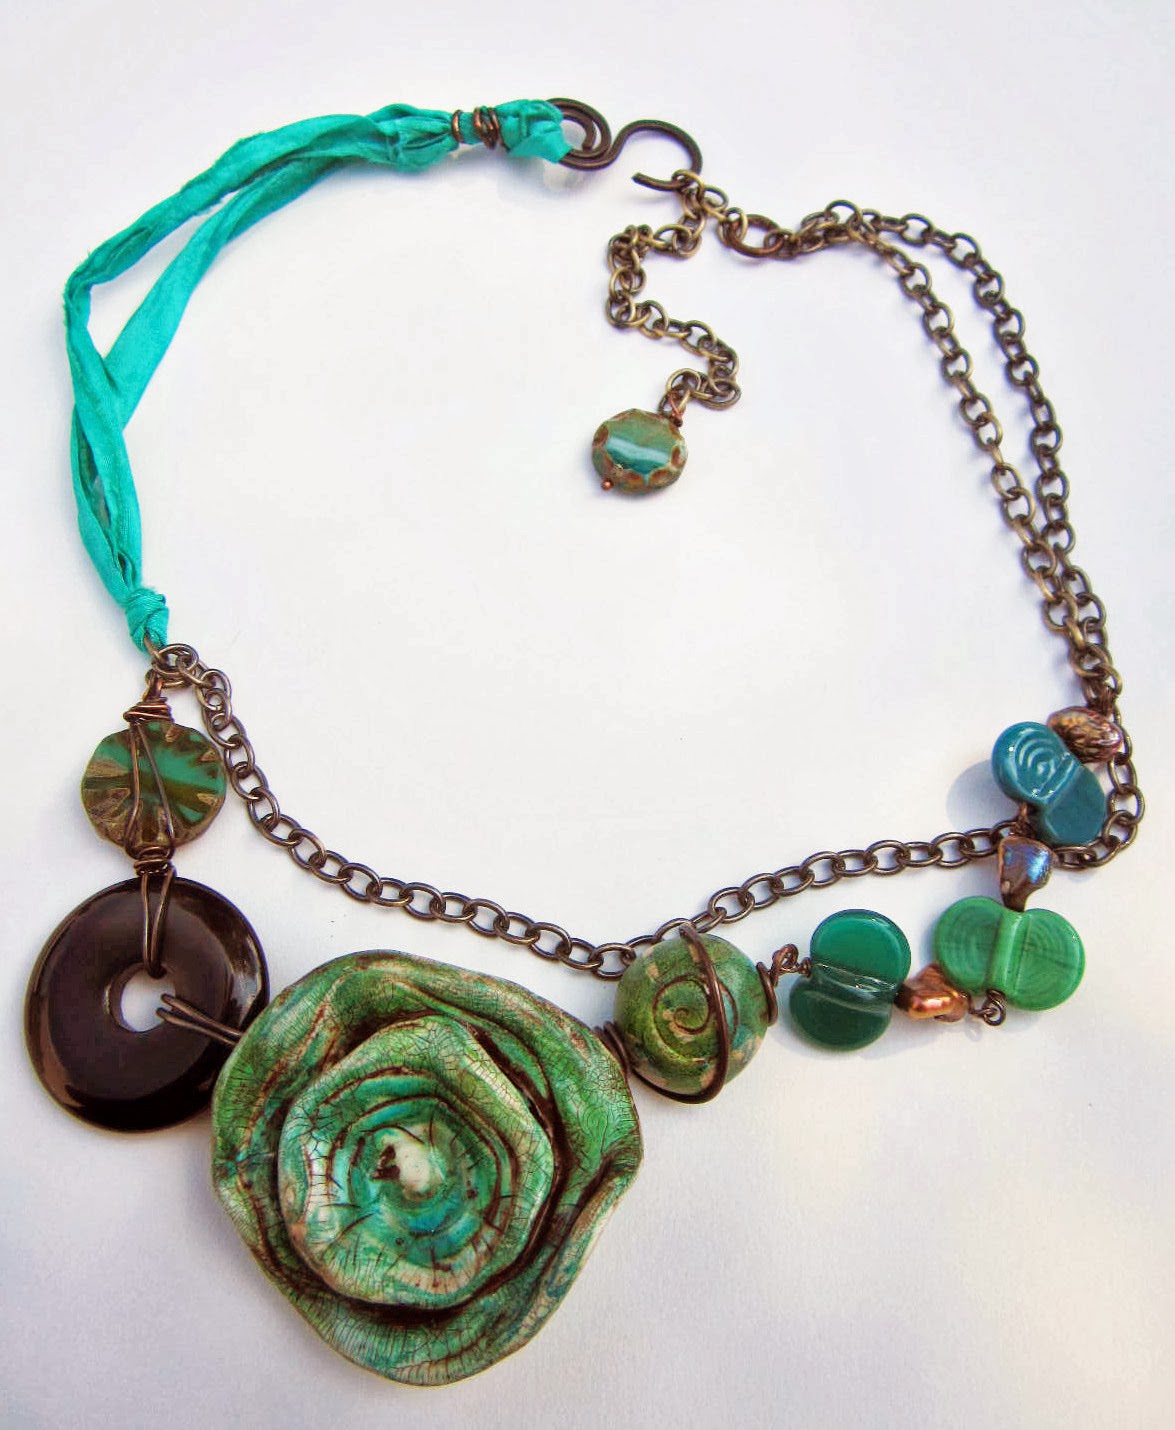
This is a good example of using lightweight sari silk on one side and chain on the other.


In order for this piece to work, I had to use the larger heavier black gemstone donut on the side which had the lightweight silk.  I also carried the chain across the front as a double layer, to add more central weight.  To ensure that it doesn't move and hang in a way that looks awkward, wear it around for a day to test it.  If you have to keep shifting it to make it hang right, then it should be re-worked.  


For my pieces, I usually go two ways, I create a heavy central focal, that will allow some variety in my necklace portion without tipping it to one side...these pieces are a good example of that.


I still made sure to weight it so the two sides weighed about the same, but when you have a heave central pendant, it helps to offset minor weight issues.

Or, I really work to weigh out the pieces so they hang right, using a variety across the front.

  I had to re-do this one a few times, to make it hang just right.  The loops are light, so I had to add a heavier bead on top, and use lightweight pearls on the other side.  again, using a heavier central focal helped.


I hope the examples helped.  I am no expert in asymmetry, I just have a lot of experience and learned a great deal through trial and error.  The absolute best advise I can give is to wear each piece to ensure it hangs right.  I have even had them hang right on a display, but when you wear it, it goes the wrong way.  It is worth it to take that extra time to balance it, or else you will have disappointed customers, and your design will not be the one you intended.


I leave you with some fun and artsy examples of physical balance in jewelry

Nat Art Jewelry

ksemi


Thursday, February 6, 2014

Art in Asymmetry

by Staci Louise Smith


Why asymmetry in design?  Well, when you switch up the color, the texture, the direction and flow of a piece, it creates interest.  It keeps the viewer looking at it, and back over it, following little details, back and forth and through it.  It makes it stand out from other designs, it makes it unique, original.  It gives it a natural organic feel, since nature is not symmetrical.  

Art is not symmetrical.  Whether you are viewing a painting, or a sculpture, the subject keeps your eye moving around, up and down, and through the entire piece.  This is intentional, it is the composition of the piece.

Sculptures are made to be viewed from all angles, keeping interest the entire way around the piece, as Steve Frank certainly does with his piece below.


https://www.etsy.com/listing/151412336/modern-abstract-wood-sculpture?ref=shop_home_active_4


There are ways to get the eye to do that.  Repeating things is one way.  You can repeat shapes, colors, or textures throughout a piece.  This will keep the eye traveling around the piece, as well as create a visual balance in an asymmetrical design.  Also, adding some contrast in your piece will continue to create interest and make the pieces that are repeated pop.

I love this lino cut by Jess Freeman.  It uses vertical free form trees repeated to move your eye across the picture- and contrast is added by horizontal lines in varying thickness'.  


https://www.etsy.com/listing/88851195/abstract-landscape-linocut-print-9?ref=related-2

I also picked this lovely painting by Amanda of Earth Angels Art.  Look at how she uses the moths, and dots throughout the picture to keep your eye moving around.  They are lighter color, to contrast the dark sky, and repeated, to keep your eye looking for them.


https://www.etsy.com/listing/99101108/the-owl-and-moon-art-print-by-amanda?ref=shop_home_active_5

I think that often we do these things while designing without even knowing it.  However, it helps to know and understand these things, because sometimes we are stuck, sometimes we just can't figure out why something doesn't look right, and then we have these rules and guidelines and tips to fall back on.

Lorelei did a great job using repetitive shapes in this piece.  The similarity in shape keeps your eye moving right through the necklace, and the variety of textures and color hold your interest.


https://www.etsy.com/shop/LoreleiEurtoJewelry

It's also a good example of visual balance, as it has the appearance of being symmetrical, even though it isn't.

Visual balance can be created in many ways.  This piece / style below is one of my favorite pieces.  It is in no way symmetrical, yet, it is balanced using muted colors, and basic shape and size.  It comes to a focal point at the bottom center, and graduates by size on each side.  Swirls and repeated shapes and colors pull the eye through the piece.


I think that for those of you who gravitate to symmetry in your designs, this is a great way to start trying out asymmetry.  Try to create that visual balance while at the same time, adding interest by using different components, with varying texture, shape and color.

I also like this piece by Glowfly, which is just a very intricate pendant.  It looks very symmetrical at first glance.


However, it is not symmetrical.  They have used the flowers and leaves and lines of the stems to create repetition in the piece, though it is definitely not symmetrical.  It creates a wonderful feel of symmetry while adding the interest of an asymmetrical piece.


Now- you can also do a great asymmetrical piece that is not visually balanced.  However, there still needs to be some sort of cohesive nature to  make the piece work.  I often like to make pieces that are bold, and unbalanced.  With only a couple components- you don't have much to work with to create flow.  Sometimes they work, sometimes they don't.

This large chunky one works, and its one of my favorite pieces.  With only two large focal components, there is still enough flow so that it doesn't look awkward.


www.stacilouiseoriginals.com 

I really encourage you guys to try out some asymmetrical designs.  It is very freeing, once you start to see that they can be balanced, without ever having two of the same bead in the entire piece!

Monday we will be talking about physical balance in a piece to bring your designs home.

Remember to share you progress in our Flickr group!  We'd love to see what you are up to!


Monday, September 16, 2013

Boot Camp: Hoops and Negative Space

by Staci L. Smith

I was going to do a little tutorial on soldering hoops, but MaryAnne posted this great video that did all the work for me!  Thanks MaryAnne!
 
So it allows me to talk today about why I love using hoops / loops in my designs and some ideas of how to use them. 


I have always been drawn to hoops, whether in the form of wire or a donut bead.  They offer endless possibilities in design.  They can be a focal piece or an accent.  The can be connectors, or made into chain.  The form of the hoop, can give you an array designs and styles to chose from.
 
I personally like the negative space it creates.
Negative space is a space that is not occupied, or taken up by a focal piece.  It is used in great paintings, to push your eye to the main focal point of the picture, or to keep your eye moving around the piece. 
 
I find that water color artists often are the masters of negative space in paintings.  Below is a good example.  See how the negative space between the trees allows you to focus on the trees themselves? 
 
 
Painting by Pat Howard of the Painted Prism
 
In jewelry, not only does a hoop provide negative space, but it can also lighten up a large piece of jewelry by occupying more area, using less material.  Using heavy stones, ceramic and glass can weigh a piece of jewelry down.  Especially if you like your jewelry large like I do.  Hoops allow me to make the pieces more wearable.
 
Creating a large focal using hoops, like this piece, allows you have a large piece that is very light, both in actuality and to the visually.


Adding negative space can also break up a flow of solid chunkiness, to give the eye a break from the heaviness, and since its a hoop, it carries the eye through the piece, without creating a break that is unappealing.


In fact, I am so drawn to negative space, I even started adding it to my beads, as in these skeleton hearts I created in polymer clay.


I have used hoops this year, to allow me to make some simpler pieces, that can still be funky.  In this piece, I used a simple loop to hang a bead I loved from.  That way, the focus is the paisley bead (by Diana of Suburban Girl Studio).  A very simple design, that is light and chunky at the same time.


Here I soldered some loops together and gave them a verdigris patina, and they have become the focal point.  I made it asymmetrical, so it could still be funky, yet it is light and simple at the same time.


Hoops don't have to be empty though, and I have also used them to frame beads that I want to accent, like in this piece with a fancy Joan Miller Bead
 
 
I hope you enjoyed a little trip through my mind, and how and why I love the shape of the hoop.  I also hope its inspired you to use them in jewelry creations.  Hoops span all styles of jewelry.  It is the most basic form.  It can be simple or complex.
 
Please share you hoop /loop creations in our Flickr group this month for the current Boot Camp.  I also hope you will join us on
 
October  14th for the blog hop, and show off what you have been making with hoops!


Tuesday, June 4, 2013

exciting opportunity for jewelry designers!

Love My Art Jewelry has been contacted by the catalogue & website uncommon goods to share this press release with our followers:
--------------------------------------


FOR IMMEDIATE RELEASE

UncommonGoods Hosts their Third Annual Jewelry Design Challenge
June 3, 2013 (Brooklyn, NY) - UncommonGoods, an online retailer that specializes in handmade, eco- friendly and uniquely designed gifts and accessories, has just launched their Jewelry Design Challenge, a call for unique, handmade jewelry including necklaces, bracelets, earrings and rings. The winner will receive $500 and an UncommonGoods vendor contract. Guest judges will provide all runners up with a consultation and critique of their work, as well as tips for marketing and growing your business. Additionally, the UncommonGoods buying team will be happy to review full portfolios in consideration for future work.

After the call for entries, the semifinalist designs chosen by the UncommonGoods buyers will appear on UncommonGoods.com where the online community will vote on their favorite pieces to move on to the final round of judging. The top five voted designs will be judged by UncommonGoods Assistant Jewelry & Accessories Buyer Sharon Hitchcock, Senior Manager of Etsy Wholesale Vanessa Bertozzi,and Jewelry Maker Etta Kostick.  A winner will be chosen in early-July.

Until June 30, 2013 at 11:59 EST, designers and artists are welcome to share their products at http://www.uncommongoods.com/designs/jewelry.
For more information, contact Gaby Dolceamore at UncommonGoods, 
jewelry-contest@uncommongoods.com

**Accepting work from U.S. residents only

About UncommonGoods
Founded in 1999 and headquartered in New York City, UncommonGoods is a catalog and online retailer of creatively designed, high-quality products. UncommonGoods works with a growing network of artists and makers to bring unique and special products to customers across the United States.
# # #
-------------------------------------------

we know how exciting this is (it is for us too!)
here are a couple of suggestions:
please read the rules carefully.
notice the materials they do not wish to see included in the jewelry they sell.
take a look at what they are currently selling as a point of reference, to get a feel for what they like to offer their customers. this does mean to change what you make or how you express yourself - it's just good to see how things all fit together!

from all of us here at love my art jewelry, we wish you good luck!


Saturday, November 17, 2012

but do you consider light?

mary jane dodd

sun tunnels, utah - nancy holt

we know that there are elements of design - color, texture, shape - & principles - balance, unity, scale - (to name a few)... 

but do you consider the light? 


in your work itself?

in your photography?


everything you work with has qualities of translucency or opacity - explore them... the strength and solidness of metals and clay, the delicacy of gems, glass and resin...  you can find the balance... 


designing from the gut is a wonderful thing - your hands dance across different bits and bobs... but being aware of your choices and thinking about what they mean adds a dimension of intentionality to your work

and this can take it to another level completely - 


Thursday, June 7, 2012

guest post - susan of libellula jewelry


I’d like to talk about “style” and whether or not our work is perceived as having a “cohesive style”.  I’ve been told that in order to create a brand and have my work be recognized or known, that I must settle upon a style and make my work more centered and cohesive.


At first, I tried to decide exactly what my style is or isn’t and it quickly became obvious that I could not limit myself or box my creativity into one style.  I remember reading Lori Anderson’s blog posts about her eclectic style in both her home decoration and jewelry design.  It has not held her back.


It reminds me of an acquaintance in New Orleans.  Shamarr Allen is a trumpeter, singer, and songwriter who started out learning the Jazz standards.  He became not just good but very, very good and the old guard Jazz musicians wanted him to stick with only Jazz.  They didn’t like that he was young and wanted to branch out into Hip Hop or Rock-infused music.  That led to him recording a cd titled Box Who
In?  He went on to record and tour with Willie Nelson and Asleep At the Wheel and got some experience playing Country Swing.  He has since said that he will record any kind of music he wants and that he might even record a Country cd. He might be joking--or not.


So, I’m going to listen to my heart and follow my ideas wherever they might wander.  I may never have a body of work that is distinctly recognizable as my “style” but I will have been true to what I enjoy making.  And just in case, I’ll keep putting my little tags on my jewelry.  Maybe that will help people know it’s my
work!
...................................................................................

you can find susan a.k.a. libellula jewelry here:

blog

etsy shop - cicada silver

etsy shop - libellula

flickr 


Saturday, April 28, 2012

artist at work

mary jane dodd

jewelry stand by alba nelly urbina

while it is necessary to make well,

the importance of staging and photography is undisputed... 

alba (a.k.a. sparkafarian) of moxie metal is one i depend upon to help me with the tall second order...   


i have my eyes set on one of these - 


if you would like to see the artist at work, take a look at this -  


Thursday, April 26, 2012

Do you use a sketchbook?

Recently I was going through old sketch books attempting to identify so different patterns of creativity. I don't generally sketch out as many ideas for my jewelry or beads as I do work out ideas for my paintings and other work.

I found my sketchbook I kept in my very first jewelry class and was really taken by how much my ideas took shape over the pages. I thought I would share some from the very first project from my metals class took shape.

A large part of my senior thesis in painting had to do with birds. Here is one sketch where I was working out ideas for a painting.

The requirements of this first project was to complete a piece using cutting-and-piercing metal and any cold connections. Here you can see where I was working out different ideas for the sawed parts and various designs that did not make "the cut".

In between sketches, there were brief little pages of notes that I took in class or wrote down the names of artists whose work inspired me. A neat little hint that I wrote at the bottom is to bend wire solder at the end into a semblance of the shape of the letter rather than attach a label that will most like fall off before you finish the length of solder.

Here you can see my final idea and a tiny mock up I made beforehand. This specific professor often encouraged us to make models or mock ups before we began to help us work out specific design problems that might arise during the process. (That's a polaroid of me a friend took at the time! I can't believe I ever had hair that short!)


Here is an image of the finished pendant. I'm still not good at tube rivets! Finished piece: Copper,  Nickel, Cardboard, Laser Printed Acetate, Feather, Stamping, and Texturing.

After reminiscing through this old sketchbook, I'm excited to begin trying more mock ups and design sketches as I work on a piece.


Do you keep a sketchbook of your jewelry ideas? Do you sketch items out or make models to avoid potential design flaws? I'd love to hear if you do!

Thursday, January 20, 2011

Do Something Different !


Yeppers, that doesn't look a thing like jewelry. It's my first zen tangle. It's my pen drawing on a little 4 inch piece of paper. And yes, I do know this is a jewelry blog. But bear with me, this might actually make a little sense by the end of this post.


 I recently stumbled across zen tangles when I was reading Marsha Neal's blog. Lots of you know her for her incredible ceramic pieces with these amazing textures that she's created from her own drawings. She recently started doing a weekly challange over on the I am the Diva blog, hosted by Laura Harms. She's a Certified Zen Tangle teacher and truthfully I don't in fact know just exactly what that means. So I hitched a ride and started tangling just because it was different from what I usually do as a jewelry component maker. It was a little different from my rather rigided thinking about design. You know, I like all of the dots to connect. I like things to be coherent within a strict and rigid little world I set up for myself.


Well low and behold letting go of those constraints is a real eye opener. Zen tangle actually opened up a whole new world for me. I am by no means an expert. Very far from it. Zen Tangle is an art form in and of itself with the premise that anyone can draw. But beyond that is the letting go of preconceived notions of what your drawings might look like. Think childhood, think coloring outside of the lines, think just letting go for a little while.

And just how does this tie into jewelry? I know you've  been waiting for how this actually has anything at all to do with a jewelry blog. You know how sometimes you hit the wall. Just nothing at all comes to mind that might be in the least bit new, interesting. You know, the I can't make one more piece of jewelry because I am done in. There is nothing at all out there that is original. OK, I can totally accept that I am the only one who has ever been in this position.

Well, I can say with absolute certainty that taking a little tiny bit of time to do something completly different can open doors.


This is a grown up version of a pattern from my very first tangle. Go back and look at the first photo. This is a larger version of the pattern that I didn't even think about. It's in the bottom left corner. I would never have thought of this pattern if I hadn't just let go. It's destined to be a texture plate for working with metal clay (probably, but you never know).

The point of all of this is that sometimes if you let go you can move to a place that is totally an expression of you. And if you a tangle, and nothing at all comes of it, you've had a few minutes to let go. The ideas spring from there. And thats what making art jewelry so, so much fun.

So let those ideas bubble up, spring forth!

Happy making
face
Related Posts Plugin for WordPress, Blogger...