Showing posts with label ceramic. Show all posts

Monday, November 14, 2016

Philadelphia Museum of Art Contemporary Craft Show Part 1

by Staci Louise Smith

I finally got to make to the Philly Museum Art show that is held at the PA Convention Center.  It is an hour drive or train ride for me, yet I have never been there- go figure.  So my mom, my daughter and I hopped a train and made an afternoon of it.   

It was Julia's first train ride and she really loved it.

We got to watch the landscape change from rural to urban on our way into the city.  I have and will always love the street art and graffiti.  I tried to snap a few pictures, but the train moves fast.


The walk from the train station to the Convention center is all inside a magnificent building.  I snapped a few pictures, but Julia did too.  I liked seeing what she thought was amazing- she took pictures of the elevator (I think she was amazed at how far up and open the ceiling was- it dawned on me, that she hasn't been in such a large building before?  Maybe a mall in her early early years?  but no large city buildings).  She asked me to take her picture in front of the mural too.  


I honestly think I had as much fun seeing her experience the beauty of the city for the first time too.


OK OK- enough about our trip.  Let's get to the good stuff.  

The art was mouth watering.  


I mean, the talent here was out of the world.  Not just the concepts, and the colors and the forms and textures, but the mastery of craft........I was in heaven and overload at the same time.  Today I am going to highlight some of the sculptures that caught my eye (and captured my heart).  Sculpture has always had a special place in my heart, and in school, it was probably my favorite art class.  So when I see people just rocking it, like it is an effortless flow from their being  (I know it's not effortless), it almost makes me cry with joy. I enjoy nothing more then witnessing others expressions of art first hand.  So let's get started.........

There was a glass artist there, Anna Boothe.  Her work had the look of old glass, her pieces has a relic feel to them, yet a modern twist.  Of course, this spoke to me, because I love all things ancient modern.  Most of her work is kiln cast.......and you can read more about her and her work here.


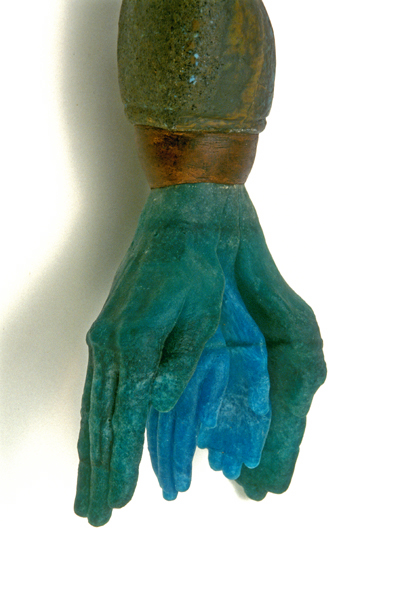
Images from Anna's website

Next up is Nile and Michelle Fahmy. They are master metal smiths.  I almost wanted to bow to her.  Their mastery of metal is humbling to say the least.

Here is a bit from their artist statement (they are a brother sister team)
Our metalwork is driven by ancient techniques, some of which date back to the Bronze Age. This means that we practice and preserve smithing techniques that are rarely seen in our world today. Every piece produced requires a great amount of focus, control, physical strength, and endurance. A single vessel may require thousands of hammer blows and hundreds of hours of labor. Each finalized piece of art is completely unique due to the nature of the forging process.

We draw our inspiration from the patterns of the natural world. These patterns of growth, erosion, and decay are everywhere around us. By studying these patterns, we can use a hammer to be wind on stone, water on earth, or the gentle unfurling of a young leaf. The metal moves again and again beneath the hammer blow, eventually coming to rest in a new form, and finally the creative process is complete. Nothing is added, nothing is subtracted, there is only the metamorphosis.


I saw their work before I saw their statement, and let me tell you, it rings so true.  You can feel the raw energy of their work when you walk into their booth.  You can see the deliberate hammer blows that had to happen to create these 3-d vessels from sheet metal.  


Do you need a break yet?  A cool drink perhaps?  I mean, that is just two of the amazing sculpture artists from the show.  Ready for more???

Then, there was Wolf Creek Studio, composed of Sharon Matusiak and Robin Washburn.  They are mixed media artists who work together.  (Please check out their site for amazing works of art)

Metal, wood, paint.........you have to see this video about their studio and art.  (the video is done by Ethan Allen studio- stick with it through the Ken Gray plug in the beginning).  You have got to see the studio and their works.


Wasn't that an awesome tour???


Next, meet Su Griggs Allen.  She was a delight to talk to and her work is something straight out of my dreams.  


Her booth pulled me in, and I wish I had more time to take in each and every piece.  she was a delight to talk to as well.


It was fun to chat with her, as she shared how she has been desiring to go smaller and make some jewelry.  This struck me, because I, who make jewelry often dream of going larger into sculpture.  Us artists get bored and need to change things up often I think!  One of the things I love about the chance to talk to other creative minds is how much we all have in common.

And last but not least, there was Judit Varga.  Her work was by far my favorite, and when you see it I think you will know why.  Her form, her colors, her textures.................they were organic and modern, like urban decay.  All ceramic, all clay based coloring..........every single piece was amazing (we were there on Sunday, and I heard from her friend that most of her big pieces had sold already).  


 This piece was my favorite at the show!  

I loved the striped and broken form of the circle, the folding and wilting.  I loved the rusty box it sat on, the contrast of colors.  The organic painted appearance of the base against an almost fabric print stripe.  My words don't do it justice.  


This piece is hollow.  As if it were not amazing enough...........

I also grabbed some photos from her website, in case my poor in person pics were not enough for you to swoon.


I have to stop here.  When I say this show is overwhelming, I think you can get the idea.  This is only a drop in the bucket. 

I really hope you will visit the websites of these amazing artists.  Their work is inspiring.  THEY are inspiring!  
And tune in Thursday to see my jewelry favorites from the show.  :sigh:  that may take take blogs itself....................... 

Thursday, August 13, 2015

Bud Vases as Needle Holders at Bead Fest Philadelphia

In just a week I will be arriving at Bead Fest in Philadelphia to get my artist table set up.
This is the first time in 6 years I have done this show myself.

Marsha Neal Studio Artist Booth 570A Bead Fest Philly Aug 21-23, 2015
My friend Darlene of D7Studio
(booth 366) has been taking my bead work with her to bead shows here in the north east US since I stopped doing shows. And I feel that at least for Bead Fest (and Bead & Button) it is time for me to reconnect in a physical presence way with my friends and customers.

Darlene will still have the majority of my "bead" work at her booth 366 with all kinds of cool jewelry supplies and other artists work (Nolly from Nolly's Folly).

My artist table 570A will focus more on my bracelet kits, sculptural beads, vessels and small terrarium pieces. And I am right with Staci, Diane, and Nikki - it is going to be such a fun creative area (all of the show will be - but especially the area where the artists are!)


So for those of you that do work with any kind of crafting needle - you should swing by and get one of my small vessels. They were originally intended to be used as bud vases for teeny flowers (my little kids like to pick flowers for me - but usually they don't have much of a stem) but they sweat water, so they are now only for "dry use".


Here is a quick shot of the various stages of me making these small vessels. I use my own bisqued clay texture plates that I made with flowers and seed pods from my garden. The clay is cut to a general size, and is rolled into the plate to get the reverse image. I have to work quick to not have cracked walls, as these are not large pieces of clay. 


Here they are drying out on a piece of drywall scrap after being made (the drywall helps absorb the moisture from the clay and helps avoid stress drying cracks).

The bottoms are kept a bit thicker to allow the piece to stay upright while in use.


And one of my favorite parts of figuring out the design of these is allowing the bottom of the piece to come up around the sides and create this organic line and bevel. The line collects the glaze during the firing and allows for puddling. The bevel conveys a sense of the piece being lighter.


And above you can see the dried seed pod from a newer plant (Begonia) that I used to press into the clay a couple of years ago. Makes me want to start to make some new plates with the growing season coming to an end in a couple of months. My favorite time of the year to collect!

And if you are attending Bead Fest Philadelphia August 2015 copy and print this $5 weekend admission pass! The regular fee I believe is $14 for the weekend pass (free if you are taking classes).

Hope to see you there!

Friday, March 20, 2015

Creating a Custom Bead Tree

by MaryAnn Carroll

Some History:

It has been awhile since I used my little doll kiln to fire beads. I do fire in our large wood-fire kiln, but that is only when Bill has enough large pieces to fill it up. A few weeks ago I decided I would sit down and create lots of mid-fire (approximately 2200 degrees F) cone 6 beads and a bunch of cone 10 (can fire to approx. 2400 degrees) beads for the wood kiln so I would be better prepared.... I am the type that is often scrambling at the last minute!!

Here they are completely dry and getting bisque fired. I bisque fire to about 1850 degrees F and that preps them for the glaze that will be applied. There are a few other things in there that I am making for our upcoming show that we are organizing called Potters for Pets that will be at the CNY SPCA in Syracuse, NY.  We also have a Facebook page for this event. We are really hoping for a big turnout, since this is the first show that we have been in charge of. (A little promo here) If you are in the Central New York area, it would be great if you could share our event! It is a first annual, so we need all the help we can get!!


So, I typically leave my warped, very used bead trees in my kiln after use. This time I went to look and there were two of the four! I searched and searched..... no luck. Being that I have a husband who most of the time likes to please, he made me a couple more, but it will be weeks before they are ready to use.  My bead trees are made to get the most out of my kiln. The original group has gone through at least 40 firings and are badly warped. Even warped, I make them work.

Since I use a mid-fire clay, my bead trees are made from a higher fire clay (cone 10) which can go to up to about 2400 degrees F. You could make this out of the same cone that your clay is, but I don't know how well it will hold up. My original trees have been fired to cone 12 in the wood-fire kiln many times. They have taken a bit of a beating as you can see. That's okay.... it is just the beads that need to be pretty!


What we originally did is take the measurements of my little kiln. We then designed trees (this was a few years ago) that would work just right inside the kiln utilizing the most space.  The new ones are a tad bit narrower as it was always a tight squeeze getting all four trees in and there is nothing worse when you carefully set the last tree in a your hear, "ping!" A bead has left one the of trees!!!! Yup, that means that they ALL come back out to start all over. Needless to say, loading the kiln is not one of my favorite things.

With all of that said, I thought I would share how to custom make some of your own bead trees. I cannot compare these to what you can purchase online, but I can say that I can use the most space possible with my own design. You certainly need to start by taking your own kiln measurements and go from there. Also, take into consideration that as a rule the clay will shrink 15%.

The Tutorial:

Here is one of the new trees shortly after being built. This time Bill added some supports on the side to see if this will help slow down the warping. To create this, he use a slab of clay that was rolled out. He then scored and slipped the clay to connect the sides and the base.

Here is a link of a score and slip demonstration. 

After doing that we waited until it dried to a leather hard stage.


In the leather hard clay, I used a pencil tip to begin the spacing that I want. It is best to stagger them as you will see later. I start by measuring approximately 1 inch apart.


I did pull out the ruler after the first row. so that I could stagger more accurately to make the most holes that I could. That is another benefit to making your own. 


After the pencil measures, I started to puncture the holes with a toothpick (I use toothpicks for everything when it comes to clay!) Never just push it through. You need to use a rolling motion.


What I found, however, was that the clay was a little too hard and I was afraid that I wold break the tree. I grabbed what was closest to me. I get lazy sometimes and don't like to get up when I am in the middle of something! I then took a that little piece of nichrome wire in my reach (the same high fire wire that you will hang beads on when you fire them) and used that to puncture the rest of the holes.


As you can see, I did not put the hole all the way through. Instead I pushed it (turning the wire) until it just started to poke out the other side. You don't want to put too much pressure on the clay. If it broke, it would be a very sad day.


You then go to where it was punctured on the opposite side and push the wire through tuning while doing that. This process gets repeated multiple times. I think I did this at least three or four times. 

Once you are satisfied,, you can take one of your clay tools. I would tell you what this one is called, but at the moment I cannot remember. If you are over 50, you get it! You can pick a tool that you are most comfortable with. This happens to be my "go to" tool.


Then I wiggle the holes to make them bigger than the nichrome wire that will be used to hang the beads. The reason for this is that the clay will shrink 15% as stated earlier. I also do not like them to fit too tight. I like to balance the beads on the wire.


Here it is after an hour of work. It takes many times to get it just right. Leather hard clay is not something you want to be rough with. It will break. Now the only thing left is to let it dry slowly. It will be a couple of weeks before I can fire this tree for use with my beads. You do have to fire this before using. I would recommend at least a full firing to cone 6. Certainly, if you use lower fire clays such as earthenware, you would have to make some adjustments.


So, as those dry, I am going to use my old dependable warped trees to fire this batch of beads that I made. As you can see I have glazed beads balancing on the nichrome wire.


These are all fired now. It took two firings for all of them.


By custom making my bead trees, I am able to avoid using shelves like you see in this picture. This was a pain and takes up space that I cannot afford.


Here is on group fired. One took a hit by tipping into the kiln brick. I was able to use my dremel to sand that white off of it. It is the pendant on the top left. that is because I just balanced a broken tree between two kiln bricks. Not the the best move...... live and learn.


And..... guess what was found a day after making the new trees.  I am sure that I don't need to tell you that the answer is... the two missing bead trees!!!! Yup, Bill found them out by the wood-fire kiln. Isn't that always the way? The good news is that now I have some extras.


Enjoy your Friday.


face
Related Posts Plugin for WordPress, Blogger...