Showing posts with label bronze clay. Show all posts

Thursday, August 8, 2013

Beads and Bead Show Stuff and Beads and ....um....beads

by Staci Louise Smith

Summer life is crazy.  The days are longer, but seem to fly by all too quickly.  With three kids at home and Bead Fest Philly to get ready for, mine are zooming by.
 
I am still making the beads for the show, and I haven't even begun to work out all the little details- like cards and bags and all the little stuff I should have with me. 
 
However, Genea and I will have necklace kits for sale that we are pretty excited about.  I just have to paint the stars for them.
 
Here is what she sent me
 
 
I will be adding stars similar to this


Each set is totally different, and will have instructions for a finished piece and all the materials required to make it.  I can't wait until they are all done!
 
 
I am wishing we had done more kits in another style too, but time didn't allow this year. 
 
This is the first time Genea and I will be selling at Bead Fest, so if our posts are all bead show focused, I apologize, but its all we are doing right now!  Our minds are in production mode! 

(shameless plug) We are booth #371 and you can find a coupon on my blog that you can print and get in for only $5 at the door, instead of the full $15 price. (back to the beads)
 
So, this is the progress I have made......................


painting the polymer- this is all merely first layer of paint, no antiquing or crackle yet.  They are much brighter then they will end up.


These still need to be painted. 


Metal clay is coming along, but I have a lot of metal work to do yet before the show.  If I get a lot done in the next few days, I will feel much better about where I am at. 
 
I made some new- HUGE bronze pieces. 


I even came up with some new designs in bronze along the way. 
 
I know it will come together, but right now it is bead chaos.  I have a million beads around me and none are quite finished!
 
I have taken over the family room too, so I can see how my display will work out. 


 I am taking lots of jewelry as examples of ways to use my beads, though I hope they invoke inspiration in each and every person who buys them!
 
 For those of you who can't make it to Bead Fest, or if you just can't wait to get started, I have 20% off both my etsy shops until next Wednesday, the 14th.  Use code NOBEADFEST to save at checkout.

jewelry:  www.stacilouise.etsy.com

beads:  www.slartisanaccents.etsy.com

Is there anyone who has never been to a big bead show before?  If so, do you think you will take the plunge and try one out?

I am kinda sad I won't be shopping and hanging out this time around and have to work!  Once I finally went to a big bead show, I was hooked.  I won't miss one now!


Thursday, January 17, 2013

A Peek into Production

Well, it's that time of year for me, the time of year when I crunch to have enough stock for the Berks Bead Bazaar in 6 weeks.  As of last weekend, I had nothing  to sell.  I still don't have anything sell ready, but my beads are underway.  So I thought I'd give you a peek into the madness, I mean, production.


I also have lots of new designs, including some toggle clasps!!!  I made my Moon Babies smaller this year, and shrank down some other designs as well, because sometimes they need to be the accent and not the focal.    So without further ado, here is the photo journey of bronze beads.


Bronze clay freshly molded, still damp


Then they go onto the hot plates....when I go into high production, two is not enough!  (I am not patient at all)


Next they get sanded with a soft sanding pad to smooth the edges, and holes get drilled at this point


Then they go onto a tray .
After that, they are fired in the kiln.


This is what they look like out of the kiln, with a light brass brushing under water to clean the carbon off.


You can see the finish is kinda matte- that's because the particles are not compressed yet.  The bronze is very porous at this stage.  To make it shiny and add strength, I put it into the tumbler with steel shot for anywhere from 10 minutes to an hour depending on the finish I want.


Looking into the tumbler when they are done polishing.


All shined up and ready for patina or a liver of sulfur bath.

The bunnies are new- and I plan to use ball head pins, balled on both sides, to rivet them to a backing.  I will hopefully have that to show one of these Mondays!

Here are some more of my new designs before they are cleaned up.  


I hope you enjoyed this peek into the process of bronze mass production. I really enjoy working this way- in batches!  I get into a nice groove and just go with it.

What about you?  Do like to work in big batches, or small / single projects?

Thursday, September 20, 2012

Base Metal Clays

by Staci Louise Smith

Silver metal clay was my first love.  I love silver jewelry. 

(some of my silver work)


 However, when the price of silver jumped, I bailed and had to try out this base metal clay. I started with fast fire bronze, since the ONLY book I could find at the time was this one.  (and its a good one too- I recommend it)
I bought the book, clay, and the firing tools I needed. I got a second set of dry working tools and I was off.  I am by far no expert, but I will share a little bit about this medium, since there is just not a lot of information out there. 
First I will start by saying, I only bought a second set of dry working tools, since I could wash the clay off my other tools more easily so it wouldn't contaminate my silver clay.  However, for sanding and filing I got a second set.  Its worth it, because if you get bronze clay bits in your silver its going to ruin it. 
From all the people I have talked to, the only sure way to fire bronze and copper clay is in a kiln. So I highly recommend firing in a kiln, in carbon.
Not all carbons are created equal, and this is where the guess work and playing around starts.  I have tried many carbons before ending up with one I like.  It's a personal preference really, they all offer various finishes.  I have talked with people who don't think they all fire the same either. 
You will also have to choose a firing container.  I used my good old stainless steel container for about 6 months. 
However, stainless steel is messy, and will spall, creating a black build up in your kiln.  So when Cool Tools came out with firing foil to make your own pan, with no mess, I bought it.  I loved it, for about a year.  It's inexpensive, and keeps you kiln clean, but it eventually wears down, and mine got holes in it, and then items near the holes were over-firing (bubbling). 


So I may go back to my good old stainless steel.  There are also these new ceramic firing vessels I'd like to try. I hear good things about them.  Perhaps down the road I will try them as well.  They maintain a better heat, so you have to reduce the firing temp while using them. 


Am I making you want to try this product?  There is honestly a lot of guesswork, and a lot of figuring every time you change a variable.  There are a lot of failures.  You get guidelines for firing, and most times they are good, but depending on the thickness and size of your pieces, and the age of your carbon, and the placement in your firing container, you can end up with pieces that are under fired, bubble or burst,
and you may never figure out what caused it either. 
 
I always try to hammer my pieces when they come out of the kiln, to ensure they are fired properly.  They should not crack or break.  If they do, they are under fired.

All in all, I love the look of bronze and copper clay. I love the price.  Even if I lose one or two pieces in each firing, it still is economical for me.  I am also someone who is open to learning via mistake, and doesn't mind a BIG learning curve, so for me, it works.  It may not be for everyone.
 
Working in bronze clay is a bit trickier at the "wet clay" stage,  then the copper.  It doesn't want to stick to itself as easily as copper clay.  So for working with the clays, I prefer the copper.   I think the copper tends to fire more consistently also.  But for finished results, I prefer the look of bronze, and its my go-to clay for making components.  I use fast fire bronze, and it shrinks MUCH less then the copper as well, and that's another bonus for me, since I like my pieces to have some good chunk to them.  Here are two pieces, one in copper, one in bronze, that i used the same mold for.  You can see the shrinkage difference.
 
The Moon Baby Focal is done in bronze (and has a patina) and the single wing is made from the same mold, in copper. 


I prefer using molds for the bronze clay, since its sooo hard to get it to stick to itself, its very difficult to hand build things.  I often rivet  finished pieces that were molded, to copper backings or add them to polymer when finished to add more dimension and depth, because its hard to achieve with the base metal clays.  (my hat is off to those who successfully do add dimension, such as Lee Ann of Summer Studio's and her 3-d bronze beads, that is no easy task!)


Above are mine, and below are LeAnn's beads. 
 
Here are a couple places for information on bronze and copper clay.
So, for those of you who have been working with this medium, what was your most epic fail, or your greatest break through?  Do you have a favorite place to gather information on metal clay?

Wednesday, August 24, 2011

Men wear jewelry too

by LeAnn Weih 


It started with these two bracelts that I made for myself. Then I made another for my daughter. Peter remarked, "you know, men wear jewelry too."  I should not have been terribly surprised by this revelation. A couple of years ago my 7 year old nephew went into a bit of a pout when I made his sister a necklace. We ended up selecting a bronze dragonfly and a simple leather cord for him. Or there were the men who would come by my table at art market and look at metal pieces and then be disappointed that I didn't have cords that were a good length for men.

So this started me thinking maybe I should make Peter a bracelet or two. So I challenged myself to use the basic design of these two bracelets to come up with the masculine counter parts. Bronze components seemed an obvious choice but most of the pieces I make are decidedly on the feminine side.


So I made up some new styles of components that were a bit more rustic and had a somewhat heavier feel to them. I used much heavier leather than in my bracelets. All of the beads I have are more feminine than I was looking for in men's jewelry. So instead I made up coils of heavy 16 gauge bronze wire and used them in place of beads.


Your turn!
Do you make men's jewelry?
What do you look for in the design of men's jewelry?

Wednesday, July 27, 2011

Home Sweet Home


Hi, All! It's been a while since I've been on the LMAJ blog. I'm just now feeling a little bit settled since we made the big move from West Texas to North Carolina. It's been a long trip in more ways than one. Life could not be more different here. For one thing it's really, really green.  West Texas summer is hot, dry and kind of brown. And there are hills here and it rains...a lot.

The house we moved into hasn't been lived in for more than 3 years. You can probably picture the state of the gardens. Total wreck. We've spent many hours out there cleaning things up. It's something of an obsession of mine right now. I love to grow things. Yes, I know this is a jewelry blog but we're getting there. Truly.

The heat last week chased me back inside and to my new studio. Air conditioning is the best thing since sliced bread! I'd show you pictures of the new studio but it's a disgraceful mess right now. It's starting to feel like home sweet home. Maybe another time I'll give you a tour?


These are some of the things out in the garden that are inspiring my work right now. Coreopsis, bitty baby tomatoes, new leaves, tickseed. It's not so much about the colour as the shapes. I love the form of seed heads, the unfolding of leafs, opening blossoms. I take a little tour every morning as the day is getting light. I'm looking for new small wonders to reveal themselves. I'm never disappointed and always feel quite in awe of the beauty of quietly growing things.


Bronze head pins. I never in a million years would have thought I might make head pins. But they just seemed the way to put together beads into something that mirrored my feelings about all of the lush green growing things out there in my little world.


And bead caps. I have one hundred zillion ideas in my head for bead caps.


These are my tomatoes. OK, I know they don't really look that much like tomatoes. But that's the great thing about taking a leap from the literal to the abstract. You can use what you see, what feels good as a spring board to expressing your own unique world view. 


So what's inspiring you right now?

Thursday, February 17, 2011

Confused About Metal Clay?


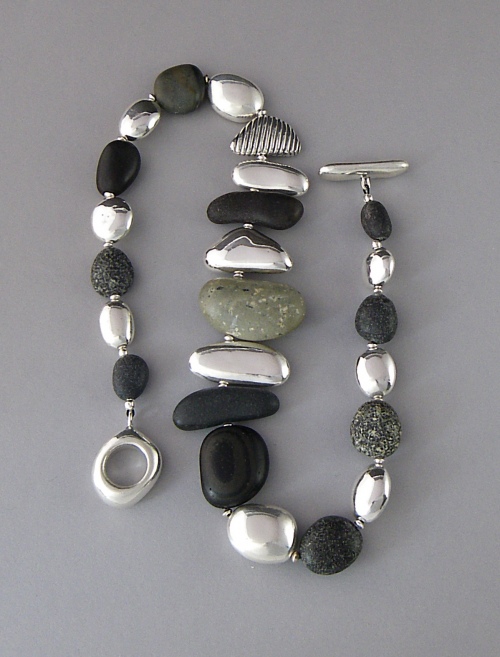
This gorgeous necklace was made by Barbara S Fernald, whose work with metal clay and jewelry I very much admire. She lives on Ilseford, Maine, on small island with a winter population of only about 70 people. Much of her work is inspired by the island, it's beaches and the sea around her. She made all of the large silver beads in this necklace from fine silver metal clay using her own hand made molds and texture plates.

You can see more of her work at her website or her Etsy site. From her website you can follow her blog where Barbara generously shares her work and glimpses of island life. I find her blog a treat and always look forward to hearing about what she's up to.


So what is metal clay, anyway? I often see metal clay referred to as PMC. PMC (Prescious Metal Clay) was developed in the early 1990s by Dr Morikawa of the Mitsubish Matericals Corporation. Technically, PMC is a brand name. There are many brands of metal clays on the market now and many types of materials available, including fine silver, gold, bronze, copper, steel, just to name a few.

What all of these metal clays have in common is that they are composed of very fine microscopic particles of metal suspended in a non-toxic organic binder. This results in a plastic substance that can be molded, carved, shaped, pushed and prodded into many forms and in ways that would be difficult to achieve with traditional metal smithing techniques.

Once formed and dried, all metal clays are 'fired' usually in a kiln but some types can be torch fired. Firing is a little bit of a misnomer too. What happens is that the organic binder burns out and the particles of metal sinter (melt together) to form a final piece that is 100% metal.


This only scratches the very surface of metal clay. It can be a very technical medium, sometimes frustrating, but I always find it exciting to work with. The number of metal clays being developed is growing at a very rapid pace. It can sometimes be hard to keep up with!

There are many, many resources out there if you'd like to know a bit more about working with metal clay. Here's a few that I turn to frequently when I have questions. 


I'd love to hear about what you think of metal clay! If you've got any resources that you really like, let me know. I'll add them to the list.

Many thanks to Barbara for sharing her photos with us.
face
Related Posts Plugin for WordPress, Blogger...