Showing posts with label ceramic tutorial. Show all posts

Thursday, April 10, 2014

Cleaning Bead Holes: Fine Finishing Boot Camp

One of the most difficult things to deal with in the ceramic bead making process is the bead hole.
More specifically, keeping the glaze from filling the hole(s) and avoiding sharp edges around your bead hole.
Marsha Neal Studio Glazed Porcelain Pendants.
Almost 2 years ago I wrote up this blog post about Cleaning Your Holes!

I have had many friends ask me to clean out holes from other artist pieces or commercially made beads they bought either online or at a show, but did not realize that the hole had been fused with glaze or that it had not been cleaned.
Or that the hole was way too small for the intended use.

My previous post goes into details on using diamond tip drill bits with a Dremel tool and with water, so I won't bore you here with the same info.

Glass beads that are made on a mandrel will need to have the bead release cleaned out of the hole. The beads are usually soaked in water then drilled out.
(Check out this great post by ShebaMakeda Glass Beads)

Polymer clay bead holes can be enlarged by drilled out with a drill bit after the clay has been baked.
(Check out this cool post: Lentil Bead Drill Jig by Desiree's Misc)
Image: Beaducation.com Small Files (Set of 6)
Metal beads can usually be cleaned with a small file.
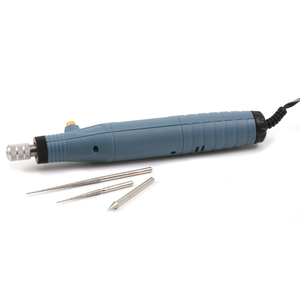
Image: Beaducation.com Pro-Electric Bead Reamer
Bead reamers of all sorts (electric and manual) are available through many bead suppliers, hardware stores, arts & craft stores, etc.
Image: Beaducation.com Diamond Bead Reamer Set

Because I work in a manner of "production" when I am cleaning out my bead holes, I prefer to use my cordless Dremel tool with a diamond tip bead reamer and a bucket of water.

And now that I saw that Dremel has a drill press - I think I know what is going to be on my next "need to get this tool" list. I have way too many gemstone beads and agates that have weird holes that are narrow on one side, wide on the other - that I need to fix!

When using bead reamers or drill bits to enlarge your bead hole,
Please remember to work SAFE and SMART by using:
Gloves, goggles, dust mask, wet drilling to reduce dust and heat, etc.
And remember to work smart with water and electricity: dip your bead and just the tip of the drill bit!

And bead makers - remember - it is up to you to sell a product that is usable and of the highest quality that you are capable of. Don't skip on quality steps like this because it will only make people pause before they purchase something else from you in the future.

Tuesday, February 26, 2013

Nichrome Wire In Ceramic Beads

Nichrome Wire and It's Use In Ceramic Bead Making.
Experiments with Cone 5 glaze firings using 
Porcelain and Stoneware clay.
What is Nichrome Wire?
There is a lot of information out there on the web about it, so I'll avoid the boring details. 
I will mention that it is an Alloy. 
It contains nickel and chrome.
It is commercially available in various gauges and lengths and can withstand high temperatures,
which is it why ceramic and fused glass artists that use kilns like using it.

Three major things that I often hear about Nichrome in the jewelry world (and my answers):
1. It's Nickel - a lot of people are allergic.
*Yes - Nickel. Design smart and use it where it will not contact the skin directly*

2. It's not pretty. I like things shiny.
*The firing process oxidizes the metal, which looks green or dull. Sometimes it can be taken off with a green scrubby (see below). Think about how you clean rust off of steel wire used by glass bead makers.*

3. It can be brittle.
*Yes. Depending on the gauge of wire, how hot the kiln firing was, and how much the wire was "work hardened" after the firing may make the wire more susceptible to becoming brittle. Try not to over work it. The larger the wire, the more brittle it seems to become (Thanks Elaine Ray for our conversation about that).*

So here is my process of making 
Porcelain and Stoneware Ceramic Headpins 
with 24 ga Nichrome Wire:
 Measure and cut wire ahead of time.
Insert wire into wet clay.

 After clay is dry, bisque fire to Cone 04 (@1900 degrees F)

Glaze ceramic part, wipe off any glaze that remains on wire.
I like to suspend my beads.
This means figuring out the weight of the work and how much that ga wire can hold without slumping during the firing.
I've been doing this for 10+ years.

After a successful Cone 5 (@2230 Degrees F) Glaze firing,
I can easily bend the 24 ga Nichrome wire to "straight". 

I then use a green scrubbie to clean the wire.
This is where you need to be careful to not overwork the wire as this action of cleaning and straightening is work hardening the wire.

 I am able to make a quick simple wire wrapped bale with the 24 ga Nichrome wire with my normal tools (just like steel wire though, you might want to not use your "really good" tools).

Nichrome wire in my kiln.
The elements which are in the element holders of my L&L Kiln.
The Thermocouple
(green rod sticking out of the kiln wall at 1 o'clock).
The bead tree "rods" that come standard with these
Roselli Bead Racks.
The hooks I make with the 17 ga Kemper Hi Temp Wire to suspend my work.
And now - the 24 ga (and 22 ga) for making Ceramic Head Pins.

Some of the nichrome gets dark green,
while some stays just dull.
I keep noticing this and want to see why.
Maybe it is the ratio of nickel to chrome?

And then the after thought, which probably entered my mind at some point while making these:
Will they ship easily?
Did I waste wire by making them too long?

And as a bead maker there are questions:
1. How long of a wire do jewelry makers prefer? 2" or 3"or 5"?
I guess that depends on the project.

2. Do you prefer to receive your head pins ready to use?
Or should I not take extra time to clean them for you first?
Extra steps means extra time for either of us.
That of course is reflected in the price.
Either yours or mine.
I would tend to think in general people would want to receive them clean,
or at least somewhat clean with the oxidized green scale almost removed and ready to use.


And as a jewelry designer...
Well there are SO many things you could do!
Check out this post on what my "go to" jewelry designer friend Jenny Davies-Reazor quick whipped up for me with some of my head pins (we were discussing ways to "hide" the nichrome for issues #1, 2, and 3 above).

I'm going to experiment further and will post more next month here on LMAJ.
Hope to have lots more examples on use too...

4/23/15 Source update:
For those of you looking for nichrome wire there are a few good places to look.
I have ordered Kemper High Temp wire from my local ceramic supplier in the past.
I now order in larger quantities from Jacobs Online (the Nichrome 60).

Hope this helps!
face
Related Posts Plugin for WordPress, Blogger...