Showing posts with label Summers Studio. Show all posts

Wednesday, October 26, 2011

Simple Ceramic Button Clasp

by Summers Studio


I learned how to make this style of clasp from Lorelei Eurto. It's a simple way to make a focal out of a large ceramic button.


It's essentially a variation on an S style clasp. I used quite heavy gauge wire in this one, 16 gauge, so that I'd get a nice sturdy clasp that wouldn't warp under the stress of being worn. One of the problems I had with it though was that the button wobbled on the wire. But I had one of those eureka moments, which really do not happen often enough.


I used a smaller gauge wire and wound it back through the button holes to sturdy up the clasp. Now it looks a bit like the button is sewn on.

Want more details on how to make this type of clasp? Click here to go see Lorelei's excellent video of her technique.

Wednesday, September 28, 2011

Playing with Light

Photography and getting my little pieces presented is one of my least favourite things to do. I've read heaps of things on this. I've tried heaps of things. I always come back to there has just got to be a better (and less expensive) way to do things. 

Now that autumn is here that means for a lot of folks a there will be a limited amount of natural light for photos over the next few months. So what do we do? How do we compensate for the light in the grey days of winter?

Enter Carol Bradley Designs and her post and links to Boo Jewels, truly excellent tips on her experience of getting great jewelry photos.  Boo Jewels  is not only a jewelry designer but a photographer as well.  She's got lots of information in there in a very easily understood language of just what your camera is doing and what you can do with your camera. Which is fabulous for me because sometimes I just zone right out when it comes to technical stuff.


Back when I was in Texas, I did a lot of my photos in relatively low light. Mostly because the natural light was so intense that I had to or all of my photos were over exposed and had deep distracting shadows. So while I was there I did a few experiments based on the tutorial by Boo Jewels.

Two of the things I picked up on straight away were reflecting light and changing your Ev setting on your camera. Mostly because I could reflect light with a cheapo 5 minute hand crafted fix and I actually knew where my Ev setting (that's an exposure compensation setting) was on my point and shoot camera. 

So what I did was set up a tiny little experiment. I photograph most of my jewelrey components on a colour background because I think white is sort of boring for the pieces I make. This green that you see up there is one of the colours I find most pleasing for bronze pieces. It's also one of the most difficult I use to get good and true colour on a computer monitor. But I can't help it, I like how it looks with golden colours of bronze.

So basically, I bounced light around and compesated for indoor exposure. Easy peasy. The first photo, top left is without any 'enhancement', just my normal factory setting on the camera. I usually go in and edit these types of photos to make them brighter.  The top right uses a reflector to bounce light onto the piece. Still kind of dark. The bottom two use and Ev setting of 1 (normal is 0) to compensate for low lighting. The difference is that in the bottom right photo I used a reflector to shine light back onto the pendant. (More on that later, promise) See how they get lighter and brighter?

None of these photos were edited in photoshop or other types of software. These are straight out of my camera. You could and probably would go in and do this.


I know a lot of you photograph jewelry and components on a white background. This is the same sequence, 1) top left, camera factory settings, 2) top right,  light bounced back with added reflector, 3) bottom left,  exposure compensation, 4) bottom right, exposure compensation plus light reflected back onto the component.


And here is that same set of photos adjusted in a photo editing program to be brighter. It works but I still feel like it is over exposed and lacking depth. So I think this is really just a start.


So here's the photo set up. I use an inexpensive clamp lamp from the hardware store fitted with a daylight bulb, one of those spiral types.Those bulbs last forever. I think I've been using this one day in and day out for about 4 years now. It is clamped to the back of  a chair in my dining room. The reflector is on the right and is a piece of kitchen foil scrunched up and then smoothed out and wrapped around a Whitman's Sampler Chocolate box. The chocolates are long gone and I really would like some more. The background paper is scrap book paper from the craft store. Low tech, not very elegant. Easy peasy!

Go check out the tutorial from Boo Jewels. There's heaps more information and ideas there.

How do you use light to photograph your work?

What will you do when the grey days of winter come around?

I'd love to here how you set up your photography!

Wednesday, August 24, 2011

Men wear jewelry too

by LeAnn Weih 


It started with these two bracelts that I made for myself. Then I made another for my daughter. Peter remarked, "you know, men wear jewelry too."  I should not have been terribly surprised by this revelation. A couple of years ago my 7 year old nephew went into a bit of a pout when I made his sister a necklace. We ended up selecting a bronze dragonfly and a simple leather cord for him. Or there were the men who would come by my table at art market and look at metal pieces and then be disappointed that I didn't have cords that were a good length for men.

So this started me thinking maybe I should make Peter a bracelet or two. So I challenged myself to use the basic design of these two bracelets to come up with the masculine counter parts. Bronze components seemed an obvious choice but most of the pieces I make are decidedly on the feminine side.


So I made up some new styles of components that were a bit more rustic and had a somewhat heavier feel to them. I used much heavier leather than in my bracelets. All of the beads I have are more feminine than I was looking for in men's jewelry. So instead I made up coils of heavy 16 gauge bronze wire and used them in place of beads.


Your turn!
Do you make men's jewelry?
What do you look for in the design of men's jewelry?

Thursday, February 17, 2011

Confused About Metal Clay?


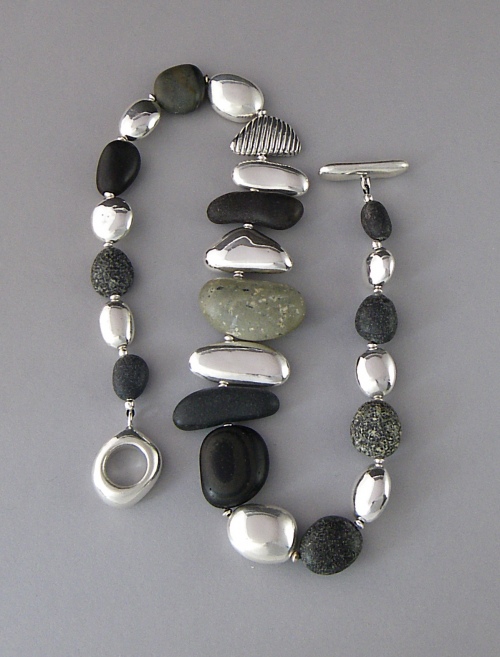
This gorgeous necklace was made by Barbara S Fernald, whose work with metal clay and jewelry I very much admire. She lives on Ilseford, Maine, on small island with a winter population of only about 70 people. Much of her work is inspired by the island, it's beaches and the sea around her. She made all of the large silver beads in this necklace from fine silver metal clay using her own hand made molds and texture plates.

You can see more of her work at her website or her Etsy site. From her website you can follow her blog where Barbara generously shares her work and glimpses of island life. I find her blog a treat and always look forward to hearing about what she's up to.


So what is metal clay, anyway? I often see metal clay referred to as PMC. PMC (Prescious Metal Clay) was developed in the early 1990s by Dr Morikawa of the Mitsubish Matericals Corporation. Technically, PMC is a brand name. There are many brands of metal clays on the market now and many types of materials available, including fine silver, gold, bronze, copper, steel, just to name a few.

What all of these metal clays have in common is that they are composed of very fine microscopic particles of metal suspended in a non-toxic organic binder. This results in a plastic substance that can be molded, carved, shaped, pushed and prodded into many forms and in ways that would be difficult to achieve with traditional metal smithing techniques.

Once formed and dried, all metal clays are 'fired' usually in a kiln but some types can be torch fired. Firing is a little bit of a misnomer too. What happens is that the organic binder burns out and the particles of metal sinter (melt together) to form a final piece that is 100% metal.


This only scratches the very surface of metal clay. It can be a very technical medium, sometimes frustrating, but I always find it exciting to work with. The number of metal clays being developed is growing at a very rapid pace. It can sometimes be hard to keep up with!

There are many, many resources out there if you'd like to know a bit more about working with metal clay. Here's a few that I turn to frequently when I have questions. 


I'd love to hear about what you think of metal clay! If you've got any resources that you really like, let me know. I'll add them to the list.

Many thanks to Barbara for sharing her photos with us.
face
Related Posts Plugin for WordPress, Blogger...