
I've been working on a few new designs for peyote cuffs, including this Sun Cross piece.

One of the things the new designs all seem to have in common is that they are done in odd-count peyote, the bane of many a beginning (and, in some cases, more advanced) bead weaver.
Then why do you create odd-count peyote designs if the stitch causes so many headaches, Carol Dean? Well, it lets me satisfy my designer's need for SYMMETRY. Because most of my work is abstract rather than representational, geometric rather than pictorial, symmetry becomes an important design principle for me to follow.
The offset nature of peyote (think of bricklaying) makes it impossible for any two adjoining stitches to mirror one another in color and position. When you bring in a third stitch, however, you can have a shared middle (axis) from which the mirroring can begin. In the case of the Sun Cross, that shared middle is the vertical center of the cross, all stitches to left of that center stitch (which uses two beads, to add to the confusion...sorry) mirror the stitches to the right, creating symmetry.
The offset nature of peyote (think of bricklaying) makes it impossible for any two adjoining stitches to mirror one another in color and position. When you bring in a third stitch, however, you can have a shared middle (axis) from which the mirroring can begin. In the case of the Sun Cross, that shared middle is the vertical center of the cross, all stitches to left of that center stitch (which uses two beads, to add to the confusion...sorry) mirror the stitches to the right, creating symmetry.
When I first started designing, I HATED odd count peyote and refused to use it in my work. That resulted in some work-around designs like this Polka Dot bracelet.
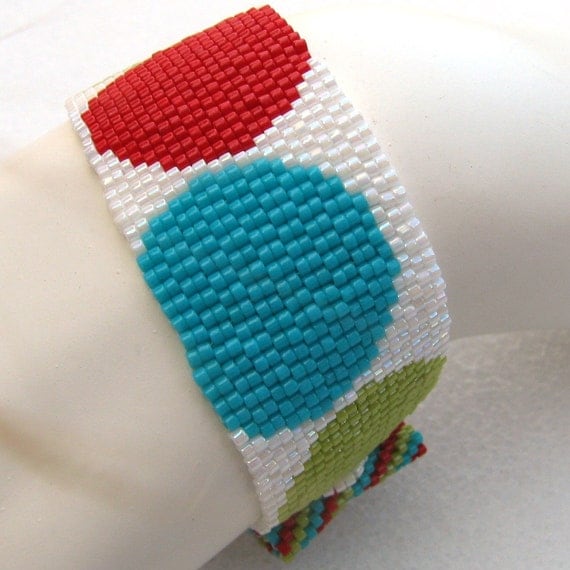
Circles are the ultimate symmetry, right? But if you can't center them in a design (put them in the middle) then you have to deliberately offset them, like I did here.
It was rather frustrating: I could create wonderful symmetrical designs but didn't have the beading skills (or thought I didn't have the beading skills) to execute them. I'm so glad I figured out I was wrong. I'm so glad I figured out that odd-count peyote doesn't have to be a difficult or unpleasant experience.
As a matter of fact, I strongly believe that odd count peyote (at least as done "a la Sand Fibers") results in a stronger piece of jewelry... which is a pretty excellent trade-off for the few extra steps (read: extra time) it takes to bead.
I created the following step-by-step for odd count peyote a few years ago because I wanted to share the technique I use (and even enjoy) in my own beading. This is not the only way to do the stitch, but it is the method I am most comfortable with.
So here it goes:
 |
String on the beads for your 1st and 2nd row and stitch all but the last bead in your third row.
Rather than go in and through only one bead at the end, go through the last two beads (or bead stacks if you are working more than 1-drop). |

Your 3rd row will be missing its last bead. Let's fix that.
|

Pick up the last bead (or bead stack, be sure to go in reverse order) and go through the two beads shown in the photo.
|

Now you will do a "U-turn," creating the second half of an X with your thread path and coming out the first bead of row one.
Please note that this "U-turn" is only used in for Row 3 (although it is this turn that is often used in other directions). The "U-turn" for future rows, as shown, later in these photos, is what makes this "a la Sand Fibers." |

Your thread is still not where you need it to be to continue beading, so...
|

Go through the last bead of Row 3 and turn your work
|
 |
You are now ready to bead Row 4.
|

At the end of "regular" rows, I add one simple step to allow for equal thread passes at the end of all rows. This keeps your work from "bowing" to one side in the final product, allowing for the same thread tension on both sides. Without this, the "regular" end has more give if you don't bead with super tight tension.
|

I take my needle through the bead immediately below the one I just came out of.

This is the "U-turn" you will use for the "odd" rows from here on in.
|


When you add the last bead of your row, you only go through the one bead in the preceding row, as shown.
|

Then you take your needle through the two rows below it, as shown.
|

Your thread still isn't where you need it to be...
|

so take it through the last bead of your row and turn.
|

And, as they would say in England, carry on...
|
I hope you'll give odd-count peyote a try!
7 comments:
This is great, CD. I am going to try it. You've made it look easier. Thank you.
Ok I am going to have to try this....don't know why I have such a time trying to learn this!! I do even all the time and have no problems!!! ahhhhh!!!
I would never attempt odd count UNTIL I purchased two of your patterns and HAD to learn! Well, I did THANKS to your tutorial on FB!!! I even printed out one of the pics to keep in my bead book!!! I love, love your patterns and have made 3 or 4 cuffs!!! Thanks so much...this post will certainly help folks understand how easy odd count peyote really is!!!
Wow! Thank-you for sharing that! I had tried to do some beading back when I was getting tired of stringing beads so I have an incredible respect for what you do. Your work is amazing :o) I will add this to our tutorials for anyone that wants to refer back to it.
Fascinating! I use a double needle technique when I do odd count, which avoids the pile of thread on the funky side. It NEVER occurred to me to add a turn on the other side to even things up. GENIUS! Thank you!
I have never been one for beading but I do respect the art, great work!
You can also cheat and just add a row of brick stitch to even count peyote. Although I do admit that that might not work for all pieces
Post a Comment