Showing posts with label fine finishings. Show all posts

Wednesday, April 30, 2014

Wow--You Have Such a Nice Package! By Karen McGovern

So I have the sense of humor of a 12-year old boy.

In writing the past few posts this month, I have found myself thinking of the many things we all do as artists, especially artists trying to make a living MAKING ART, to give our clients a truly wonderful experience when buying our work.  We pour so much of ourselves into our designs. Mary Jane Dodd exemplifies this like no other artist I have come across in a long time.  Her works are filled to overflowing with intent, each piece a tiny universe of meaning and consciousness that she fearlessly shares in her soulful writings that accompany each piece. Oh, and the work is GORGEOUS as well.  I secretly may hate her.  Each of us strives to create from the heart, our works a sometimes intimate, personal glimpse into our hearts and minds.  

Sigh....Mary, you KILL ME.
Then we wrap it in newspaper and Scotch tape, stuff it in a padded envelope and off it goes to its new home.

Wait, what???

Packaging.  The Achilles heel of many a working artist.  For me, this is a HUGE PROBLEM.  I really do pour a lot of myself into my designs, especially the mixed media designs that include an original short story or poem.  Days--sometimes weeks--go into the creative process, and the end results are a multi-dimensional representations of a dream, a fantasy, an idea that just couldn't wait to be born. AFTER ALL THAT YOU WANT ME TO COME UP WITH SOME STUPENDOUS WAY TO PACKAGE IT?  I'm exhausted just thinking about it. 

Yet, I know how important this is and I HATE KNOWING HOW IMPORTANT THIS IS.  I have never had the privilege of purchasing one of Mary's designs.  I imagine if I did, it would arrive in a vessel created from spiders silk, organically dyed with fairy tears and tied together with thread hand-spun from the hair of a unicorn's mane.  AND I WOULD WEEP FROM THE BEAUTY OF IT.  You may think I am making fun of her or any artist that takes the time to create packaging as artful as the designs they carry, but I am not.  I am simply SOAKED IN JEALOUSY that they are able to do this.

For me, packaging is simply a means to an end.  It's just not high on my priority list.  I tell myself it's because I'm all about recycling and not creating waste, but we all know it's because I'm somewhat lazy and my brain just doesn't pump out ideas when it comes to this.  I am forever digging through my stash of recycled boxes and bags, all of which have had long, hard lives prior to me slapping a label on them and sending them off.  For a while I tried, I really did, to create thoughtful packaging.  I have a dear friend who gave me some spectacular heavy handmade paper infused with flower petals and leaves.  I created envelopes from the paper to fit whatever design I was shipping and yes, each was lovely and each NEARLY KILLED ME TO MAKE BECAUSE I HATED EVERY SINGLE SECOND IT TOOK TO MAKE THEM.  That's when it hit me.  Here I was, sending off a design I created with joy and intent, now soaked in anger because I was forcing myself to make something to accompany it that I simply didn't have the creative energy for and resented deeply.  KARMA MUCH?  So, I embrace that I am not good at fancy packaging and have moved on.

You don't have to stress over packaging, and you SHOULDN'T.  Find a simple packaging technique and stick with it.  Here's what I do.  I buy basic, solid color Kraft boxes whenever I see them in a variety of sizes.  I also splurge on Bali cloth bags whenever they are on sale.  I buy cool stickers and pretty yarns.  I have a stash of this at all times.  I also have a variety of stamps because I etch a lot.  So--plain Kraft boxes get a stamp or a sticker, and are tied with pretty yarn.  The bags are good to go as is. GENIUS!  AND, you can buy beautiful hand crafted gift boxes online, you know.  ETSY THAT STUFF.  Now, the actual shipping box may be a tattered mess, but I will tape it up like a little box mummy and it will arrive safely, and I hope that the quality of the works inside more than make up for the less than Martha Stewart exterior.

Simple.....I like it!
So, forgive me, and yourself, for not hand crafting all our packaging.  Simplicity is often best, keeps us sane, and is very effective.  Besides, it is a BITCH to find good quality unicorn hair these days.

Monday, April 28, 2014

Psst....Your Crimps are Showing! Fine Finishing Boot Camp!

Details, details.  This month's boot camp is all about details.  Fine Finishings, the little things that make your work really POP, really shine.

As a newbie jewelry designer, some of the basic details were often the most difficult to master.  One thing in particular I have always been obsessive about is covering my crimps, and creating good, strong crimps. 

Stainless steel crimps
If you work with gemstone beads, you know how important a good crimp is.  Especially if you like heavy, large beads.  The crimp is the very foundation for any strung design.  The strength of your crimp is the difference between a design that will last for generations and a disaster that falls apart after a few wears.  So, what's the deal with crimping?  For starters, crimps come in all materials.  You may think that sterling silver or real gold crimps are the way to go to make your designs lux, but I prefer base metal crimps and here's why--pure silver and gold crimps are usually weak as Hell.  Silver and gold are soft, and a tiny crimp needs to be strong to support your design.  I have found that base metals are much stiffer and stronger, and hold up for the long haul. You can get them in stainless steel, which will last forever! 

Tools matter and a good set of crimping pliers is a must.  Learning how to use them matters.  Where to place the crimp in the jaws, how to then finish the crimp with that all important fold, then test that crimp to make sure it's holding.  I sometimes use two crimps if the design is heavy or I'm not sure about the crimps themselves.  Practice, practice, practice.
 

Then, covering those bad boys.  To me (and this is just a personal opinion), nothing makes a design look unfinished like an exposed crimp, yet I see this so often!  Get yourself some crimp covers and hide that thing!  Crimp covers are basically seamed round beads (usually 4 or 5mm) that are left open, allowing you to slip the bead around the crimp like a clamshell, then you squeeze the crimp cover closed--viola, no visible crimp!  Crimp covers are also great for fixing mistakes in layout or spacing.  Have a loose spot or space between beads you didn't notice?  Slip in a crimp cover or two and you're good to go.  If you want to get super fancy, you can also use French wire to cover the stringing material you made your loop with. French wire is fine wire coiled up like a micro spring.  You thread your stringing material through it to cover it.  I must confess that this is something I should do, but don't because I am lazy and impatient and never remember to order it.  BUT, whenever I see a strung design finished with French wire I love it and really think it adds a professional detail and look to the design.  AND, it protects your stringing material from whatever you crimped it to (clasps, hoops, etc.).  Again, these little things matter so much in the long run!! 

Gold French wire from Rio Grande
You'll discover all sorts of ways to cover crimps--pre-made crimp covers are just one quick and convenient way to do it.  I create tiny wire wrap bundles around my crimps as added texture to a design, or use a large hole bead that will slide over a crimp, followed with a crimp cover or bundle somewhere else in the design to take up the slack.  You can be creative, even with something as basic as crimping.

Two recent designs showing how I cover crimps--either with large hole beads followed by crimp covers
to take up slack, or bundles of wire as an accent following or over a crimp or large hole bead.
Finally, when trimming your stringing material behind a crimp, try not to trim flush with the crimp.  Leave yourself as much room as you can for stretching or loosening (unfortunately, this is pretty much inevitable over time).  I try to use beads with holes big enough for my stringing material to pass through twice (at lease near the crimp) so I can tuck a nice tail of material behind the finished crimp.  This way if the crimp gets loose or fails, the entire design won't immediately fall apart.  This is also a good argument for double crimping on each end.  Better to be safe than sorry!

The process--All it takes is patience.  Notice the extra tail of stringing material I left, going through the turquoise. 
If this was an extra heavy design, I would add another crimp here, then cover it.
While crimps may not be the most exciting topic in jewelry design, learning how use them properly and professionally are basic skills all jewelry designers must master.  So, go forth and CRIMP ON...just make sure you COVER YOUR CRIMPS!

Monday, April 14, 2014

Fine Finishings Boot Camp: Test your Product

by Staci Louise Smith

No matter what you purchase, chances are, it went through some sort of testing before it was put on the market.  

I love this picture- the ultimate phone testers, kids!

Why should the arts be any different?

We as artists want to stand out, to be respected.  We ask that people buy handmade, and support small business.  
If we don't offer them a quality product, then why would they want to?

No matter what your medium is, you need to test your product.  If you make ceramics for food, you need to test your glazes to ensure they are food safe.  If you do mixed media, you want to make sure your papers, your sealers, and whatever else you use, will stand the test of time and not fade or fall apart down the road.  

And if you make jewelry, testing should be a normal part of your creative process. 

People wear jewelry.  I mean, they WEAR it.  Some people wear it harder then others.  I learned so much the hard way- using too thin of wire, not securing crimps well, or crimping too tight.  I had things returned to me to re-make.  There is nothing worse then that.   Let me say that again, there is nothing worse then someone returning a broken product.   

My point is, that, if you plan to sell your product, make sure you really know and understand your medium.  You should know all about it, whether it be metal or polymer, ceramic or fibers.  You should know what it is made of, how it reacts with other products, and how it wears in the long term.  Knowing all this is a great start, so you know what you should be testing for.

I remember when I learned to solder from a friend.  We painstakingly took time to solder two things together, and  after it was done, she said, "now try to break it".  and I was like, "are you kidding me???"  And she so wisely replied, "do you want it to break for you now so you can fix it right, or break for your customer?"  And she was right.  (solder needs to flow just right or it will break, even if it feels like it has a hold, if it didn't' flow just right, its not a solid bond.  sometimes you don't have a good connection to the metal either...ect)

So I try to break my soldered pieces.  I also yank my crimp beads after I am done (I have a hate hate relationship with them).  I have a long list of things I do, to ensure to the best of my abilities, that things won't come back to me.

When I use patina, I seal and seal and seal and wax my metal.  And I still found out the hard way that it will wear off if worn against suntan lotion.  

With the internet, and so much access to new mediums and information on them, many people are branching out and trying new mediums, and that is wonderful.   

However, if you are trying something new, please educate yourself, before you sell it.  You will be happy you did down the road.  It will help you to make the best quality product you can.  It will help you to know what to test for.
Test things, wear them, test them in the environments that they may encounter.  I will even give other people samples to try out sometimes, just because everyone wears jewelry different, everyone has different body chemistry.

Here are some questions you can ask yourself so you can properly test your product.

1.  How and wear is it worn, and does it work well for that part of the body?  

For example: ankle bracelets, my nemesis.  I found that no matter what I did, a crimped, strung ankle bracelet will not hold up for everybody.  I have never broken one, but it seemed that everyone else did.  So i had to switch to heavy gauge wire and chain, AND make them adjustable so that they can be worn at just the right place on each persons ankle where they won't have stress on them.

Another example: Earrings- are they too light, sometimes if they are too light, they catch in the hair and hang sideways.
  Do they have wild wire frills or things sticking out that will catch in someones hair if it is long or curly?  Are they too heavy and unwearable? 

I could go on and on.  So consider your piece of jewelry, and how it will be worn, and how that will look on a variety of people. 

2.  Does my product need to be sealed?  And if so, what is the best sealer to use for longevity, skin sensitivity, and that will NOT react with my product down the road?

Certain things like, patina metal, and polymer clay (if it is painted or has a surface treatment added), need to be sealed.  In both cases, there are products that are great for this, and products you should never use.  In the case of polymer clay, you should stick with water based products.  Other finishes can eat away at the clay over time.  So it may look good for a week or so, but down the road get gummy.

3.  Can I wear it comfortably?  

This is a big one.  WEAR your jewelry every time you make something.  even if it is only for a few hours.  Wear it, rub your fingers all over it.  Make sure there are no wires sticking up, nothing poking, no rough spots.  Make sure connections are secure, things hang properly.  

These are just a few things you can ask yourself, so you can begin to test your product.  This is YOU that you are selling.  Your art, is a little piece of you.  It is more then vision, it is execution.  It is tangible.  So make it well, make sure it will last, and your business will continue to grow, because people are happy to come back, and buy new jewelry, because they know it is a good investment.

I hope you can learn from some of my fails!  I will be sharing in the weeks to come some little tid bits and tricks I have learned to avoid these kinds of issues in your work!

Is there anything YOU learned the hard way, that you wish you had tested for?  
What would be your best advice for those just starting to sell their work?

Friday, April 11, 2014

White Copper Clay: A New Medium

by Staci L. Smith

White copper clay is a new product in the family of metal clays.  It is mostly copper, with some nickel added in to give it the white color.

I know there have been other white metal clays out, but for various reasons I steered clear.  The brand I purchased is the brand I am familiar with and use for bronze, copper and PMC.


Now, similar to when I started using bronze clay, there is not a lot of information out there about this product yet.  Actually, other then the instruction on the package insert, there is none.  

So of course I bought some, and thought I'd figure it out.  

Base metal clays are known for being finicky.  There is no set firing schedule that works for every clay, every kiln and every piece created.  Its a lot of learning your kiln, your beads, and adjusting the firing.  Though the package insert I believe does give you guidelines for adjusting the firing.  
White copper clay, does not.  It has one set of very simple straightforward instructions.

I set out with many questions:

You can read my initial blog post here.

Ok- so where do I start?  

Working with the White copper clay it looks mostly like traditional copper clay.


Working with it was similar to the base metal clays I use, I'd say it was a cross between copper and bronze.  Copper being easy to shape and smoother feeling, and sticking to itself nicely, bronze being more dry /firm, and not wanting to stick to itself at all.


Of course, you would think that since it was my first time working with something new I'd just make some charms and test fire them, right?  You would think......but alas, I seem to like to make things hard on myself (and honestly, I wanted to find out as much as possible right away about this medium).  

I made pieces that would be riveted together by heating ball head pins, made pieces that would get ring shanks soldered to them and make rings, attach balls with slip, ect.....  I did make some charm like things too though!

I fired them according to the instructions.  First phase is a low fire on a stainless steel mesh in the kiln.  Then you take them out and put it in carbon for the second phase.  

When I took out my pieces they were NOT white or pewter colored.  The ones on the bottom of my container (where my kiln seems to be the hottest) were covered in copper flecks, that were raised.  They were shaped like the carbon (I used magic carbon) and almost looked like they electroformed to the carbon.  so when the carbon was washed off, it left little raised metal pieces stuck to the surface.  And they were sharp too!


Most of the pieces had this.  As I got to the top pieces, there was less of it.  However, problem number 2......

They all looked rosy, or more like a bronze then a pewter color like they were supposed to come out.  And some were very mottled too, which happens with my bronze sometimes, but it cleans up well.


So I brass brushed them and tumbled them like I usually do.  They still looked bronze.  So I pickled them.  STILL looked like bronze.  So I had to get out my dremel and polish discs and grind off the surface coating, and voila!  There was that silver color.

after brass brush and tumble and grinding, you can still see the copper flecks

So, I am pretty sure they over-fired.  Its like brass, which is a mixture of copper and other metal.  When  you overheat it, the copper rises to the surface, and nothing takes it off other then grinding or polishing away that whole layer of metal.  I think that is what happened here.  However, I still don't know why I got the 3-d effect of the copper pieces bonding to the carbon.  If a reduced heat doesn't solve the problem, I may try another carbon.

So I cleaned them up with the dremel, tumbled them a little more, and was ready for test #2. 

Soldering.

Of course, I wanted to make a ring, and of course, it was sort of complex in shape.  I wanted two ring bands, and a small bezel, all of which required consecutive solder joins.  Well, i proved my theory of copper rising to the surface with heat, and had to grind off a layer each time I heated it!  It took forever, but it worked, and now I have a ring I LOVE.  So, it can be done, but its a lot of work and clean up, like brass.  It does however, solder well.  Very much like copper.  Takes longer to heat up, but HOLDS the heat once it gets there.  So I always let it cool before quenching.  If you quench too quickly, the piece is still so hot, the solder is still liquid and it may move or unbond before its set.  Something I learned the hard way working with BIG pieces of bronze and copper.

mid-clean up post soldering.  You can see the VERY copper looking part that wasn't cleaned up yet.  The entire white copper clay piece looked like that. (and yes, it is a messy ring, just for me, I was in a hurry)


Here it is all done though, I didn't know if it would co-operate, but I MADE it work.


Here are all the ring shapes I made


Now to wear my ring all the time and see how it wears- does it make me rashy, does it tarnish, does it NOT tarnish?  Test Test Test.  (this months Boot Camp, Fine Finishings is about putting out quality work, and quality control tips to make your work lasting and high quality!  Testing is something I cannot recommend enough!)   I cannot express how important this is before you sell new work!!!!

I also made this, which required some heat, but not as much as solder, and this cleaned up much easier, no grinding or sanding required.  Just some pickle.


Ok- antiquing the white copper clay.
I only use liver of sulfur to antique my metals.  I don't like to use anything that is really strong in my house.  even my pickle solution is very mild.  I know that nickel silver is REALLY hard to antique, and haven't had success doing it with LOS.  
So I slathered on some really strong LOS gel, let it sit for 10 minutes or so, and nothing.   So I took it and rinsed it with piping hot water.  It instantly turned all kinds of colors and then darkened. 


Ahhh.......this was key for me.  I would not use a silver toned product that could not be antiqued!!!!

Then I just polished with a silver polish cloth like I normally do, and I was a happy girl!


Now I need to see if a sealer is required. I don't want it to keep darkening like bronze can.  Maybe it will be a slow oxidation like silver.  Maybe it won't oxidize at all?  I can't wait to find out.

I will be doing yet another follow up post when I try to fire the remaining pieces at a lower temperature.  

I hope all my experimentation helps someone else.  My kiln actually requires me to fire my fast fire bronze at a little bit of a higher temp.....so, if this does better lower, that is really odd.  Stay tuned!!!!!!!!!!!!!!


Thursday, April 10, 2014

Cleaning Bead Holes: Fine Finishing Boot Camp

One of the most difficult things to deal with in the ceramic bead making process is the bead hole.
More specifically, keeping the glaze from filling the hole(s) and avoiding sharp edges around your bead hole.
Marsha Neal Studio Glazed Porcelain Pendants.
Almost 2 years ago I wrote up this blog post about Cleaning Your Holes!

I have had many friends ask me to clean out holes from other artist pieces or commercially made beads they bought either online or at a show, but did not realize that the hole had been fused with glaze or that it had not been cleaned.
Or that the hole was way too small for the intended use.

My previous post goes into details on using diamond tip drill bits with a Dremel tool and with water, so I won't bore you here with the same info.

Glass beads that are made on a mandrel will need to have the bead release cleaned out of the hole. The beads are usually soaked in water then drilled out.
(Check out this great post by ShebaMakeda Glass Beads)

Polymer clay bead holes can be enlarged by drilled out with a drill bit after the clay has been baked.
(Check out this cool post: Lentil Bead Drill Jig by Desiree's Misc)
Image: Beaducation.com Small Files (Set of 6)
Metal beads can usually be cleaned with a small file.
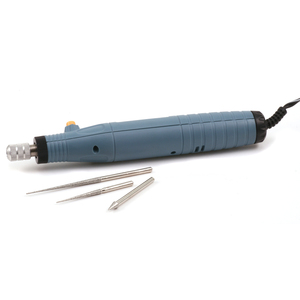
Image: Beaducation.com Pro-Electric Bead Reamer
Bead reamers of all sorts (electric and manual) are available through many bead suppliers, hardware stores, arts & craft stores, etc.
Image: Beaducation.com Diamond Bead Reamer Set

Because I work in a manner of "production" when I am cleaning out my bead holes, I prefer to use my cordless Dremel tool with a diamond tip bead reamer and a bucket of water.

And now that I saw that Dremel has a drill press - I think I know what is going to be on my next "need to get this tool" list. I have way too many gemstone beads and agates that have weird holes that are narrow on one side, wide on the other - that I need to fix!

When using bead reamers or drill bits to enlarge your bead hole,
Please remember to work SAFE and SMART by using:
Gloves, goggles, dust mask, wet drilling to reduce dust and heat, etc.
And remember to work smart with water and electricity: dip your bead and just the tip of the drill bit!

And bead makers - remember - it is up to you to sell a product that is usable and of the highest quality that you are capable of. Don't skip on quality steps like this because it will only make people pause before they purchase something else from you in the future.

Monday, March 31, 2014

What is Next? Boot Camp: Fine Finishings

by Staci L. Smith


First of all, I think we had a great turn out for our end of Boot Camp Asymmetry Blog hop.  If you haven't had a chance, you can check it out here, and see what people made!


http://lovemyartjewelry.blogspot.com/2014/03/love-my-art-jewelry-asymmetry-bootcamp.html


Thank you for joining in and pushing the boundaries of jewelry design.  Though we touch on a lot of basics on this blog, it is Love my Art Jewelry, and Art Jewelry is wild, and bold, and shocking.  The only way to get there is to push the limits of your comfort at times, and try to something new.
~~~~~~~~~~~~~~~~~~~~~~~~~~~~~~~~~~~~~~~~~~~~~

The new Boot Camp is called Fine Finishing's. 


We all start somewhere.  

can you believe this teeny tiny little pendant is a staci louise?  lol!


Most of us have the same goal, to become artists, who can make a living, doing what we love.  We want to get into better and better (juried) shows.  Maybe we want to make a statement with our jewelry, be in magazines, or even hope to be in a museum some day.  Who knows how high your goals go?  There is no limit!!!

I think that our very own Karen McGovern's work is museum worthy!  She is always pushing the limits between wearable and art jewelry.  She is fearless in her combinations, and always growing in her knowledge of the mediums she uses.  Her pieces have meaning as well.
 

But it is a  loooong road, from starting out, to these goals.
Most of us here are somewhere in the middle of this road, and along the way, we have learned A LOT of things.  Tips, tricks and advice on how to make the best, highest quality product, and what to avoid as well.

MaryAnn C. is wonderfully thorough when it comes to quality in her work!

  Artists work hard to perfect techniques, to fine tune their skills.  They are open to critique, they problem solve, and they put out products that people are willing to pay for.  Because they are unique, and because they are quality.  Art should last forever.

Maire Dodd is a great example of how an artist changes, grows and evolves over time.  Her work is always evolving, but never loses that depth of emotion that she has such a gift for being able to convey through her work.

We all started out at the bottom.  We all made mistakes, learned from them and grew.  We all took harsh criticism from peers, rejections, and critiques- and learned from them. 

Marsha Neal may be known for making beads, but she is a true sculpture- I loved seeing her branch out into new directions.  She is always pushing the boundaries of where she can take her business!!

This Boot Camp, Fine Finishing's, will hopefully give you guys some tips and tricks we had to learn the hard way through years of trial and error. 

 you may know Barb B. as a bead maker, but she loves to branch out into other inspiring art as well, and you can see how her painting and color knowledge crosses over into both forms of art for her.
Painting by Barb Bechtel

We as a group, will be touching on areas that we all are knowledgeable in.  So throughout the next 8 weeks, you will get tips on everything from wire work, closures, ceramics, and polymer, to soldering and even some advice on shopping for quality components for your jewelry.

Kelli Pope's work is always asymmetrical, and has a look that is totally unique to her.  You can always tell is her design before you even see who made it.  Having a signature style is another thing you acquire over time as an artist!

This is not just geared towards our jewelry designers.  We also seek to inform everyone as shoppers of jewelry and components.  After all, you want to make sure to use quality products in your work. 
For me (Staci) doing my own soldered chain, like in this piece was a huge step toward making my jewelry more finished, more of my own.

We hope you enjoy this Boot Camp, and will learn some information that can save you some trouble and heartbreak that we have all had to endure at some point or another.
face
Related Posts Plugin for WordPress, Blogger...