Showing posts with label beadfest. Show all posts

Wednesday, April 6, 2016

Bead Fest Philadelphia

by Staci Louise Smith

This Friday is the first day of the last Spring Bead Fest to take place in Philly.
(don't worry, the August show will still be held here)

Bead Fest Spring is where it all began for me.  It was my first big bead show AND my first time visiting friends I met online (gasp!)

2013???  2014?  Spring meet up

It has since become something I look forward to each year, and I will sorely miss the chance to come out of winter hibernation and get to see my beady creative friends in April.

I am not vending, and there are no planned meet ups or swaps this year.  However, there are still friends I plan to see there, and I am teaching all day on Sunday as well.

If you have not been to this bead show, and you are in driving distance, you should come out.  It is such a nice show.  I know I like to stock up on my gemstone strands at the beginning of the season.

If you have online friends in the area, have them meet you for lunch.  Diana Ptaszynski of Suburban Girl Studio used to organize a fun bead swap and it was a great way to score some new beads and make new friends.

Not only did I meet a lot of great people that way, I made actual friends!  I love connecting with people from far and wide. 
I am not sure what year this was....maybe 2012?

Don't even get me started on the FUN parties that Melinda Orr would put together for the August Bead Fest.  That was a whole other bonding experience!


 Anyhow, I love that we all can find something we have in common and can remain friends online.  These ladies I have met at Bead Fest has not only been online friends, but they have been REAL friends to me.  Giving me rides to a show, staying over with me before my first time teaching for moral support, watching my booth for me while I teach, that is just a small example of the great friendships that have grown over something as simple as a love of beads.  I am so thankful for their friendship and support.  All because someone like Diana took time to organize a swap!  

here we were doing a mini practice class with Erin Siegel


Diana our lovely swap host
photo by Dianne Bachelor Miller

So just do it.  Yes its awkward at first, for like 5 seconds, when you meet someone from online, but then you see beads and you start to shop and talk and time just flies!!!  It is so very worth it!


I will be around shopping on Saturday, so if you want to meet up, shoot me a facebook message on my business page.

You will probably find me lurking around 
Jenny Davies-Reazor # 522 

and Marsha Neal Studio's # 520 booths!  

So make sure to stop by and say HI to them and make sure to fondle all their lovely beads.  I know I have a list of what I need to get from them!

If you need a coupon to get in, save and print this picture and save $$$ at the door!


On Sunday I will be teaching all day.  Here is a link to the classes. Online registration is closed, but you can still sign up at the show if you are interested.


First thing in the morning, 8:30-11:30 am I will be teaching this Wild Wire Choker.

It's a really fun class that introduces you to working with larger wire in long pieces to create large focal pieces for your beads.  It is also a great class to practice those wire wrapped loops and learn to work wire while it being free form enough that there are no real mistakes!  Let go and have fun with wire!

Then, at 1-4 pm I will be teaching this Polymer Clay Carving Class.  Carving polymer clay is one of my most favorite things to do!  There are a million ways to use it.  This is an intro class, that will give you the basics, your play and creativity can take it anywhere!

So, I am frantically prepping for my classes (making kits is a laborious task, but I love it!)
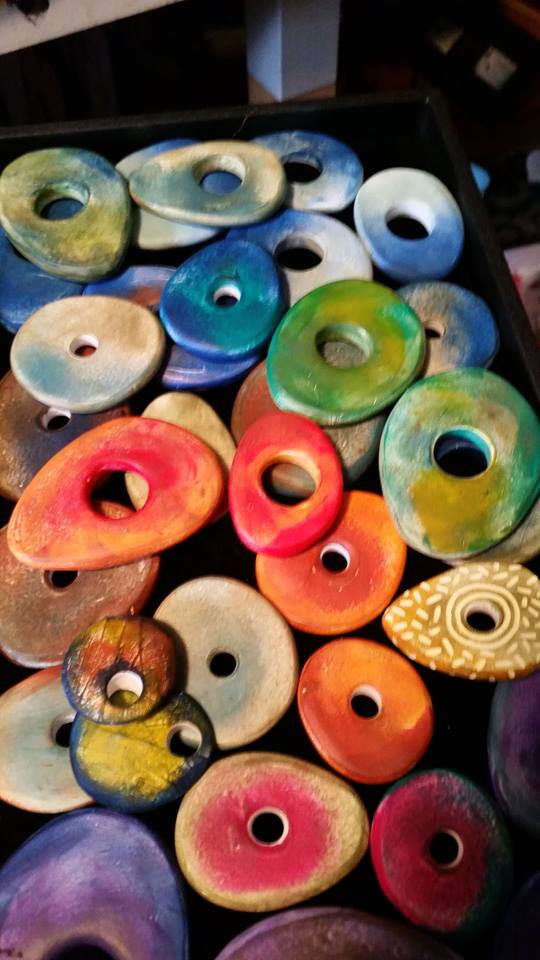
 bead blanks to carve


 wire rolls for kits


 student practice blanks to carve


polymer kits sponsored by Polyform

 bronze for wild wire choker kits

wood blocks to raise carving surface for carving class

I am also trying to get some bead inventory made to sell in my classes.  


I am sure to be tired if you see me wandering around, but I will be ready to shop and talk anyway.  Look for my bright turquoise hair and flag me down!  
me- turquoise hair!!!

I would love to meet up and chat.

I do hope you will come out.  Organize a meet up.  Make a friend, shop for beads.....you won't regret it.  Even if you get really really lost (you know who you are!...lol)

 Hope to see you this weekend!

Wednesday, July 29, 2015

Confessions from the Oven

by Staci Louise Smith

Well, I am in full on, all day all night, prep for Bead Fest.  Right now it is polymer clay on my work table.

I am really feeling the panic for sure.  
(though I do have these all made, which is a start)


However, this post is not about my panic, or the hundreds and hundreds of beads that still need to be made and painted, or the class I still need to assemble kits for and prepare.  Nope, this is about something else.

My polymer clay oven.

A few years ago, I got myself a convection oven for firing polymer clay.  I got an oven thermometer to check the temperature and used it here and there, on and off to ensure it was cooking properly.  It heated nice and even and worked like a charm, for years.  But something changed.

To check the cure,  I usually try to break a couple beads to make sure they cured right.  That is the ultimate test.   
Well, I had a batch that broke.  So I popped the oven thermometer I had inside, and it was reading differently then last time.  I had been using a cheap dial thermometer from the store.

Claire Maunsell shared with us in a class I recently took, that she used a meat thermometer (thank you for that Claire!!)- which allowed her to constantly monitor the temp of the oven throughout the process, and you can even set an alarm to go off when it hits a certain temp so you don't overbake.  
(you can take Claire's class here at Craftcast)

Well, I bought one.  

I put both thermometers in the oven, within an inch of each other, and one read really low according to the temp on the oven and the other read high- well, not high the whole time, it had some crazy spikes.  ????  AAAND, it was taking twice as long as before to reach temperature.  So all day I messed around. 

(here is my set up) The oven, with pizza stone on top (now) and the two thermometers I am using inside the oven (which are on top of the oven in the picture).  The dial one is a cheap one, and I plan to invest in a better more acurate one of them as well.  The digital is on the counter to the right of the photo with the probe that goes inside the oven sitting next to the dial thermometer.


 At first, I thought perhaps my oven was getting old, and maybe I am wearing it out (which I still think is part of the problem) from reviews online, none seem to have a long life.  

But in the course of re-firing the beads that weren't totally cured, and messing around with temperature and time, I found a few things out.  

1.  Placing a pizza stone (some use ceramic tiles) on top really helped the temperature to stay stable.

2.  I have to set the oven above my target temp for preheat and allow up to 20 minutes (I keep my clay in there the whole time though) and then reset it for an hour.

3.  I cannot have 3 shelves in there like I was doing, it was messing up the temperature too much.  I can only do two.

4.  Because ovens get older and things change, you need to constantly monitor the temps- with TWO thermometers.  (who would have thought that not only your oven could be so off, but two thermometers could read so differently)

It was a long stressful day, but I got it figured out, and my pieces are once again rock hard and fully cured.

As I was really frustrated with this, I contacted Ginger Allman of the Blue Bottle Tree to find I am not alone, that there really is a good deal of playing around to figure out your oven, or in my case, re-figure it out after it starts to get old.

(Ginger is awesome and you can find all kinds of polymer information here http://thebluebottletree.com/)

  No one really talks about it, but you need to find your own ovens sweet spot (my cure temp ended up being somewhere between what the two thermometers were reading- who KNOWS what that actually is).  I had to let go of the numbers and target temps, and do some good old trial and error to get it back to firing correctly.  (I also think my oven is on its way out, and I just hope it holds out until after Beadfest)

I think between my ovens over use, age and that most times I was only using two shelves, and came to the conclusion that maybe one reason it was firing better before, because the other pizza stone was on top insulating it, and there was more air flow inside.

At the end of the day, a good cure gives you strong beads.  You can usually feel when they are not cured right.  Bake to the correct temp (not always the correct setting on your oven) AND for longer then directions say.

Here are some resources about baking and ovens that I though had some great info.  This video, shared in the beginning about her old toaster oven and how she rigged it with tiles to make it work better.

Ginger always has great info and did a 3 part series on baking polymer

Here is a blog with some thermometer recommendations


Anyhow- I really hope my crazy day can help head off some baking issues.  I highly recommend two thermometers- even with a convection oven, because the efficiency can change over time.


Monday, September 8, 2014

Teaching.......I think I like it

by Staci Louise Smith

So, I taught my first "real" class at Beadfest this year.  I was beyond nervous.  Now, I wasn't nervous cause I didn't know what I doing, and I wasn't nervous cause I thought I wouldn't be able to convey it in words (if you know me, you know I have no problem talking for hours on end)......I was nervous, because we were making these in 4 hours.

Painted Polymer Fossil Talisman
 The class was designed so my students would learn to organically form the polymer, learn to paint it, using my crackle technique (I have a tutorial on the painting alone you can purchase here).....and then, they learned to make the whole thing in to a necklace.  

I really hoped they would walk away with some new polymer skills they could play with and incorporate into whatever art they do, and that they would get to have some fun using wire and mixing art beads to create an asymmetrical necklace.  

All in 4 hours.

My panic came from knowing I am not naturally organized.  And what I found from my practice class I held, was that this was going to have to be timed.......with a schedule, and I would have to stick to it in order to finish.

My friend Jenny Davis-Reazor was also teaching for the first time this year, and she came out to stay with me, and help out, and be moral support on Wednesday night.  I was so thankful for that!!!!  We also found out that another friend, Linda Landig came in early for the show, and she volunteered to help me with my class!  

Here we are having dinner and drinks

 meet the teacher

 this is where they could pick their kits....they got to pick colors and beads to truely make it unique
just waiting for the students to arrive

I don't think we would have finished the project if I had not had Linda's help in the classroom.  Jenny helped out in the morning, but then she had to run to pick up a friend at the airport (have I mentioned what a whirlwind Beadfest is???)  

Anyhow, the class rolled in one at a time, which allowed me to introduce myself and get them all started picking out their colors for their kits...........and then we were off.


I was thankful that Linda is not only a teacher herself, but she works with new teachers (student teachers) so she was wonderful at giving me prompts and tips so I took time to explain things here and there that needed more.  I learned a lot!  

(she also took picture of the class for me, since I was busy.....i never realized I look so much like an opera singer when I talk....lol)


and I make funny faces.....I think Linda caught them all too!

Class rolled along and I stuck to my schedule, which had time frames, and what had to be done within them, all mapped out.  It worked wonderfully!

I think my students enjoyed their time and learned a lot as well.  They seemed happy, and everyone got to go home with a piece of jewelry they made.  I think that is important in a class.  Not just to learn a technique, but to go home and be able to wear something you made!  

Student work


  I was very proud of my students, because we had to really hustle to get it all done, and they dug right in and did it!  I think many of them were pushed out of their comfort zone and they just went with it!  We had mistakes, which were great opportunities to show that you can work them with mistakes, and sometimes fix them, and sometimes go with them.  

For me, I enjoyed seeing them each put their own spin on their pieces.  The variety of sizes, and textures and shapes was great.  Although they are all similar necklaces, when you look close, no two are alike.  

So overall I loved it.  I thoroughly enjoyed teaching.  (did you know I actually majored in secondary education for a time in college??)  I plan to teach more in the future, and may even do this same class again in the spring at Beadfest, as well as adding another.  So if you didn't get to come, you may have another chance to do so!

Thanks for the ladies who came out and created with me, and thanks to the women who supported and helped me with my class!


Monday, July 28, 2014

Teaching at BeadFest

by Staci L. Smith


I will be an instructor at BeadFest this year!  I am so excited to be teaching here for the first time.  I am offering a Painted Polymer Fossil Talisman class.


here is what the class samples look like

In the class you will learn to form an organic focal and accent bead in polymer clay, and then use paints and other materials to create a crackle antiqued finish on it.  To finish it up, you learn to make it into a necklace mixing many materials, teaching some organic style wire wrapping, and using sari silk in your designs, along with chain.
  
In order to make sure I was prepared, I had some lovely ladies to my house for a test run of the class.  I am so thankful I did.  They were wonderful with tips about things they liked and didn't like in instructors they have had in the past.  It also helped me to make a timeline for my class, so it runs smoothly.  The practice class really helped me to nail down how to work through the project. I write a lot of tutorials, and teaching it live was a whole new ball game! 

I was thrilled to see everyone work through all the stages of the class and go home with completed and wonderful projects!  They did amazing....and I know it has opened a lot of possibilities up to them.

Here are the extra beads they got to make, since we had plenty of time to play


And here are their finished necklaces


Didn't they do so great???

I came away from the day with an amazing feeling- so, I know I am on the right track and that teaching is a good fit for me.
I also got great feedback from the ladies.  They said it was packed with techniques and it was a very fun class to take.  That was great to hear, because I really did want the class to cover a multitude of techniques (and who doesn't want their class to be fun?)


So, I will open this up to you guys as well, because I want to be the best instructor possible.....

I am open to tips, suggestions, and / or just fun stories of teaching or taking classes! 

If you are interested in taking my class at Beadfest, you can sign up here

https://www.etouches.com/ehome/79000/StaciSmith

If you plan to come to Beadfest to shop, you can print this coupon and save $10 at the door- make sure to stop by and see me Booth #371!  I will be selling my beads there as well!


Never been to Bead Fest?  Check out my blog from last year after the show!!!!
http://www.lovemyartjewelry.blogspot.com/2013/08/back-from-bead-fest.html

It's a great time on the East Coast....I have more fun every year I go!


face
Related Posts Plugin for WordPress, Blogger...